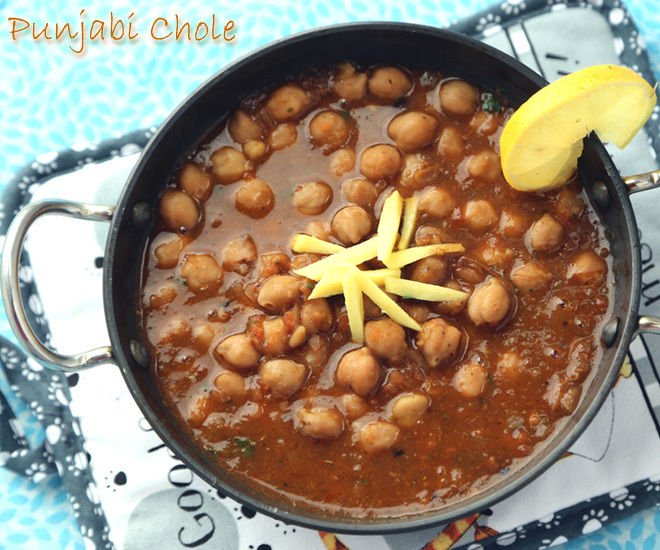
Punjabi chole masala or chana masala is one of the most popular curry dishes from Pakistan.
Punjabi Chole
So what actually is chole masala? In this recipe, chickpeas are cooked with onions, tomatoes and lots of spices. A special blend of spices called “chole powder/masala” is easily available at every store.
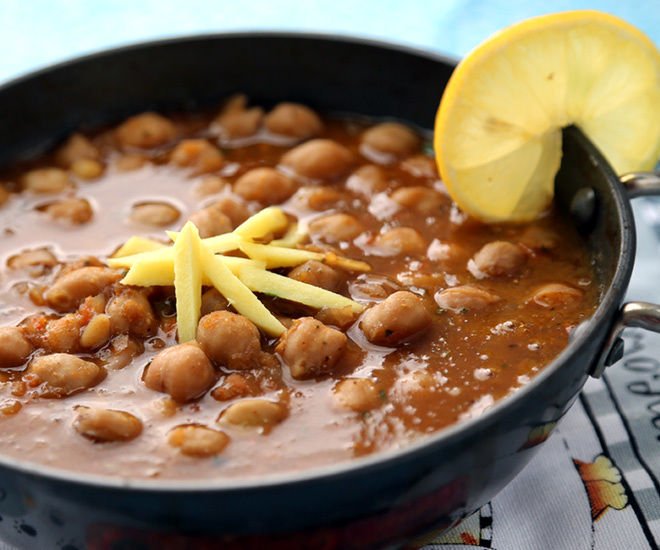
Punjabi Chole 2
One can make chole masala powder at home too by dry roasting ingredients like cumin, cloves, coriander, peppercorn, cardamom etc. But I usually get the masala from the store, saves me time and also tastes good.
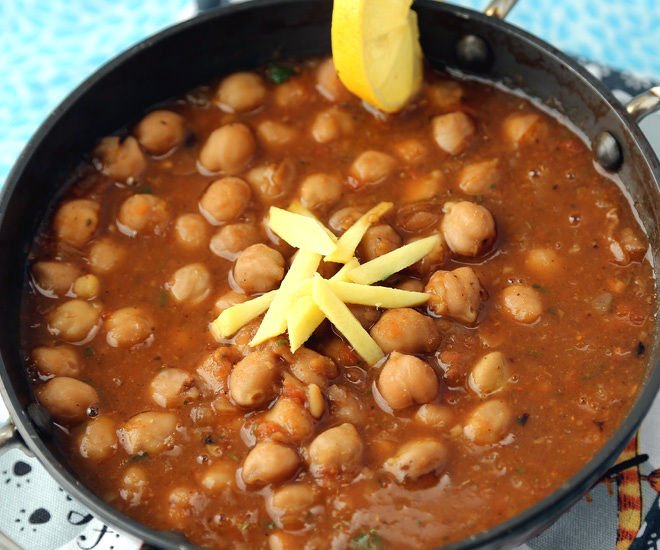
Punjabi Chole 3
You will notice that I added 2 tea bags while cooking chickpeas in the pressure cooker, that’s because the tea bags help in giving chole a dark brown/black color. I added only 2, but for a deeper darker brown color, you can add more tea bags. And before you start wondering, let me assure you that the tea bags do not hamper the taste of chickpeas in any way.
Serves: 5-6
Ingredients
To pressure cook
Chickpeas/Chole: 2 cups + 2 tbsp
Cardamom: 5-6
Black peppercorn: 4-5
Bay leaves: 2
Cinnamon sticks: 2
Tea bags: 2
Salt: to taste
Water: 5 cups
For the chole
Onion: 3/4 cup, grated or pureed [from 2 small onions]
Soak the chickpeas overnight in enough water to cover them. I soaked a little more than 2 cups and in the morning I had around 5.5 cups of it! Drain the water in which you had soaked the chickpeas.
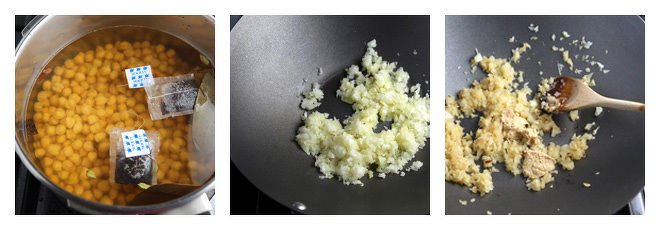
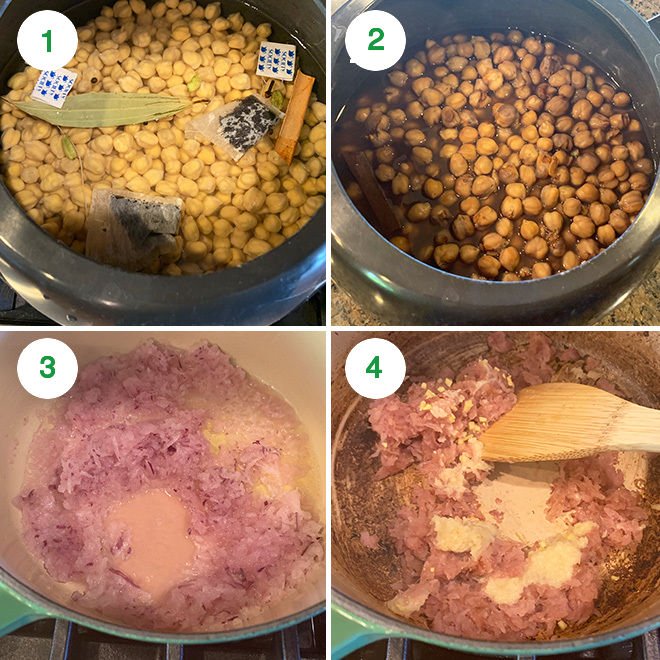
1. In a pressure cooker add the soaked and drained chickpeas, around 5 cups water, 2 tea bags, bay leaves, cardamom, cinnamon stick and some salt. Pressure cook at high flame till you get 1-2 whistles. After that lower the flame to medium and let the chickpeas cook for another 10-12 minutes. Remove the cooker from heat and allow it to cool down. Once the steam is gone, open the cooker and check the chickpeas. You should be able to press them easily with your fingers. If not, close the cooker and cook for 2 more whistles.
Here, you can also remove the bay leaves, cinnamon stick etc. from the chickpeas if you don’t want them in the curry.
2. In a wok, heat 2 tsp of oil. Once hot, add cloves and grated onions. Fry the onions till the raw smell goes away and they are light golden brown in color.
3. Add ginger-garlic paste and cook for 3-4 minutes till the smell of ginger-garlic goes away.
Punjabi Chole 4
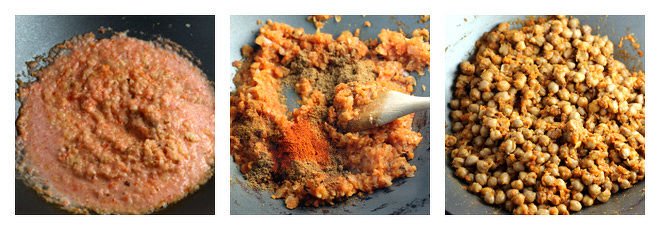
4. Now add the tomato puree , stir and let it cook for 12-15 minutes on medium-low flame. Cover the pan to prevent splash all around. This step in my opinion is very important. The tomatoes need to be cooked really well till the raw smell goes away completely. So have patience and let them cook for around 15 minutes.
5. Add the chole masala, red chilli powder, paprika powder, cumin powder, salt and mix for a 1-2 minutes.
6. Drain the the chickpeas and add them to the tomato-onion mixture, stir till all the chickpeas are coated with spices, around 2 minutes. Do not throw away the water once you have drained the chickpeas. We will add the same water in the gravy.
Punjabi Chole 5
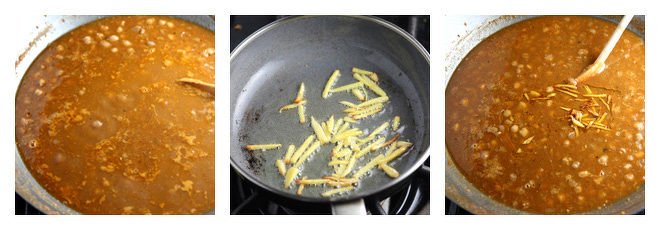
7. Add water, cover the pan and let it simmer at medium-low flame for around 30 minutes. The gravy will thicken after 30 minutes so add water accordingly. I do not like thin gravy with chole but if you do add more water than what is mentioned in the recipe.
After 30 minutes the gravy, chickpeas and all the spices would have mixed well together. We can now do the tempering.
8. To temper, heat 1 tbsp of ghee in a pan and the ginger julienne to it.
9. Fry till the juliennes are golden brown in color but do not burn them. Add to the chole curry, mix and switch off the flame.
Punjabi Chole 6
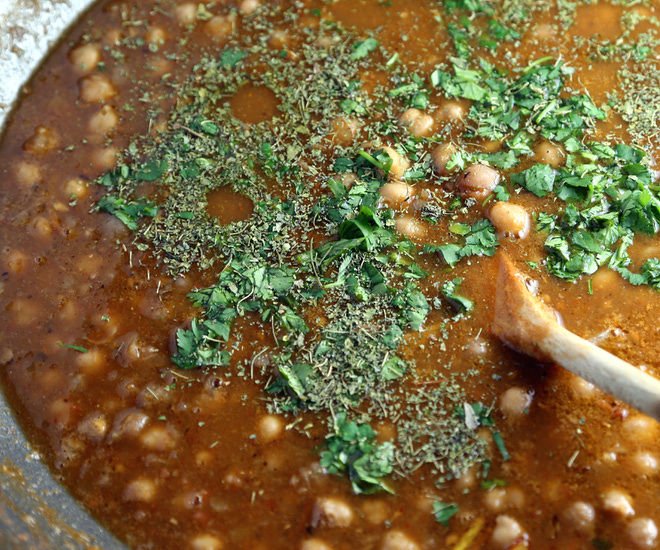
Sprinkle some garam masala,kasuri methi and garnish with chopped coriander leaves.
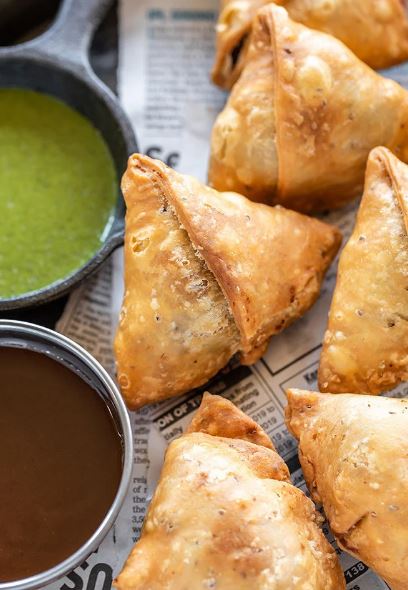
Tangy, spicy Samosa Chaat! Spicy chole (chickpeas) are served with samosa and dollops of yogurt and chutney.
This popular Indian/Pakistani street food is one of my favorite ways to enjoy samosa!
samosa chaat 1
This Samosa Chaat is a another popular Pakistani and Indian chaat where samosa is served with chole (chickpea curry).
Chaat is a broad term used for all Pakistani and Indian street food. It’s mostly spicy, tangy and topped with yogurt and chutneys.
With Ramazan and the festive season around the corner, this would make a great party appetizer!
This Samosa Chaat
✓ is bursting with flavors and texture
✓ has layers of chickpea curry and crunchy samosa
✓ is tangy and spicy
✓ pairs up so well with chai!
The samosa chaat is very easy to put together.
However in order to do, you have to make sure that all the components of the chaat are ready and good to go!
Components of Samosa Chaat
Now, this chaat has several components to it. Let’s see what these are!
Samosa: of course the main ingredients and star of the recipe here. You can either make homemade samosa or get samosa from stores.
I have used my homemade samosa here but totally okay to get them from store.
Especially if you are serving them at a party and running short on time, the short cuts are more than welcome!
Chole: aka the chickpea curry! For this samosa chaat recipe, I used my favorite chole recipe.
It’s literally the best chole and one of my most popular recipes for a good reason.
Yogurt: thick creamy yogurt is an essential ingredients here.
Chutneys: of course no chaat is complete without good chutneys. This recipe calls for cilantro chutney and sweet tamarind chutney.
Extra garnishes: and the chaat is finally topped with sev (fried savory snack), pomegranate arils and cilantro.
It short, it’s an explosion of flavors!
This samosa chaat is best served immediately. Once you have layered everything together, just serve it.
I don’t like soggy samosa in my chaat. No please!
Method
1- Soak dried chickpeas overnight in 4 cups water. In the morning drain the water, and then rinse the chickpeas.
Transfer the chickpeas to a pressure cooker and then add the whole spices- green cardamom, black peppercorn, bay leaves and cinnamon stick.
Also add black tea bags, water (around 4 to 5 cups) and salt. Please note: the tea bags are for giving the chole a dark color. They do not impart any taste to the final product.
2- Pressure cook on high heat for 2 whistles. After that lower the flame to medium and let the chickpeas cook for another 10 to 12 minutes. Remove the cooker from heat and allow the pressure to release naturally.
You should be able to press the chickpeas easily with your fingers once cooked. Set aside.
If using Instant Pot cook for 30 minutes on high pressure with natural pressure release.
3- Start making the masala. Heat oil in a pan on medium heat. Once the oil is hot, add the grated/pureed onions to it.
4- Cook the onions until the raw smell goes away completely. Then add the ginger-garlic paste and cook for 1 minute.
Samosa Chaat step 1
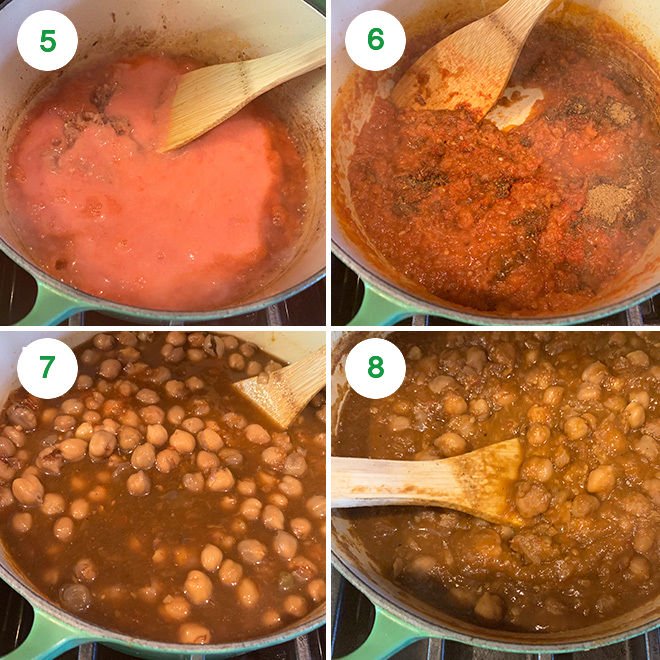
5- Add the pureed tomatoes and mix. Cover and cook the tomatoes for 15 minutes on medium heat, stir once or twice in between. This step is important, so do not rush cooking the tomatoes.
6- Once the tomatoes are cooked, add the chole masala, red chili powder, paprika powder, cumin powder and more salt. Mix and cook the spices for 1 minute.
7- Add the cooked chickpeas into the pan and stir.
8- Cover and let the curry simmer for around 30 minutes on low-medium heat. Again, don’t rush the step for best tasting chole. The curry will thicken considerably and that’s what we want for the chaat.
The curry is now done. Taste test and adjust salt etc. at this point. Let it simmer while you make the tempering.
Samosa Chaat step 2
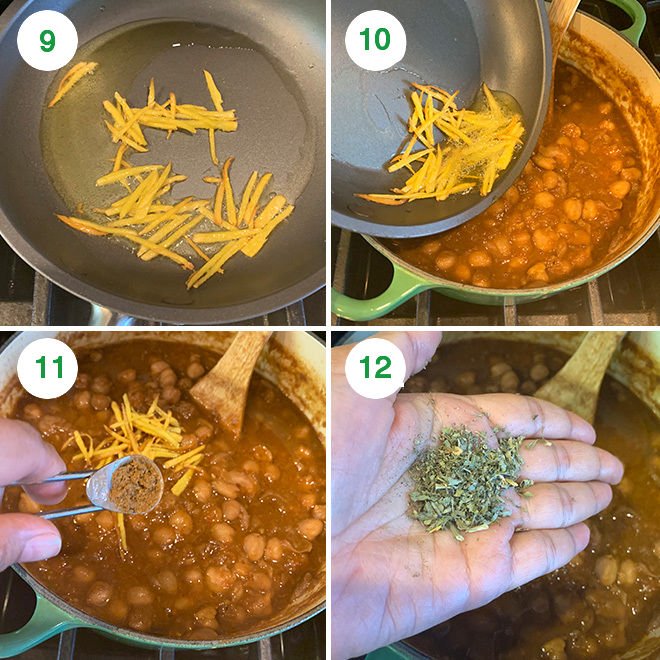
9- For the tempering, heat ghee in a pan on medium heat. Once the ghee is hot, add the ginger julienne to it and fry until it starts turning golden brown in color.
10- Transfer the fried julienne to the curry.
11- Add garam masala and mix.
12- Finally add in the crushed kasuri methi.
Once the chole is ready, gather all other ingredients and start plating the samosa chaat.
Samosa Chaat step 3
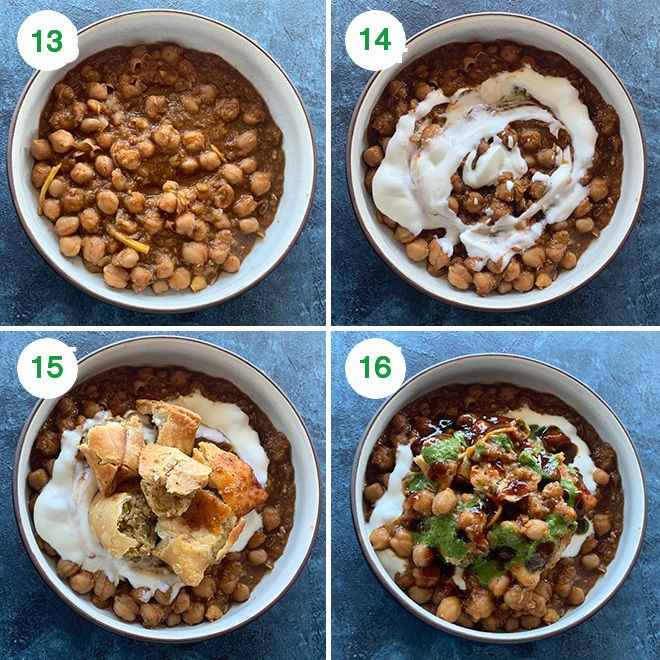
13- To make a plate of samosa chaat, place 1 cup of prepared chole into the serving bowl.
14- Top with dollops of yogurt.
15- Then roughly break 2 samosa and place them on top of yogurt.
16- Top the samosa with more chole, cilantro chutney, sweet tamarind chutney.
Samosa Chaat step 4
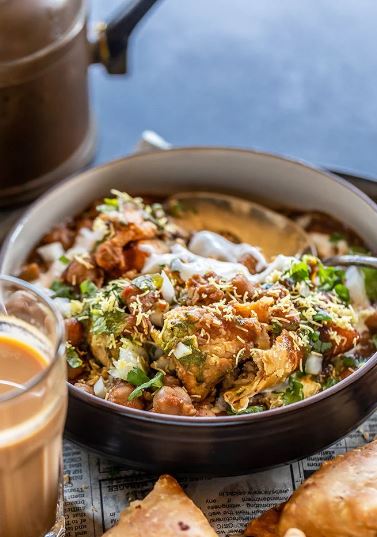
And finally garnish the Samosa Chaat with chopped onion, sev, cilantro, pomegranate arils (if using). Sprinkle chaat masala and serve immediately!
how to make samosa chaat
Samosa Chaat
Tangy and spicy Samosa Chaat is popular Pakistani and Indian street food! Crunchy samosa is served with spicy chickpea curry (chole), yogurt and chutneys!
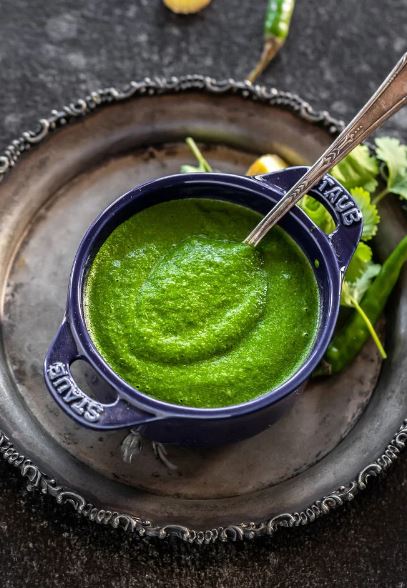
My favorite Cilantro Chutney is great on sandwiches, wraps and is also the perfect accompaniment to parathas, pakoras, samosas & more!
If you love Pakistani food, then you must have come across the green cilantro chutney.
Pakistani meals (especially snacks and appetizers) are often incomplete without a side of this chutney.
cilantro chutney
Chutneys and achars (pickles) are an integral part of Pakistani and Indian food. In my home, there was always some sort of chutney on the table for our lunch.
The common ones were of course cilantro, mint and then there was amla chutney (Indian gooseberry) and chutney made of raw mangoes! Oh well, the list is endless.
In fact everyone was so obsessed with chutneys in my house that if there was nothing else, we would make a chutney of garlic, green chilies with mustard oil.
It was the simplest chutney where you had to just crush everything and mix it all together and let me tell you it tasted amazing, especially with plain parathas!
I grew up eating cilantro chutney on everyday basis and so you can always find a batch of it in my refrigerator. It never lasts more than a week in my house, sometimes even less.
The thing about this chutney is that it is so versatile. You can use it on sandwiches, wraps, salads and so much more. If you love Indian food, then you gotta have a batch of this in your refrigerator at all times!
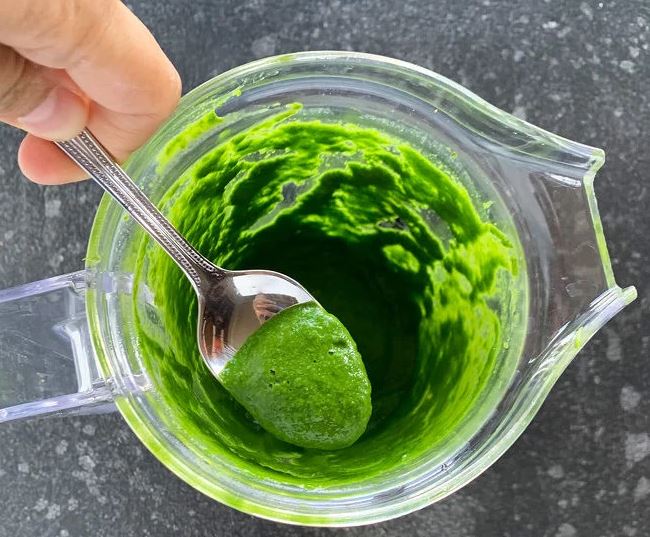
It’s like any chutney tastes 10 times better when hand grinded with that stone. This cilantro chutney is made in blender.
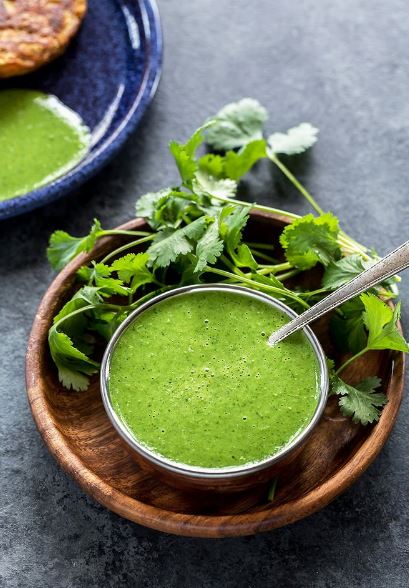
cilantro chutney 2
Ingredients for Cilantro Chutney
Cilantro: of course, the star ingredients on this dish! Use fresh cilantro here for best results.
Ginger: I love adding ginger to my chutney, gives it a nice flavor. Some people add garlic too but I usually just go with the ginger.
Green Chili: what is a chutney without some spice? My version uses only 1 thai green chili so it isn’t really spicy. If you want a spicier chutney, feel free to add more of these.
Spices: chaat masala, roasted cumin powder are added to flavor the chutney.
Lemon juice: it adds a nice tang to the chutney, do not skip it.
Yogurt: now some people prefer adding yogurt and some don’t. I belong to the former category, I almost always use yogurt in my cilantro chutney recipe.
I have tried this chutney with dairy yogurt as well as non-dairy yogurt (plain almond milk yogurt)and it comes out great both ways.
Sugar: just a bit of sugar helps in balancing the flavors. You may skip it.
And of course there’s some salt and pepper!
How to Thicken The Chutney
In my experience, the chutney made with almond milk yogurt turns out pretty thick.
Serving Suggestions
This chutney is amazing on sandwiches, rolls, wraps. And you can eat it with naan, tikki, samosa, pakoras, the list is really too long.
Basically, it tastes great with anything & everything!
Method
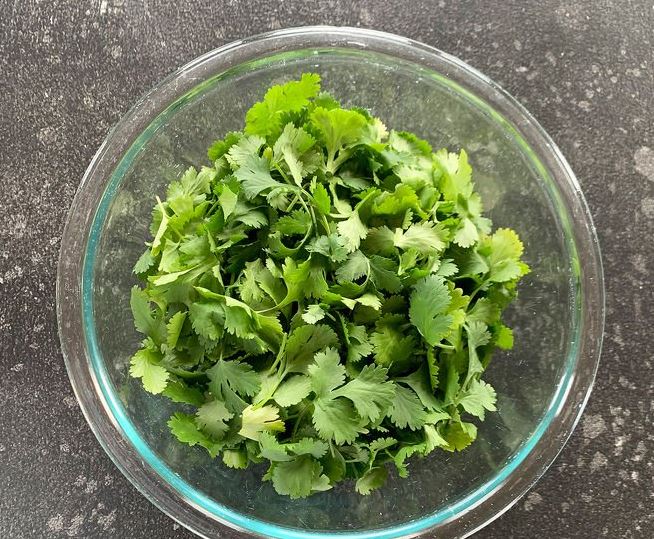
Remove all the hard stems/stalks from the cilantro, the tender ones are okay to have and then wash the cilantro.
cilantro chutney 3
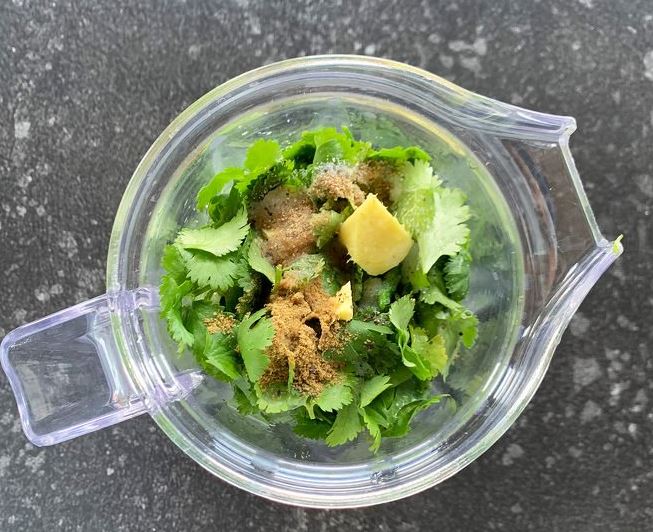
To a blender add the cilantro leaves, green chili, ginger, cumin powder, chaat masala, black pepper and salt. Also add in lemon juice and sugar.
Add yogurt to the blender. I have used vegan yogurt here in this recipe (plain almond milk yogurt).
cilantro chutney 4
Blend it all together to a smooth consistency. If your chutney has a runny consistency, you may add a teaspoon of sev or peanuts to the chutney to make it thicker.
Add 1 teaspoon at a time and then go from there.
cilantro chutney 5
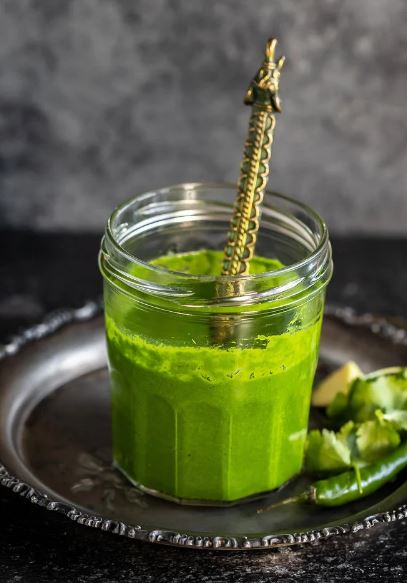
Keep this cilantro chutney refrigerated and use it as needed. You can also freeze the chutney.
cilantro chutney 6
Cilantro Chutney
Made with fresh cilantro, ginger, green chilies, lemon juice, this Cilantro Chutney is the perfect accompaniment to Indian meals!
Course Sides
Cuisine Indian
Keyword cilantro chutney
Prep Time: 10 minutes
Total Time: 10 minutes
Servings: 1 cup
Calories: 65 kcal
Author: Zeeshan
Ingredients
2 small bunches cilantro, 50-60 grams each, hard stems removed
1 green chili, or to taste
1/2 inch ginger
1/4 teaspoon roasted cumin powder
1/8 teaspoon chaat masala, optional
pinch black pepper
1/2 teaspoon salt, or to taste
2 teaspoons lemon juice
1/2 teaspoon sugar
1/4 cup yogurt, plain milk yogurt or plain almond milk yogurt
Instructions
Remove all the hard stems/stalks from the cilantro, the tender ones are okay to have and then wash the cilantro.
To a blender add the cilantro leaves, green chili, ginger, cumin powder, chaat masala, black pepper and salt. Also add in lemon juice and sugar.Add yogurt to the blender. I have used vegan yogurt here in this recipe (plain almond milk yogurt). You can also use plain milk yogurt.
Blend it all together to a smooth consistency. If your chutney has a runny consistency, you may add a teaspoon of sev or peanuts to the chutney to make it thicker. Add 1 teaspoon at a time and then go from there.
Keep this cilantro chutney refrigerated and use it as needed. You can also freeze the chutney.
Recipe Notes
Feel free to add more yogurt as per your taste. More yogurt=less spicy chutney.
All tips and tricks to make the perfect samosa each time! These are filled with a spicy potato filling and are also vegan.
how to make a perfect samosa
Samosa, does it need any introduction? I don’t think so!
The triangular shaped flaky pastry filled with spicy potato, chicken or lamb filling is a popular snack not only in Pakistan but in several countries of the world.
Because samosa is so so common in Pakistan and India (you literally get samosa and chai at every other street corner), I always considered it to be a quintessential Pakistani delicacy.
But only later I read that it has its origin in Middle East and it was introduced to India during the Delhi Sultanate rule.
It was later adapted as a vegetarian snack with spicy potato filling in India (which is what is most popular in northern India).
Anyway whatever the origin was, I can confidently say that samosa, especially Aloo Samosa is the most popular snack back home.
It’s there in every party, office meeting, chai meet-ups, you name it and samosa will be there!
I was very particular about the type of samosa that I liked and I liked it only from one shop in my hometown.
Even now when I go home, I make sure to indulge in those samosas from my favorite shop.
For me a good samosa should be crispy and most importantly it should not be oily at all.
Making samosa is a multi-step process so I am not going to say it’s super quick and easy.
But the joy of biting into that homemade flaky crispy crust filled with spicy potatoes makes it all worth it.
This is one of those treats that you should make for special occasions or over a weekend when you want to have some fun in the kitchen.
This Homemade Samosa
✓ is crispy and flaky
✓ tastes just like the samosa from your favorite shop
✓ is filled with a flavorful potato and peas filling
✓ tastes great with a cup of chai!
✓ is also vegan
I like adding peas to my samosa, if you don’t like it you may skip it.
Some people also add nuts like cashews and raisins to the filling to make it more rich. Again, a personal choice!
Even though the process of making samosa is quite straight forward, there are a number of things that you should keep in mind while making these at home.
Tips to Make The Perfect Samosa
Mixing the oil with flour is important– rub it for good 3 to 4 minutes, do so by rubbing between your hands until the oil is well incorporated with the flour.
Don’t overwork the dough– you only need to bring the dough together.
Dough should be stiff– soft dough will not give crispy samosa.
Let the dough rest for around 40 minutes– always remember to let the dough rest for at least 30 to 40 minutes before you start making the samosa.
Roll the dough evenly and roll it thin– try to roll the dough thin and evenly. If the dough is rolled thick, it will take a long time for the dough to get cooked. Also we all like thin crispy edges of the samosa, agree?
But don’t roll it super thin too, else the dough will tear apart when you fill it.
Do not use any flour while rolling the samosa, you can apply little oil on your rolling pin.
Fry the samosa on low heat – the most important thing- always fry the samosa on low heat (not high, not medium), that way they will turn crisp.
Once they have become light brown in color (after 10 minutes or so), then you can increase the heat and fry on medium heat.
Also when you fry on low heat, they won’t get any blisters which they do when you drop them in hot oil.
Why is My Samosa Not Crispy?
This happens when you fry the samosa in hot oil. You need to fry the samosa on low heat always.
Also, your dough needs to be stiff. Soft dough will also result in a not-so-crispy samosa.
how to make a perfect samosa 2
How to Store and Re-heat Leftover Samosa
I usually place them in an airtight container and refrigerate.
To warm them up, I pre-heat my oven to 350 F degrees and them place the samosa in the oven for 5 to 10 minutes until nicely warm.
Can I Freeze The Samosa?
Yes! Once the samosa is filled and shaped, placed them on a baking sheet lined with parchment paper.
Place the baking sheet into the freezer for couple of hours until samosas are firm.
Then transfer to a freezer bag and freeze.
Can I Bake The Samosa?
Yes! Brush the samosas with oil and then bake at 350 F degrees for 30 to 35 minutes or until browned.
Leftover Samosa Ideas
If you have leftover samosas (what!!), you can use them in different ways.
Like make, Samosa Chaat where you pair the samosas with chole and chutneys.
You can also make Samosa Sandwich, apply chutneys on bread and place a samosa in between. You can even put some sev on top and enjoy.
Can I Use Whole Wheat Flour?
If you want to use whole wheat flour in this recipe, I would recommend replacing half of the flour with whole wheat.
So, use 1 cup all purpose flour and 1 cup whole wheat.
Method
Make the samosa dough
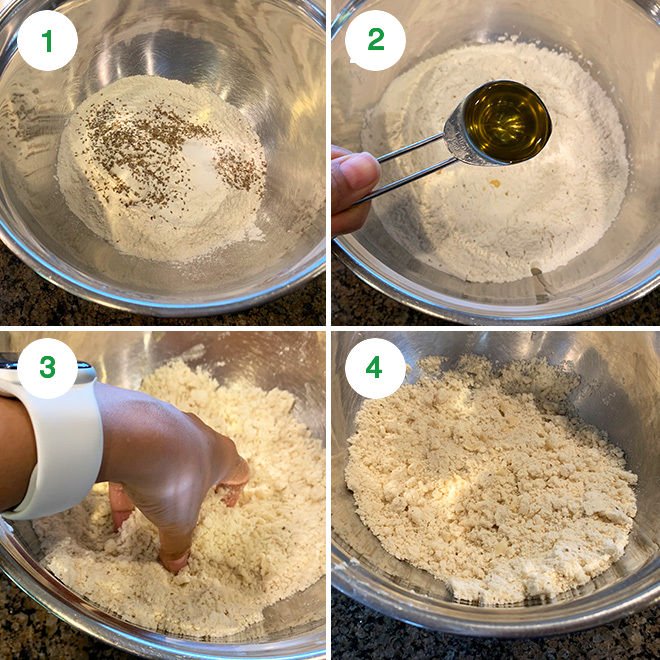
1- Start by making the samosa dough. To a large bowl, add flour, ajwain, salt and mix well.
2- Add the oil and then start mixing with your fingers.
3- Rub the flour with the oil until the oil is well incorporated in all of the flour. Do this for 3 to 4 minutes, you don’t want to rush this step.
4- Once incorporated, the mixture resembles crumbs.
how to make a perfect samosa 3
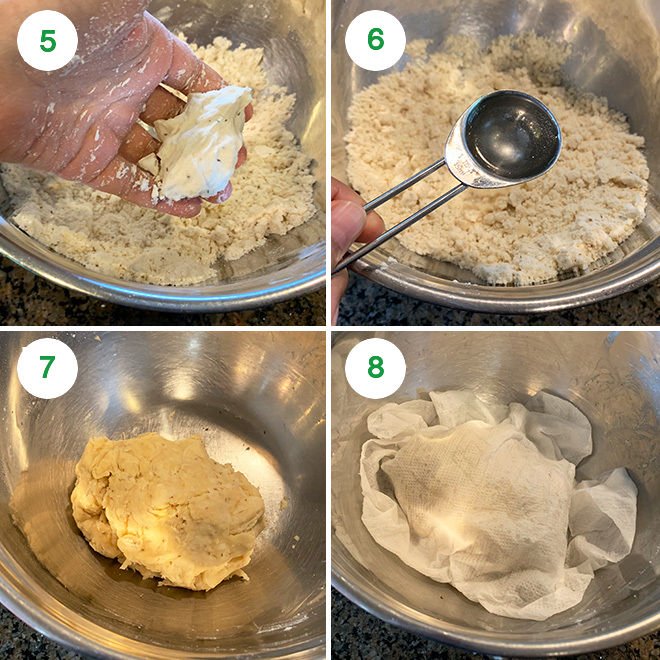
5- Press some flour between your palm- it should form a shape (& not crumble) – means oil is enough and well incorporated.
6- Now, start adding water, little by little and mix to form a stiff dough.
7- Don’t overwork the dough and don’t knead a soft dough. It should just come together and form a stiff dough. I used around 6 tablespoons of water here.
8- Cover the dough with a moist cloth and let it rest for 40 minutes. I usually soak a paper towel in water and then squeeze out all the water and then cover my dough with that.
While the dough is resting, start working on the filling.
how to make a perfect samosa 4
Make the filling
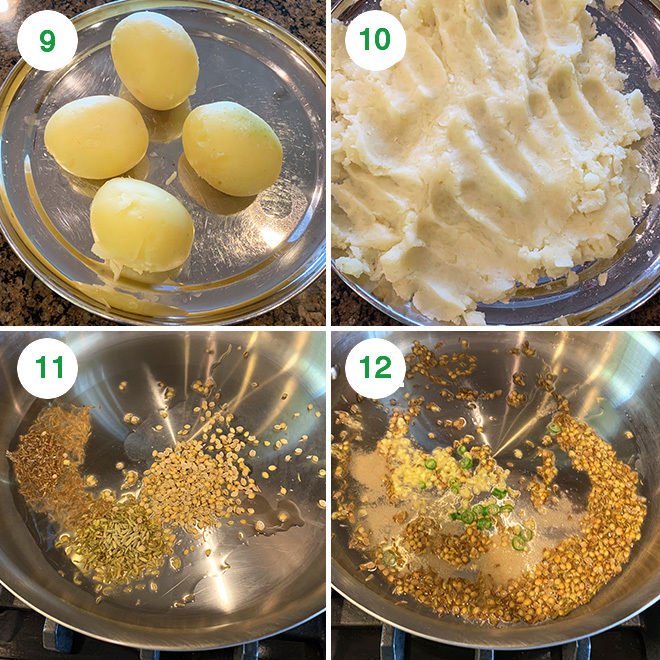
9- Boil potatoes until done.8 to 9 whistles on high heat with natural pressure release if using stove-top pressure cooker or if using Instant Pot, high pressure 12 minutes with natural pressure release on a trivet with 1 cup water in the bottom of the pot.
10- Peel the skin and them mash the potatoes. Set aside.
11- Heat 2 tablespoons of oil in a pan on medium heat. Once the oil is hot, add the cumin seeds, fennel seeds and crushed coriander seeds.
12- Let the seeds sizzle for few seconds and then add the chopped ginger, green chili and hing. Cook for 1 minute.
how to make a perfect samosa 5
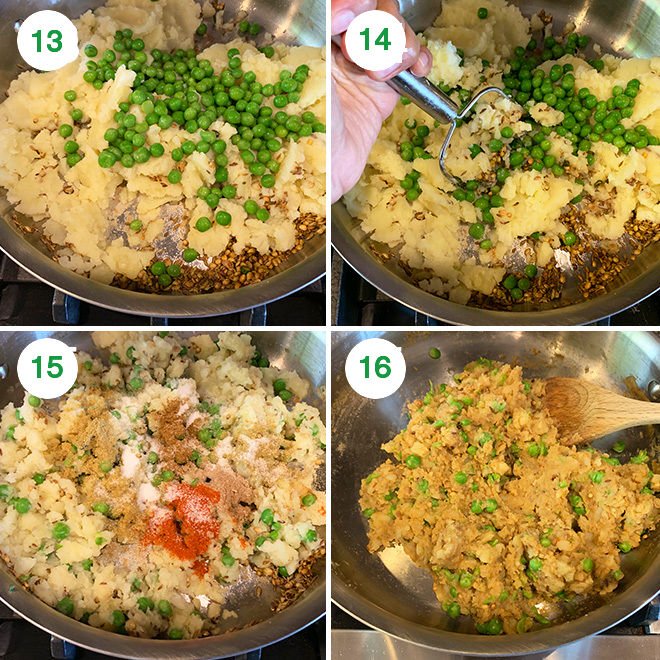
13- Add the boiled & mashed potatoes and green peas to the pan.
14- Mix everything together. I use my potato masher to combine the spices and seasonings well with the potatoes and peas.
15- Add the coriander powder, garam masala, amchur, red chili powder and salt.
16- Mix to combine. Once it’s all well incorporated, remove pan from heat and let the filling cool down a bit.
how to make a perfect samosa 6
Shape and fry the samosa
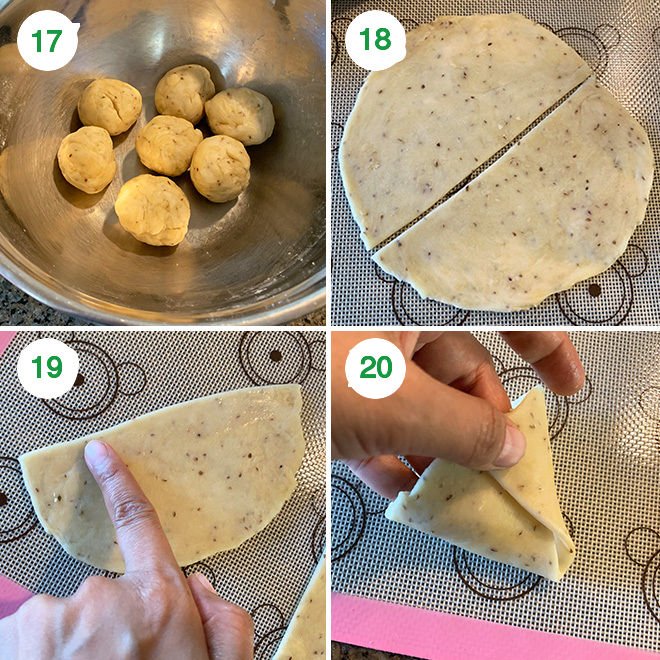
17- Once the dough has rested, give it a quick knead. Then divide the dough into 7 equal parts of around 58-60 grams each.
Start working on a piece of dough, keep the remaining dough balls covered at all times with a moist cloth else the dough will dry out.
18- Roll one dough ball into a circle-oval kind of shape, around 6-7 inches in diameter and then cut it into two parts.
19- Take one part and apply water on the straight edge/side. I usually mix some flour with water so that it forms a nice glue.
20- Now bring the two ends of the straight edge together and pinch them to form a cone. See picture (#20) for a better idea.
how to make a perfect samosa 7
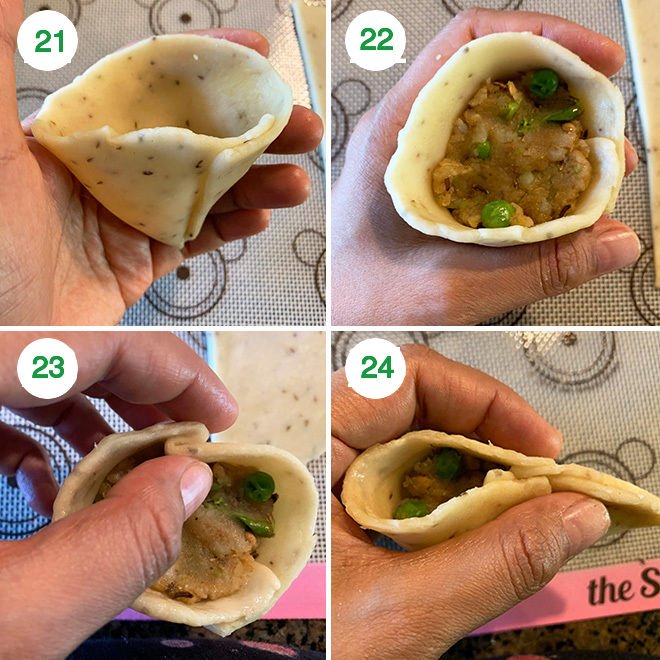
21- Pinch the pointed ends to make it a perfect cone shape.
22- Fill the samosa with the potato filling, around 1 to 2 tablespoons. Don’t overfill the samosa.
23- Now again apply water all around the circumference of the cone as you have to seal it. Pinch the opposite side (side opposite to where you pinched to form the cone) to form a plate (see picture #23).
24- Now pinch the edges and seal the samosa.
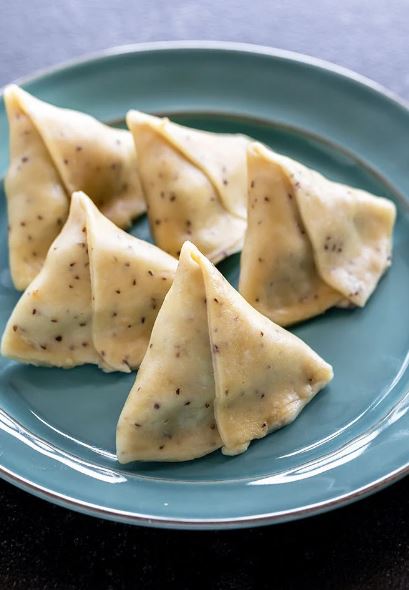
how to make a perfect samosa 8
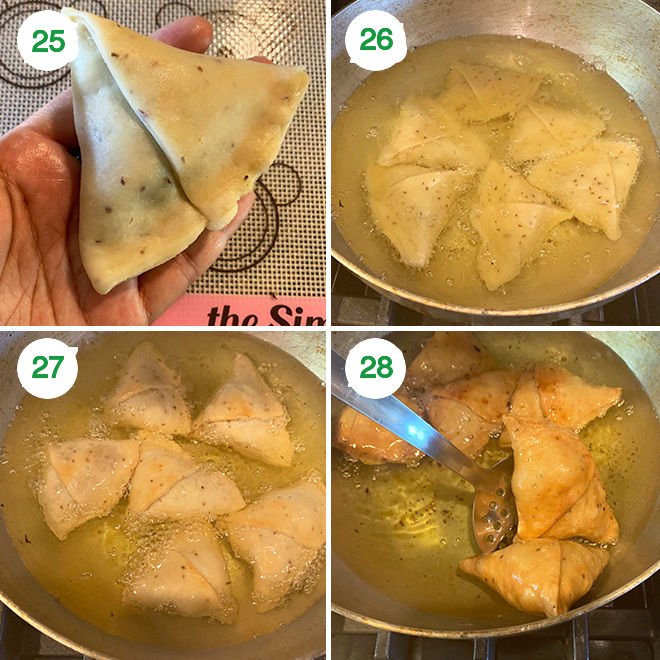
25- Your samosa is now ready. Repeat with remaining dough. Always remember to keep the filled samosa covered with moist cloth while roll and fill the others.
26- Now heat oil in a kadai on low heat. To check if oil is ready, drop a small piece of dough into the oil. It should take few seconds to come up to the surface. That means the oil is ready.
Drop the shaped samosas into the oil.
27- Fry on low heat. After around 10-12 minutes, the samosa will become firm and light brown in color.
28- At this point, increase the heat to medium and fry until it gets nicely browned.
Don’t overcrowd the kadai/wok, fry 4-5 samosas at a time. And each batch will take around 20 minutes since we fry on low heat so be patient.
how to make a perfect samosa 9
Once you finish frying one batch, lower the heat again to low and wait until the temperature of the oil drops and then add the second batch.
If you fry samosa on high heat, they will not get crispy and the dough will remain uncooked. The samosa will also have bubbles on the crust if you oil temperature is hot while frying the samosa.
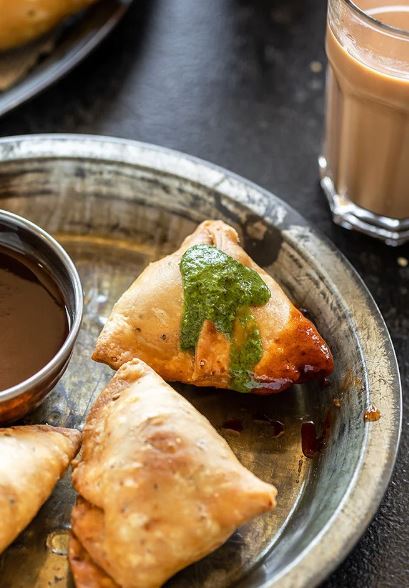
Enjoy hot samosas with cilantro chutney or sweet tamarind chutney! Yum!
how to make a perfect samosa 10
Samosa Recipe
Yield 20 samosas
preparation time
60 minutes
cooking time
90 minutes
total time
150 minutes
Crispy, flaky Samosa is the perfect appetizer for any celebration. Filled with a spicy potato filling, this Samosa is also vegan!
Ingredients
Samosa Dough
2 cups all purpose flour (maida), 260 grams
1 teaspoon ajwain, carom seeds
1/4 teaspoon salt
4 tablespoons + 1 teaspoon oil, 45 ml + 5 ml
water, to knead the dough, around 6 tablespoons
Samosa Filling
3-4 medium potatoes, 500-550 grams
2 tablespoons oil
1 teaspoon cumin seeds
1 teaspoon fennel seeds
2 teaspoons crushed coriander seeds
1 teaspoon finely chopped ginger
1 green chili, chopped
1/4 teaspoon hing, asafoetida
1/2 cup +2 tablespoons green peas, I used frozen green peas which I soaked in warm water for 10-15 minutes before using
1 teaspoon coriander powder
1/2 teaspoon garam masala
1/2 teaspoon amchur, dried mango powder
1/4 teaspoon red chili powder, or add more to taste
3/4 teaspoon salt, or to taste
oil, for deep frying
Instructions
Make Samosa Dough
Start by making the samosa dough. To a large bowl, add flour, ajwain (carom seeds), salt and mix well.
Add the oil and then start mixing with your fingers. Rub the flour with the oil until the oil is well incorporated in all of the flour. Do this for 3 to 4 minutes, you don’t want to rush this step. Once incorporated, the mixture resembles crumbs.
Press some flour between your palm- it should form a shape (& not crumble) – means oil is enough and well incorporated.
Now, start adding water, little by little and mix to form a stiff dough. Don’t overwork the dough and don’t knead a soft dough. It should just come together and form a stiff dough. I used around 6 tablespoons of water here.
Cover the dough with a moist cloth and let it rest for 40 minutes. I usually soak a paper towel in water and then squeeze out all the water and then cover my dough with that. While the dough is resting, start working on the filling.
Make the potato filling
Boil potatoes until done. 8 to 9 whistles on high heat with natural pressure release if using stove-top pressure cooker or if using Instant Pot, high pressure 12 minutes with natural pressure release on a trivet with 1 cup water in the bottom of the pot.
Peel the skin and them mash the potatoes. Set aside. Heat 2 tablespoons of oil in a pan on medium heat. Once the oil is hot, add the cumin seeds, fennel seeds and crushed coriander seeds.Let the seeds sizzle for few seconds and then add the chopped ginger, green chili and hing. Cook for 1 minute.
Add the boiled & mashed potatoes and green peas to the pan. Mix everything together. I use my potato masher to combine the spices and seasonings well with the potatoes and peas.
Add the coriander powder, garam masala, amchur, red chili powder and salt. Mix to combine. Once it’s all well incorporated, remove pan from heat and let the filling cool down a bit.
Shape & fry the Samosa
Once the dough has rested, give it a quick knead. Then divide the dough into 7 equal parts of around 58-60 grams each.Start working on a piece of dough, keep the remaining dough balls covered at all times with a moist cloth else the dough will dry out.
Roll one dough ball into a circle-oval kind of shape, around 6-7 inches in diameter and then cut it into two parts.
Take one part and apply water on the straight edge/side. I usually mix some flour with water so that it forms a nice glue.Now bring the two ends of the straight edge together and pinch them to form a cone. See step-by-step pictures above for a better idea. Pinch the pointed ends to make it a perfect cone shape.
Fill the samosa with the potato filling, around 1 to 2 tablespoons. Don’t overfill the samosa.
Now again apply water all around the circumference of the cone as you have to seal it. Pinch the opposite side (side opposite to where you pinched to form the cone) to form a plate (see step-by-step pictures above). Then pinch the edges and seal the samosa.
Your samosa is now ready. Repeat the same process with remaining dough. Always remember to keep the filled samosa covered with a moist cloth while roll and fill the others. You will get 14 samosas.
Now heat oil in a kadai on low heat. To check if oil is ready, drop a small piece of dough into the oil. It should take few seconds to come up to the surface. That means the oil is ready.Drop the shaped samosas into the oil.
Fry on low heat. After around 10-12 minutes, the samosa will become firm and light brown in color. At this point, increase the heat to medium and fry until it gets nicely browned.Don’t overcrowd the kadai/wok, fry 4-5 samosas at a time. And each batch will take around 20 minutes since we fry on low heat so be patient.
Once you finish frying one batch, lower the heat again to low and wait until the temperature of the oil drops and then add the second batch.Enjoy hot samosas with cilantro chutney or sweet tamarind chutney!
Recipe Notes
Most important thing to remember is to not the fry the samosa on high heat, they will not get crispy if you do so and the dough will remain uncooked. The samosa will also have bubbles on the crust if you oil temperature is hot while frying the samosa.
I have used green peas in my samosa filling. If you are not a fan, simply skip.
This recipes makes 14 medium sized samosa. You can make more or less depending on how you like.
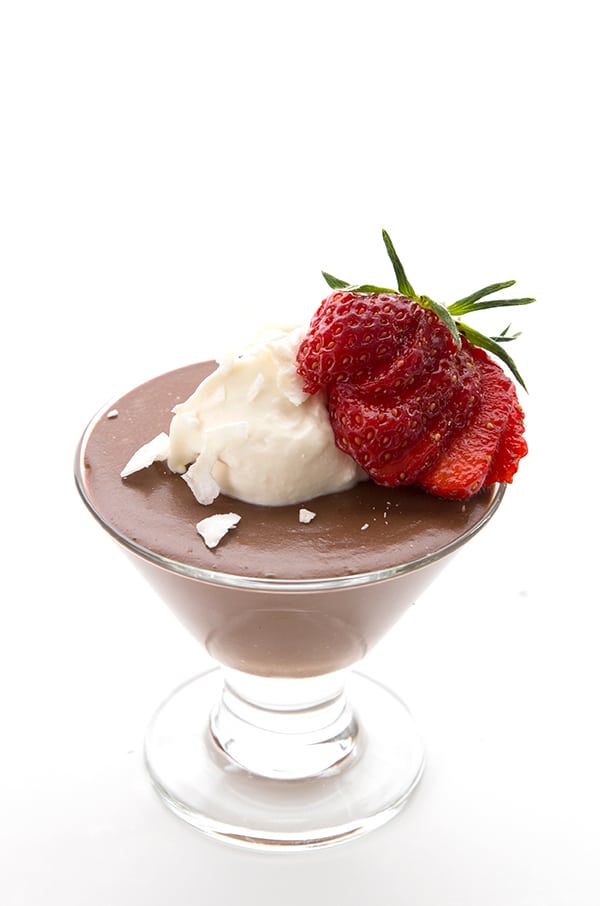
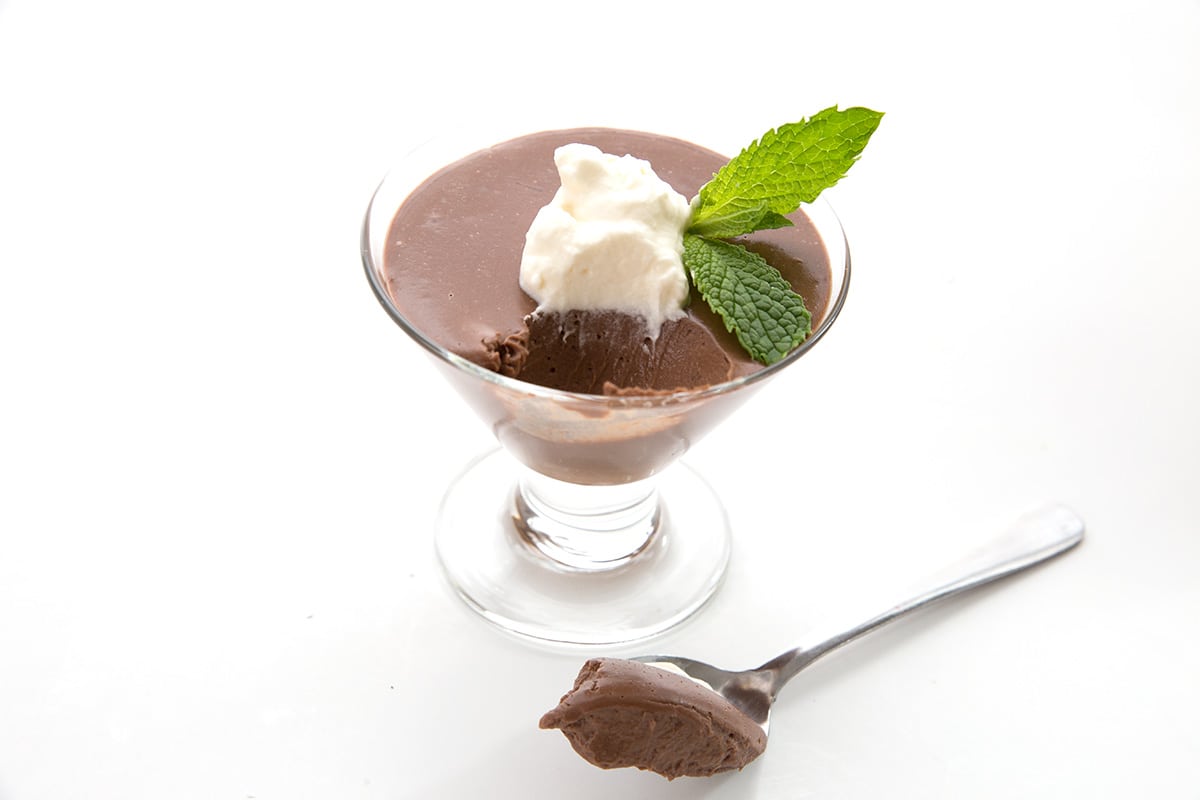
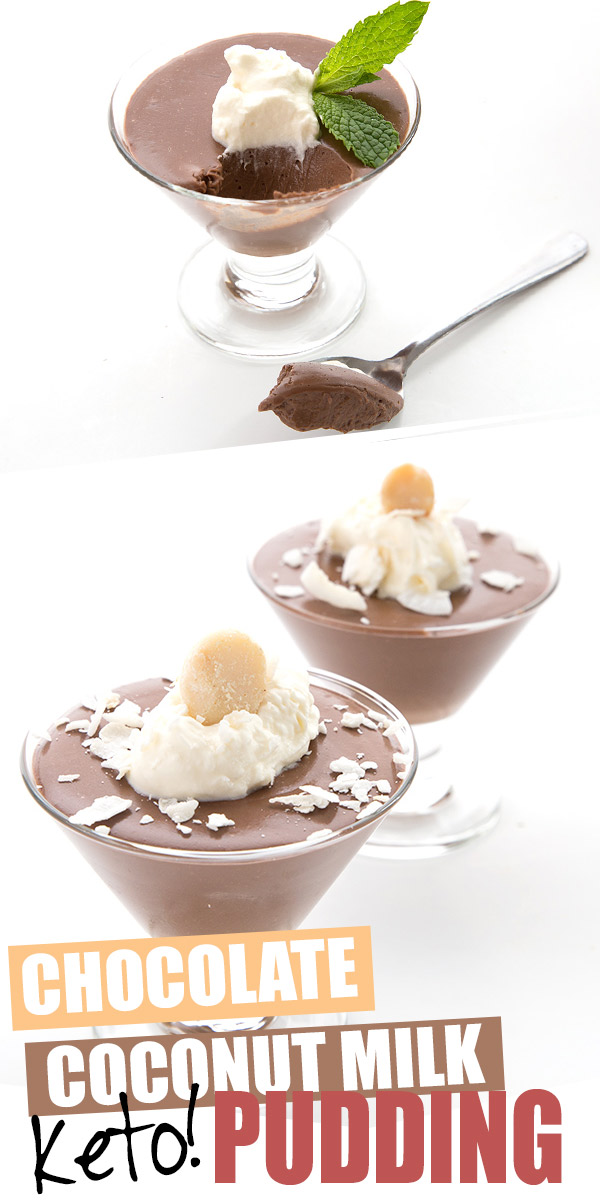
Creamy keto chocolate pudding made with coconut milk. This delicious sugar-free pudding takes only 20 minutes to make and is totally dairy-free. A wonderful low carb dessert the whole family loves. Updated recipe!
CHOCOLATE COCONUT MILK PUDDING 2
HOW TO MAKE COCONUT MILK PUDDING
Use full fat coconut milk. For one thing, this is a keto diet and that fat is healthy stuff! And for another, the thicker version will help the pudding set properly.
Use coconut milk that contains a bit of guar gum, which will also help your keto pudding set properly.
Bring your coconut milk to a full simmer. You don’t necessarily want it to boil but you want it to simmer strongly before moving to the next step.
Properly temper your egg yolks. What does this mean? It’s the process of slowly adding hot liquid to the yolks as you whisk, to bring them up to temperature. This helps ensure that they don’t curdle when you add them back into the pan with the rest of the liquid.
Use good cocoa powder.Have some chopped chocolate in this recipe but just cocoa powder works best. Choose a good quality brand.
Yes, the additional xanthan gum is still necessary to make it thicken up properly.
CHOCOLATE COCONUT MILK PUDDING 3
CHOCOLATE COCONUT MILK PUDDING
Prep Time
2 mins
Cook Time
15 mins
Total Time
17 mins
Chill Time
2 hrs
Servings
6
Calories
228
Creamy keto chocolate pudding made with coconut milk. This delicious sugar-free pudding takes only 20 minutes to make and is totally dairy-free. A wonderful low carb dessert the whole family loves.
Ingredients
1 13.5- oz full fat coconut milk
1/3 cup Swerve Sweetener
3 large egg yolks
1/4 tsp xanthan gum
1/3 cup cocoa powder
3 tbsp coconut oil OR 3 tbsp butter
1/2 tsp vanilla extract
Instructions
In a medium saucepan over medium heat, combine the coconut milk and Swerve. Bring to a simmer, stirring occasionally.
In a medium bowl, whisk the egg yolks until smooth. Slowly add 1/2 cup of the hot coconut milk mixture into the egg yolks, whisking continuously.
Slowly whisk the tempered egg yolks back into the saucepan of hot coconut milk. Reduce heat to medium low and sprinkle with xanthan gum, whisking continuously. Stir in cocoa powder and cook until mixture thickens, about 3 to 4 minutes.
Remove from heat and stir in the coconut oil and vanilla extract until smooth. Divide between 6 dessert cups and refrigerate until set, 2 to 3 hours.
Garnish with lightly sweetened coconut whipped cream, some berries, or some macadamia nuts.
Nutritional Information
Amount Per Serving (1 serving = 1/6th of recipe)
Calories228 Calories from Fat 203% Daily Value*Fat 22.6 g 35%Carbohydrates 4.9 g 2%Fiber 1.8 g 7%Protein 3.6 g 7%
* Percent Daily Values are based on a 2000 calorie diet.
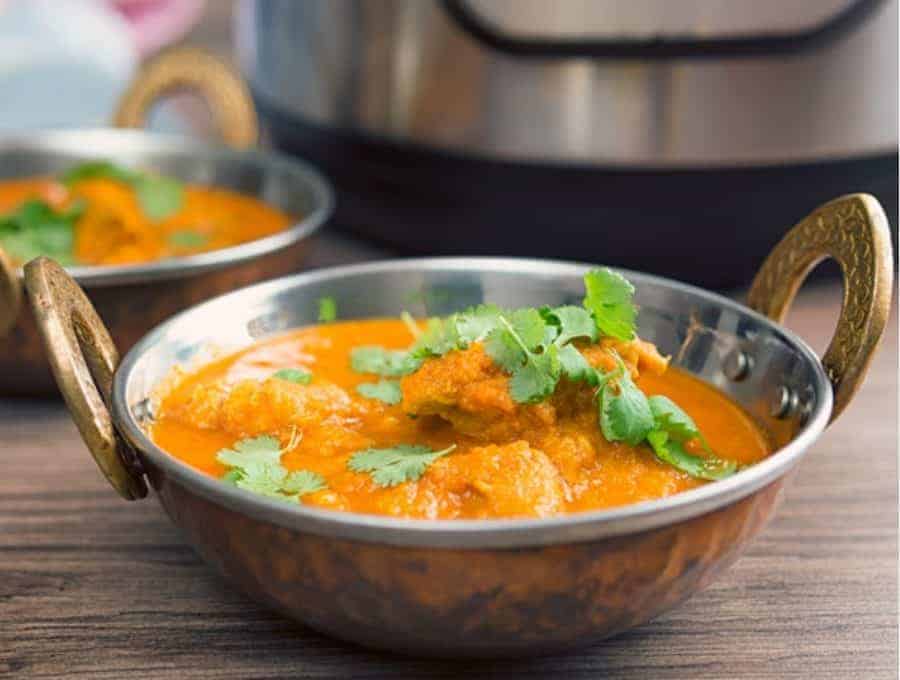
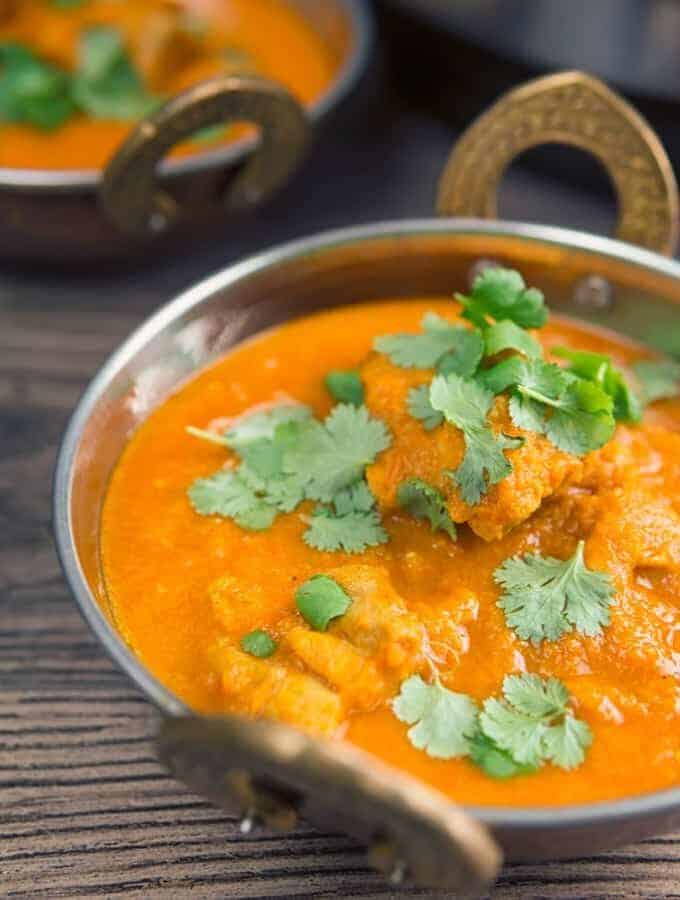
Make an authentic Chicken Vindaloo in your Instant Pot or pressure cooker in minutes rather than hours! It’s easy to make, keto and gluten-free!
CHICKEN VINDALOO
IS CHICKEN VINDALOO SPICY?
If you aren’t familiar with Chicken Vindaloo, it’s a crazy delicious Indian curry dish. It’s absolutely bursting with flavor and it’s definitely an Indian food staple. It is a traditionally spicey dish, but since you’re making it at home you can control just how spicy it is.
The beauty of this homemade Vindaloo is you can adjust the heat to your liking. Personally, I like heat to be in balance with other flavors. In this Chicken Vindaloo recipe, you should taste spice, heat, and a hint of tartness in the back. All the flavors should be in balance, without one taking over another
Accidentally make yours too spicy? No big deal. You can cool your tongue and keep the dish low carb with my Home Made Naan Bread
Now let’s get to cooking…
HOW TO MAKE AUTHENTIC CHICKEN VINDALOO IN THE INSTANT POT
The main issue with making Chicken Vindaloo is you have to brown aromatics first and then grind them together. I wanted a way to not have to do that. Not only does it take a while, but your house also smells of the browning and I don’t always love that.
A quick tip! use a paper bowl in the microwave for some of this prep work. Not only it reduce the dishes I had to wash, but my pressure cooker was also free for other things while the aromatics cooked.
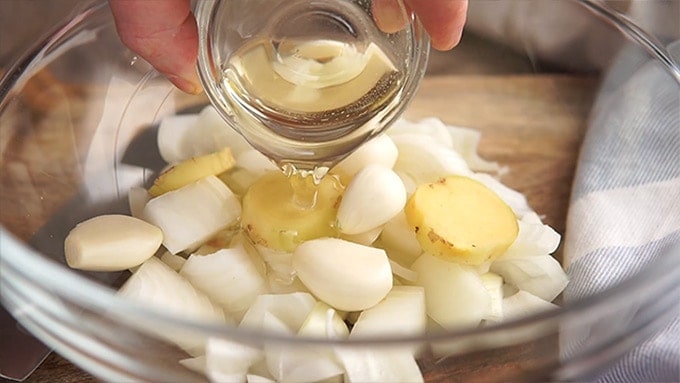
1. In a large microwavable bowl, heat the onions, garlic, ginger and oil for 5 -7 minutes until the vegetables are browned on the edges.
chicken vindaloo 2
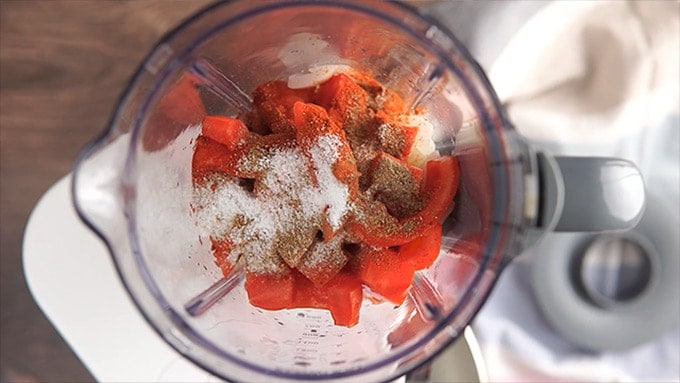
2. Pour veggies into a blender and combine with all other ingredients except turmeric, water and chicken. Blend into a smooth paste.
chicken vindaloo 3
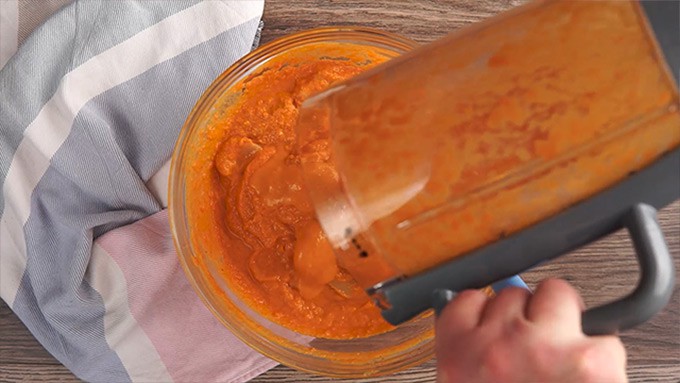
3. Place chicken in a bowl, and coat with the spice and vegetable mixture. Stir well to coat the chicken. Wash out the blender bowl with the 1/4 cup water and pour that over the chicken as well. Mix.
chicken vindaloo 4
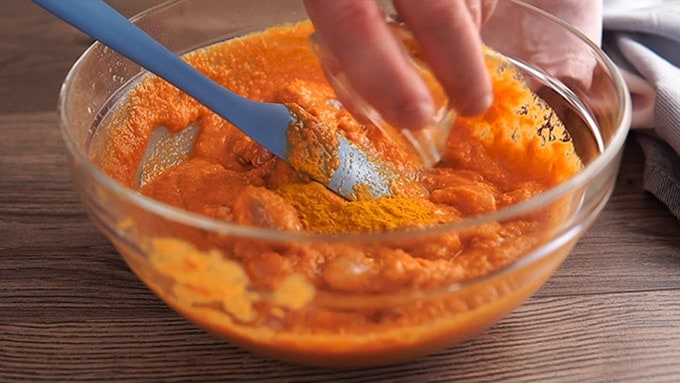
4. Add turmeric now (adding it earlier could stain your blender bowl) and marinate for 30 mins to 8 hours.
chicken vindaloo 5
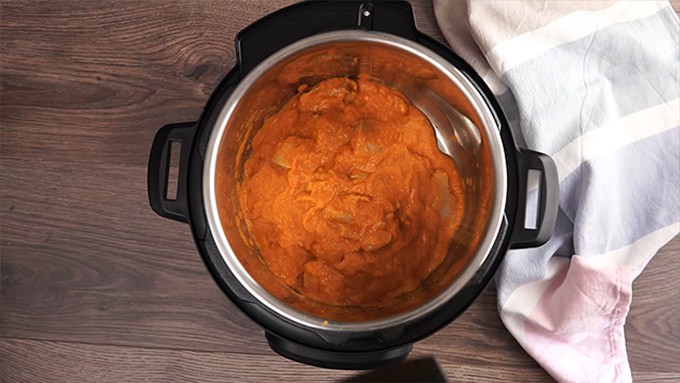
5. Pour the chicken and marinade into your Instant Pot.
chicken vindaloo 6
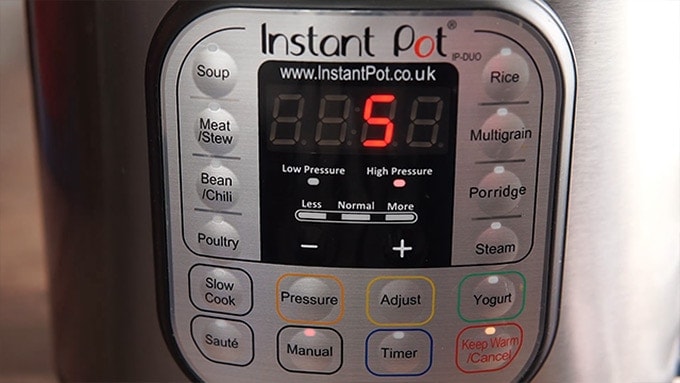
6. Cook on High Pressure for 5 minutes, and allow the pressure to release naturally for 10 minutes. Release remaining pressure.
chicken vindaloo 7
WHY IS VINDALOO CALLED VINDALOO?
Vindaloo (which is also commonly spelled Vindalu) comes from India–via Portugal. The story goes that this is how the Portuguese soldiers who came into Goa preserved meat. Typically, they used wine or wine vinegar, garlic and chilis, all of which help preserve meat in hot climates.
So “carne de vinha d’alhos” got distorted to Vindaloo, and now the world has a great, spicy, piquant dish that you can make to burn off the roof of your mouth. Just kidding!
WHAT DOES CHICKEN VINDALOO TASTE LIKE?
People think every Vindaloo has to be” blow the roof of your head off” spicy, but that’s not actually true. In the old days, people used a lot of cayenne, not just as a taste preference, but also because it helped preserve the meat. You do not need to make Vindaloo super spicy–unless you WANT to.
It’s the same story with the vinegar. An erstwhile preservative, now you can adjust it according to your taste preferences.
What you want in a good Vindaloo, in my opinion, is a good balance of heat, sour, and umami. So you should have a HINT of vinegar come through–but not an overpowering vinegary taste. You’re not trying to make salad dressing here after all ?
WHAT IS IN CHICKEN VINDALOO SAUCE?
Chicken Vindaloo Sauce is slightly smokey, spicy, and tangy. You will need garlic, ginger, white vinegar, tomato, salt, garam masala, smoked paprika, cayenne pepper, coriander, cumin, and lastly, turmeric, added separately.
This may not be like the super-thick restaurant sauces which are created with filler vegetables. It makes a thinner, more flavorful sauce than what you may have been served, but this is actually a more authentic version.
If you want a thicker version, I’d add a few potatoes chopped small, which can then disintegrate into the sauce once lightly mashed.
Do not use cornstarch! Not only is that not traditional, but it is also less flavorful than a chicken vindaloo thickened with potatoes or other cooked vegetables.
HOW DO I MAKE A LAMB OR PORK VINDALOO?
For a Lamb Vindaloo curry, I would suggest cubing leg of lamb. Those cubes will cook under pressure in about 10 minutes, with 10 minutes of natural pressure release. Then, release all remaining pressure.
For a Pork Vindaloo, use cubed pork shoulder. Once again, if you make bite-size cubes, you should cook under pressure in about 15 minutes, with 10 minutes of natural pressure release. Then, release all remaining pressure.
CAN YOU MAKE CHICKEN VINDALOO WITH POTATOES?
Short answer, yes. You can make chicken vindaloo with potatoes. And many people do. I mean, carbs and Indian cuisine traditionally go hand in hand.
TIPS AND TRICKS FOR MAKING CHICKEN VINDALOO
You can make a Pork Vindaloo by using pork shoulder cut into 2-inch cubes. Cook in the Instant Pot for 15 minutes and allow to NPR (natural pressure release) for 10 minutes.
You can make a Lamb Vindaloo by using leg of lamb cut into 2-inch cubes. Cook in the Instant Pot for 10 minutes and allow to NPR (natural pressure release) for 10 minutes.
This Chicken Vindaloo curry Recipe is the perfect make-ahead dish. You could make the sauce in the morning and marinate the chicken. At dinner time, all you would have to do is cook the chicken in the Instant Pot!
You can customize how spicy the Chicken Vindaloo is by adjusting how much cayenne you use.
Make sure to add turmeric last as it may stain your blender when you make the sauce.
So whether you’re a vindaloo fanatic, new to the dish, or are just looking for a quick and delicious Indian dinner option, you’re sure to love this Chicken Vindaloo recipe! Make sure to share this recipe with your friends on Facebook so they can enjoy it as well!
chicken vindaloo 9
Chicken Vindaloo
Make an authentic Chicken Vindaloo in your Instant Pot or pressure cooker in minutes rather than hours! It’s easy to make, keto and gluten free!
In a large microwavable bowl, heat the onions, garlic, ginger and oil for 5 -7 minutes until the vegetables are browned on the edges.
Pour veggies into a blender and combine with all other ingredients except turmeric, water and chicken. Blend into a smooth paste.
Place chicken in a bowl, and coat with the spice and vegetable mixture. Stir well to coat the chicken. Wash out the blender bowl with the 1/4 cup water and pour that over the chicken as well. Mix.
Add turmeric now (adding it earlier could stain your blender bowl) and marinate for 30 mins to 8 hours.
Pour the chicken and marinade into your Instant Pot.
Cook on High Pressure for 5 minutes, and allow the pressure to release naturally for 10 minutes. Release remaining pressure.
Depending on your chicken and how much water it releases, you may need to remove the chicken pieces and evaporate some of the water by using the Sauté function to cook the sauce down.
Use this as your base recipe!
Make a Pork Vindaloo cooking in the Instant Pot for 15 minutes, and 10 minute NPR. Cut pork shoulder into 2 inch cubes.
Lamb Vindaloo can be made in the Instant Pot cooking for 10 minutes, and 10 minute NPR. Cut lamb of leg into 2 inch cubes.
**ADD TUMERIC LAST AS IT MAY STAIN YOUR BLENDER WHEN YOU MAKE THE SAUCE.**
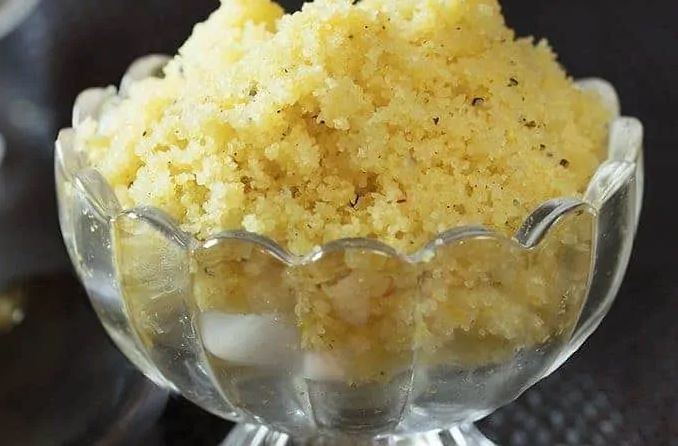
Here’s a simple Pressure Cooker or Instant Pot Halva recipe that will let you make this classic Indian Halva without having to stand, stir, control spatters, and wonder if it’s done yet or not. Whether you call it Halva, sheera, sheero, or kesari, you will agree this simple farina dessert is delicious and when made in a pressure cooker, quite easy.
HOW DO YOU MAKE HALVA?
Okay, it’s actually not that difficult to make stovetop halva–IF.
IF you’ve ever watched it being made, IF you’ve had a family member show you how, IF you’ve eaten vast quantities of it in your life so you know how to tell when it’s done and of course IF you have time to stand and stir and control the adding of water so you don’t get splattered and burn yourself.
Indian Halva 2
HOW IS SOOJI HALVA MADE TRADITIONALLY?
Traditionally, this recipe is made stovetop. First, you roast the sooji or farina. Then you add to it a sugar syrup you’ve prepared, along with lots of ghee and cardamom. Then you cover it and let it cook until done just so.
We’re not making it that way. We’re not going to roast the sooji for starters. This is the part that takes forever. It does make a slight difference to the taste but really, it’s not a huge difference and I’m okay skipping it.
We are also not making a sugar syrup and we are definitely not pouring the hot sugar syrup into hot sooji and watching it splatter all over our stove top and ourselves.
WHERE DO I FIND FARINA?
This is going to be a lot simpler than you think. Either go to the Grocery store and look for sooji. Or go to grocery store and get some Cream of wheat.
Yup. Cream of wheat = Farina = Sooji.
HOW TO MAKE INSTANT POT HALVA RECIPE |INSTANT POT SOOJI HALVA RECIPE
HACK #1
So in this Instant Pot Halva recipe, we are going to combine everything in the right proportions, cook it pot-in-pot, remove it and eat it.
No really. It will be that simple.
HACK #2
The other little hack I used for this was to grind saffron threads rather than soak them in milk, wait for them to soften, and dirty yet another dish to make it.
What you do is that you grind up some saffron with a little sugar in a mortar and pestle. Not only does this make the saffron easier to dissolve, it also stretches that expensive saffron a bit.
Just another way to be #ruthlesslyefficient ?
So to recap, we are making this Instant Pot Halva by mixing up sooji, sugar, water, cardamom, and saffron. And then we are cooking it pot-in-pot for ease and to ensure the right consistency.
Got it?
Let’s make it!
Instant Pot Halva Recipe
Here’s a simple Pressure Cooker or Instant Pot Halva recipe that will let you make this classic Indian Halva without having to stand, stir, control splatters, and wonder if it’s done yet or not. Whether you call it Halva, sheera, sheero, or kesari, you will agree this simple farina dessert is delicious and when made in a pressure cooker, quite easy.
In a small bowl, mix together farina, sugar, cardamom and the saffron-sugar mixture.
Add water and ghee and mix well.
Pour the mixture into the greased pan and cover with a silicone lid or foil.
Pour 1.5 cups of water in the inner liner of the Instant Pot. Place a high steamer rack on top of this. Place the cover pan on the rack.
Set the Instant pot to cook on high pressure for 5 minutes. At the end of the cook time, let the pot sit undisturbed for 5 minutes and then release all remaining pressure.
Using silicone mitts, remove the inner pot. Use a fork or spoon to fluff up the halva and stir it around really well. You’re doing this to spread the cardamom and saffron throughout the halva. As you stir, you will see the grains start to separate, and the halva takes on a yellow-orange tinge from the saffron.
Once the halva has been broken up and the spices are mixed in, the halva is ready to serve.
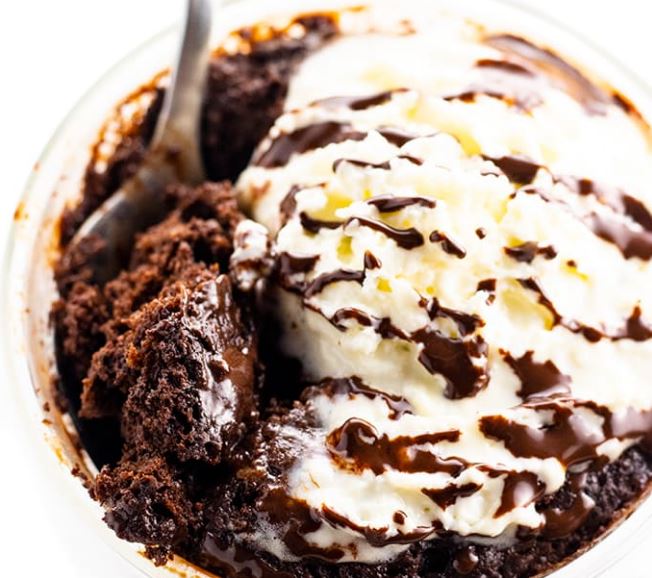
This yummy keto mug cake is also paleo friendly and requires only 6 ingredients. Best of all? It only takes 2 minutes to make!
Net carbs per serving: 4g
LOW CARB PALEO KETO CHOCOLATE MUG CAKE
LOW CARB PALEO KETO CHOCOLATE MUG CAKE RECIPE
See how to make keto mug cake in 2 minutes, using 6 ingredients! This rich, moist, low carb paleo chocolate mug cake recipe has only 4 grams net carbs.
What do you do when you need a healthy dessert like NOW?! Keto chocolate mug cake!!! This easy keto mug cake (seriously, 2-minutes!) will save the day to satisfy all of your chocolate cake cravings. What do I love about this paleo chocolate mug cake? It’s single serving – great for portion control! It’s so rich and chocolate-y – great for those chocolate cravings. And, this low carb chocolate mug cake is made with nutritious ingredients – great news if you want to start your day off with a chocolate breakfast!
The entire recipe for paleo chocolate cake in a mug has only 4 grams net carbs, 1 gram of sugar, a good helping of protein, and even a quarter of your daily iron needs. It’s gluten-free and grain-free, too. With this kind of nutrition info, you can feel good making a meal out of it.
If you’re a chocolate lover like me, though, you have to try this version. It will really hit the spot for that chocolate craving – and fast.
Plus, making low carb chocolate mug cake is incredibly easy. Here, I’ll tell you all about it…
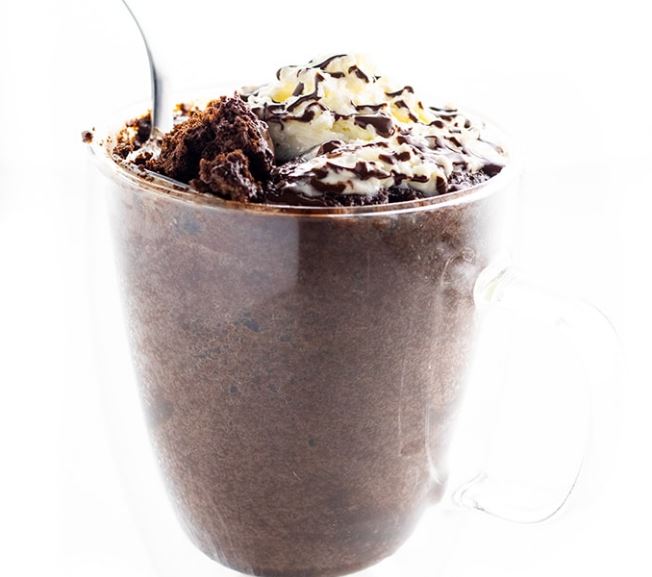
WHAT IS KETO MUG CAKE?
If you haven’t tried a low carb chocolate mug cake yet, you’re in for a treat. It’s moist and chocolate-y, and tastes like a real dessert. And the best part? This easy keto mug cake is ready in just a few minutes!
Keto chocolate cake in a mug is exactly what it sounds like… it’s a single-serve chocolate cake that’s made in a mug! Easy, fast, and made with common ingredients for anyone that likes gluten-free, paleo, or low carb cooking. All you need is salted butter, unsweetened baking chocolate, almond flour (make sure it’s blanched and finely ground!), sweetener, baking powder, egg, and vanilla extract (optional).
Low Carb Keto Chocolate Mug Cake
HOW TO MAKE A KETO MUG CAKE IN THE MICROWAVE
The original recipe for how to make chocolate mug cake uses the microwave, making it ultra fast to prepare. If you prefer the oven, no problem! We’ll cover both ways, so you can decide what is best for you.
Melt the butter and chocolate. You can make your paleo chocolate cake in a mug or in a ramekin, and melt the butter and chocolate right in there.
Mix up the batter. Stir in almond flour, sweetener, baking powder, egg, and vanilla into the ramekin or mug.
Cook. Microwave the mug cake for 60-75 seconds, until just firm.
TIP: This last step is really the only “trick” to the recipe. As long as you don’t overcook your low carb chocolate mug cake, it won’t be dry! You want it to be spring-y, but not dry.
HOW TO MAKE A KETO MUG CAKE IN THE OVEN
You can also bake this paleo mug cake chocolate in the oven too.
Preheat the oven to 350 degrees F.
Melt the butter and chocolate. Melt the butter and chocolate together in a double boiler
Mix up the batter. Stir in the almond flour, sweetener, baking powder, egg, and vanilla.
Bake mug cakes. Transfer batter into ramekins and bake for about 15 minutes.
TIP: You’ll need either a large 12-oz ramekin or two small 6-oz ramekins. Make sure your ramekins are a lot bigger than the volume of the batter (about double the size), because the cake will rise as it’s baking.
There are also some substitution alternatives, depending on your needs.
Keto Mug Cake Without Milk
Unlike many other chocolate mug cake recipes, this one has no milk. Don’t worry – it’s not dry at all! The butter and chocolate in there keep it ultra moist.
Dairy-Free Keto Mug Cake:
If you need the keto chocolate mug cake to be completely dairy-free, you can also replace the butter with ghee or coconut oil. When you substitute one of these, just add a pinch of salt to compensate for the salted butter.
Personally, I prefer grass-fed butter for the best flavor, if that works for you. Many people include it in a paleo diet, as well.
Low Carb Mug Cake Sweetener Options:
Regarding the sweetener, any granulated one will work for this easy chocolate mug cake recipe.
Low Carb Keto Chocolate Mug Cake 2
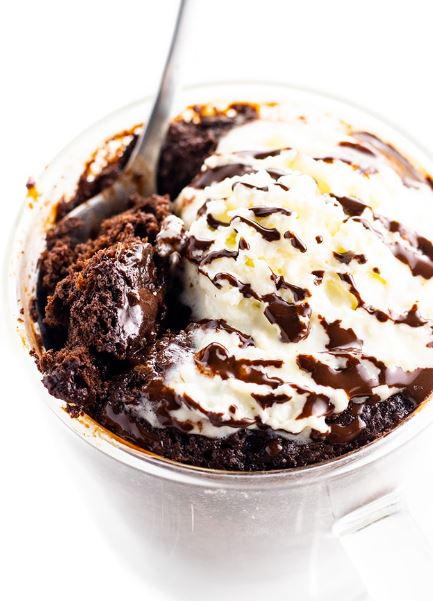
TOPPINGS FOR PALEO CHOCOLATE CAKE IN A MUG
It’s delicious on its own, but my favorite way to enjoy this delicious mug cake is to add toppings. For the ultimate keto mug cake, top it with
More (sugar-free) melted chocolate
Chopped nuts
Homemade whipped cream – you don’t even need sweetener, but can add some powdered sweetener if you like
Sugar-free keto ice cream
Peanut butter drizzle
HOW TO STORE LOW CARB CHOCOLATE MUG CAKE
If you find yourself with some extra low carb flourless chocolate mug cake (I don’t know how this would happen!), you can store it at room temperature for a day, or in the fridge for 2-3 days.
This keto mug cake recipe is best fresh, but you can store it for a few days.
CAN YOU STORE PALEO CHOCOLATE CAKE IN A MUG?
Yes, you can store these paleo mug cakes right in the mug if you’d like. Seal the top tightly with plastic wrap to avoid drying out.
CAN YOU FREEZE PALEO CHOCOLATE MUG CAKE?
Yes, you can freeze paleo chocolate mug cake. Wrap tightly in plastic wrap and store in the freezer. Let it thaw in the fridge and then re-heat in the microwave or oven until just warm.
TIP: You can add a bit of butter or ghee on top before reheating to keep the mug cake moist.
Low Carb Keto Chocolate Mug Cake 3
TOOLS TO MAKE LOW CARB KETO CHOCOLATE MUG CAKE
Double Walled Insulated Mug Set – Use clear mugs for this keto mug cake chocolate, vanilla, OR cinnamon!
Measuring Spoons – A must for baking.
Easy Whipped Cream Dispenser – You’ll want to top your paleo chocolate mug cake recipe with whipped cream and this gadget makes it easy to have whipped cream at any moment… without chemicals.
LOW CARB PALEO KETO CHOCOLATE MUG CAKE RECIPE
See how to make keto mug cake in 2 minutes, using 6 ingredients! This rich, moist, low carb paleo chocolate mug cake recipe has only 4 grams net carbs.
Prep Time
2 minutes
Cook Time
2 minutes
Total Time
4 minutes
Course
Dessert
Cuisine
American
Calories
433 kcal
Servings
Mug cake
Author
Zeeshan
INGREDIENTS
1 tbsp Butter (salted; *see notes for dairy-free options)
3/4 oz Unsweetened baking chocolate
3 tbsp Blanched almond flour
1 1/2 tbsp ( any granulated sweetener; *see notes for options)
1/2 tsp Gluten-free baking powder
1 large Egg
1/4 tsp Vanilla extract (optional)
INSTRUCTIONS
Microwave Instructions
Melt the butter and chocolate together in a mug or large 12 oz (355 mL) ramekin in the microwave (about 45-60 seconds, stirring halfway through). Be careful not to burn it. Make sure the ramekin is at least double the volume of the ingredients, because the mug cake will rise.
Add the almond flour, sweetener, baking powder, egg, and vanilla (if using). Stir everything well until completely mixed together.
Microwave for about 60-75 seconds, until just firm. (Don’t overcook, or it will be dry.)
Serve with whipped cream (or coconut whipped cream for paleo), and/or drizzle with more melted chocolate stirred with sweetener.
Oven Instructions
Preheat the oven to 350 degrees F (177 degrees C).
Melt the butter and chocolate together in a double boiler on the stove. Be careful not to burn it. Remove from heat.
Add the almond flour, sweetener, baking powder, egg, and vanilla (if using). Stir everything well until completely mixed together.
Transfer the batter to a large 12 oz (355 mL) oven-safe ramekin (or two smaller 6 oz (178 mL) ones). Make sure the ramekins are at least double the volume of the ingredients, because the cake will rise. Bake for about 15 minutes, until just firm.
Serve with whipped cream (or coconut whipped cream for paleo), and/or drizzle with more melted chocolate stirred with sweetener.
RECIPE NOTES
Serving size: 1 mug cake (entire recipe)
For a dairy-free or paleo version, use ghee or coconut oil, and add a pinch of salt.
The original version of this recipe used erythritol, but the monk fruit allulose blend makes a far superior, super moist mug cake. Paleo followers may prefer to use coconut sugar for the sweetener.
NUTRITIONAL INFORMATION PER SERVING
Amount per serving. Serving size in recipe notes above.
Calories 433, Fat 38g, Protein 14g, Total Carbs 11g, Net Carbs 4g, Fiber7g, Sugar 1g
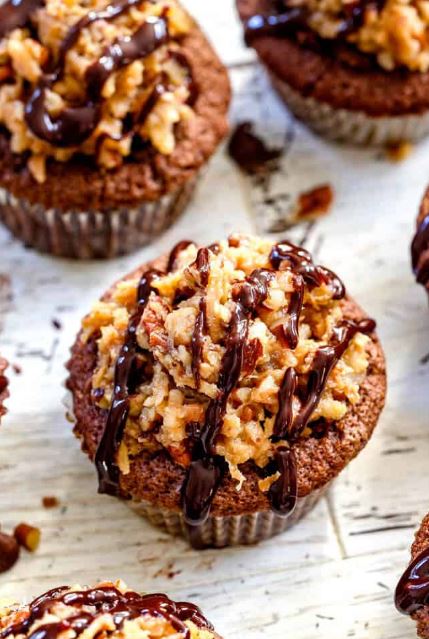
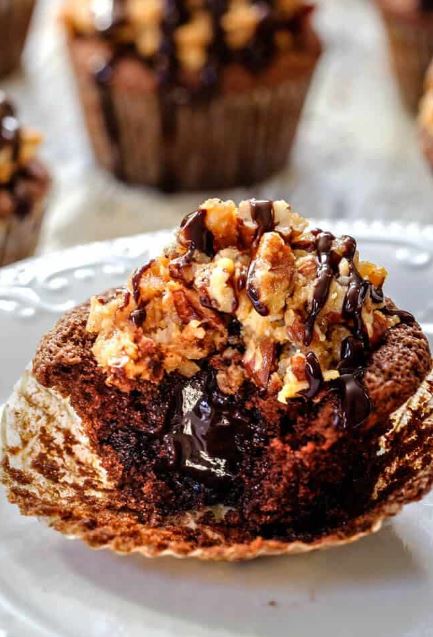
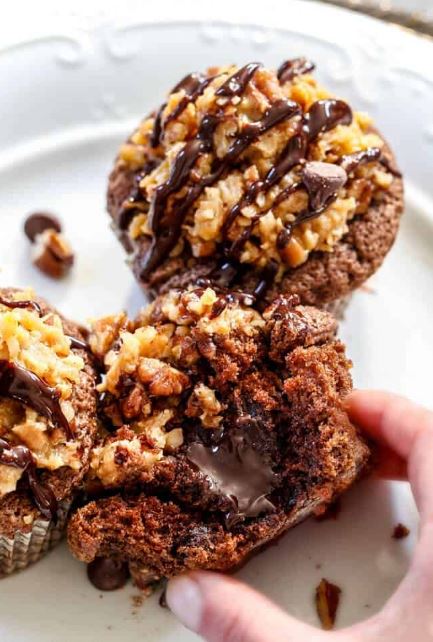
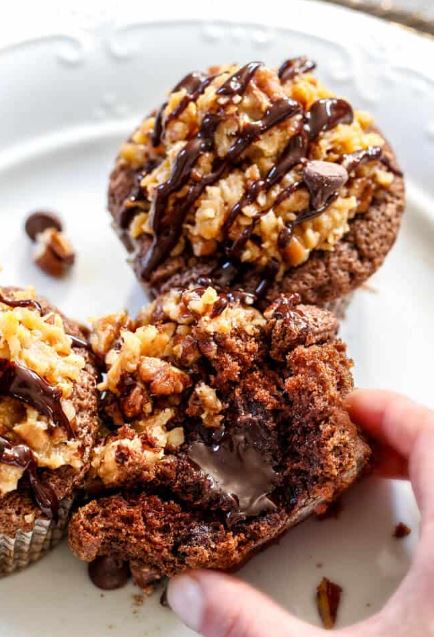
Super moist, rich, chocolaty German Chocolate Cupcakes brimming with Chocolate Ganache all topped with caramel-esque sweet and crunchy Toasted Coconut Pecan Frosting! . These German Chocolate Cupcakes are a chocolate lovers dream; a coconut lovers dream; a caramel lovers dream and about to become YOUR dreams come true!
CUPCAKE WITH ROYAL GANACHE FILLING
WHAT IS GERMAN CHOCOLATE?
What exactly is German Chocolate? First of all, you might be surprised to learn that the chocolate coconut delicacy we all love as German Chocolate Cake has nothing to do with chocolate from Germany but rather is named after Samuel German, a Walter Baker & Company employee (in Dorchester, Massachusetts), who developed the dark baking chocolate used for this dessert in 1852.
HOW TO MAKE GERMAN CHOCOLATE CUPCAKES
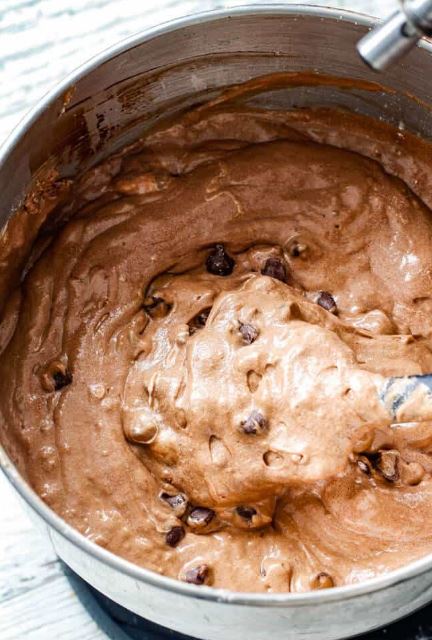
CUPCAKE BATTER
This German Chocolate Cupcake recipe is the perfect balance of sweet, nutty, coconut delight. Because German chocolate is on the sweet side, It is paired with semi-sweet chocolate, unsweetened cocoa powder and tangy buttermilk in the preparation of this dessert.So we have a rich, multi-dimensional chocolate-buttermilk cake that is not overly sweet – but ready to cocoon our Chocolate Ganache.
CUPCAKE WITH ROYAL GANACHE FILLING 2
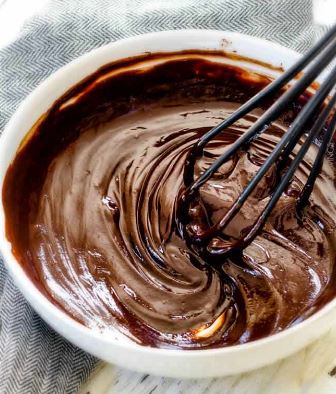
CHOCOLATE GANACHE
The Chocolate Ganache is s simple whisking of chopped semi-sweet chocolate and German chocolate into very hot heavy cream and butter to create a mega silky, molten chocolate surprise. How easy is that?!
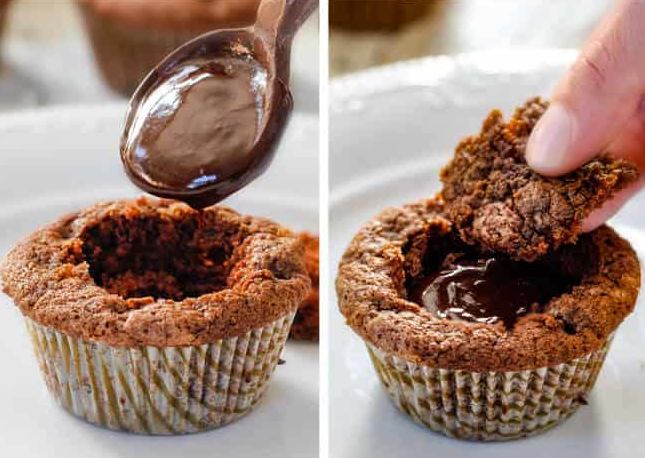
There also is no piping the chocolate into the cupcakes. Simply cut a cone-like shape out of the top of each cupcake, take a bite off the bottom of the cone (or cut it off if you prefer), fill your cupcake with chocolate and replace the top of the cone.
CUPCAKE WITH ROYAL GANACHE FILLING 3CUPCAKE WITH ROYAL GANACHE FILLING 4
GERMAN CHOCOLATE FROSTING
Next, create your uber delectable sweet and sticky Coconut Pecan frosting by first toasting your coconut and pecans together in the oven. A lot of recipes don’t call for this, but this extra steps makes such a difference! Next, whisk together your brown sugar, evaporated milk, and butter and simmer until thick enough to coat the back of a spoon to create a gooey caramel like frosting base that you lace with your toasted pecans and toasted coconut.
Then its frosting time! And because there really isn’t a nice way to frost these German Chocolate Cupcakes because the gooey, crunchy, chewy Coconut Pecan Frosting is so thick, I just use an ice cream scoop – and that means it takes mere minutes to frost these babies. And that is a very, very good thing when this deliciousness awaits…
TIPS FOR GERMAN CHOCOLATE CUPCAKES
USE ROOM TEMPERATURE INGREDIENTS: Always use room temperature eggs because they trap more air and result in fluffier cakes and cupcakes. Room temperature eggs also mix much easier so you are more likely not to over-mix your batter which can result in dense cupcakes.
CREAM UNTIL FLUFFY: One of the keys to the softest German Chocolate Cupcakes – or any cupcakes – is to cream your sugar and butter until light and fluffy. You should beat your butter and sugar at medium – high speed for at least 4 minutes. I suggest setting a timer because 4 minutes will seem extra-long but you don’t want to cut it short. The bubbles created when beating will expand as the cupcakes bake, resulting in a lighter cupcakes. If you don’t cream them enough, your cupcakes will be denser, not as tender, or rise as high.
DON’T PEEK! I know it is going to be hard not to peek, but please don’t open the door! Opening the doors can cause your cupcakes to cook unevenly and to fall.
DON’T OVERBAKE! One of the main reasons people complain of dry cupcakes is because they overbake them. You want to remove your cupcakes when there are just a few crumbs clinging to a toothpick. Check your German Chocolate Cupcakes at about 15 minutes then continue to cook as needed, setting a timer so you don’t overbake them.
CUPCAKE WITH ROYAL GANACHE FILLING 6
CAN I MAKE GERMAN CHOCOLATE CAKES AHEAD OF TIME?
You can make the German Cupcakes completely ahead of time and refrigerate until ready to serve, then either let them come to room temperature before serving, or better yet, microwave for 10 seconds or so in order for the ganache to soften into delectable motlen . Alternatively, you can make the cupcakes ahead of time and fill with ganache and frost when ready to serve:
Let baked cupcakes cool to room temperature.
Cut out cones for the chocolate ganache according to recipe directions.
Transfer cupcakes to an airtight container and store at room temperature for up to two days.
Meanwhile, you can make the frosting and refrigerate.
Before serving, gently warm German Chocolate Cupcake frosting on the stove to loosen.
Fill cupcakes with ganache and frost according to recipe directions.
CAN I FREEZE GERMAN CHOCOLATE CUPCAKES?
Place cupcakes on a baking sheet in the freezer so they are not touching.
Freeze for 1-2 hours or until solid.
Wrap each cupcake tightly in plastic wrap and then place into a zippered bag or airtight container.
Freeze cupcakes and frosting for up to 1 month.
Allow the cupcakes to thaw overnight in the refrigerator then unwrap and come to room temperature on the counter before serving.
For best results, microwave for 5-10 seconds before serving.
CUPCAKE WITH ROYAL GANACHE FILLING 7
GERMAN CUP CAKE WITH GANACHE FILLING
These German Chocolate Cupcakes are a chocolate lovers dream; a coconut lovers dream; a caramel lovers dream and about to become YOUR dreams come true!
3 oz. semi-sweet Baker’s chocolate, chopped (may sub chocolate chips)
1/2 teaspoon Vegetable oil
1 tablespoon heavy cream
INSTRUCTIONS
1. Ganache: Add heavy cream and butter to a large microwave safe bowl and heat for 1 1/2- 2 minutes (until simmering), stir to combine. Add chopped chocolate and vigorously whisk until chocolate is melted. Place in the refrigerator to thicken and cool.
2.Toast Coconut and Pecans (for frosting): Heat oven to 350 degrees F. Add coconut to one half of a baking sheet and pecans to the other half. Bake for 5-7 minutes, or until coconut is golden, stirring occasionally and watching closely towards the end as coconut turns very quickly. Once golden, remove to a large bowl/platter, or any cool surface.
3.Cupcakes: Grease 17 cupcake liners in a cupcake/muffin pan. Set aside.
4.Heat 1/4 cup water in a medium microwave safe bowl until simmering (about 1 minute on high). Add chopped German and semi-sweet chocolate; whisk until smooth. Set aside to cool.
5.Sift flour, baking soda, baking powder, salt, and cocoa powder in a medium bowl. Set aside.
6.With a hand or electric mixer on medium-high speed, cream butter and sugar together until light and fluffy, approximately 3-4 minutes. Add eggs, 1 at a time, mixing just until incorporated after each egg. Beat in melted chocolate followed by vanilla.
7.Turn mixer to low and slowly add the dry ingredients, alternating with the buttermilk. Fold in chocolate chips.
8.Pour batter into greased cupcake liners. Bake at 350 degrees F for 15-20 minutes or until toothpick inserted into center comes out clean. Cool cupcakes in the pan on a wire rack.
9.Frosting: Meanwhile, whisk the egg yolks, evaporated milk and brown sugar together in a large saucepan. Add butter and cook over medium high heat until the sugar dissolves and the butter melts, stirring constantly. Bring to a gentle simmer then turn heat down to medium. Continue to cook, stirring constantly, until thick enough to coat the back of a spoon, approximately 6-8 minutes. Remove from heat and stir in vanilla, salt, coconut and pecans. Allow to cool before frosting (you can place in the refrigerator to spread up this process.)
10.Assemble: Insert a knife at 45 degrees approximately 1/4 inch from the edge of each cupcake, and proceed to cut a cone shape. Remove cone and cut away all but the circular top (“Top”) – or just eat the bottom of the cone. (see How To Pics HERE). Fill each cupcake with a heaping 1/2 teaspoon Ganache and replace Top.* Scoop the frosting onto the cooled cupcakes with a heaping 1/2 ounce ice cream scoop.
11.Chocolate Drizzle (optional): Add chocolate, heavy cream and vegetable oil to a medium microwave safe bowl. Melt chocolate in microwave, mixing at 30 second intervals until melted. Drizzle over cupcakes by placing chocolate in a Ziploc bag, and cutting off the corner.
12.Store Cupcakes in an airtight container for up to 2 days then refrigerate.
13.I like to warm my cupcakes for 10 seconds or so before eating- so good!
RECIPE NOTES
*If Ganache has thickened too much, then microwave at 5-10 second intervals, stirring in between until Ganache reaches desired consistency. **Ganache will thicken as cupcakes sit at room temperature and is still delicious but for a “molten” oozing ganache as shown, microwave cupcakes for 5-10 seconds each before devouring.
This Chocolate Ganache is silky, creamy, sweet and shiny made with just 4 ingredients. It’s ideal for glazes, frostings, fillings and 1000X better than store bought chocolate sauce. Use this simple ganache to elevate ice cream, brownies, cakes, truffles or anything it touches! I’ve included how to make Chocolate Ganache, How to Store Chocolate Ganache, How to Use Chocolate Ganache and everything in between!
Chocolate Ganache 1
CHOCOLATE GANACHE RECIPE
This Chocolate Ganache Recipe is pure chocolate decadence yet is deceptively easy to make! You only need chocolate, heavy whipping cream, butter, a microwave, and 5 minutes to make this fool proof, easy ganache recipe.
Whether it is Valentine’s Day, bridal or baby showers, birthdays, family movie night, family ice cream night, or simply dessert time, this Chocolate Ganache recipe makes every memory more delicious. We inhale it drizzled on popcorn, enveloping donuts, bathing cakes, smothering ice cream and on and on. What is your favorite way to devour ganache?
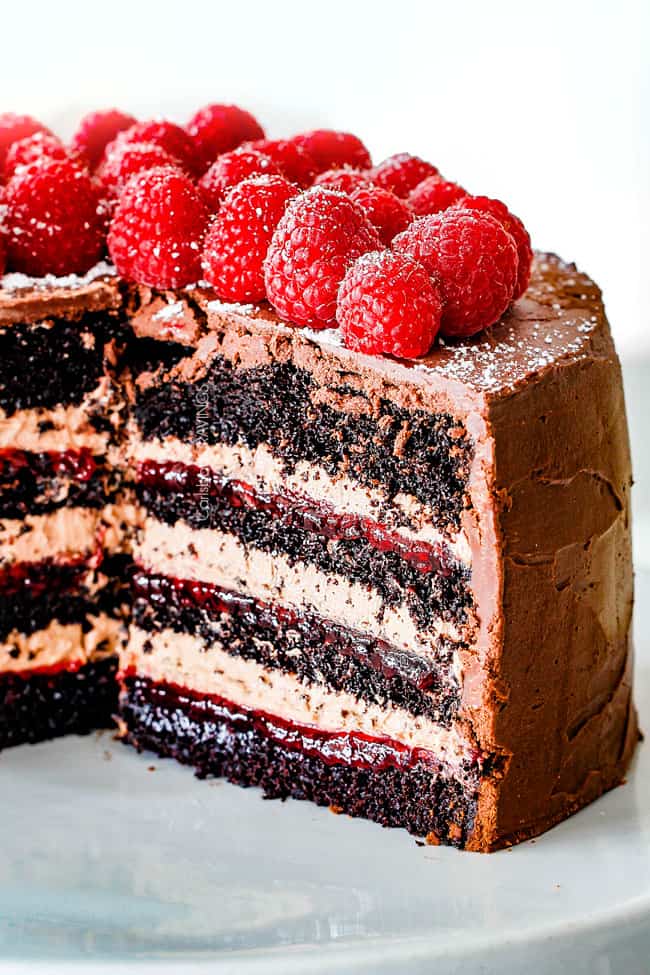
Strawberry Cake
WHAT IS CHOCOLATE GANACHE?
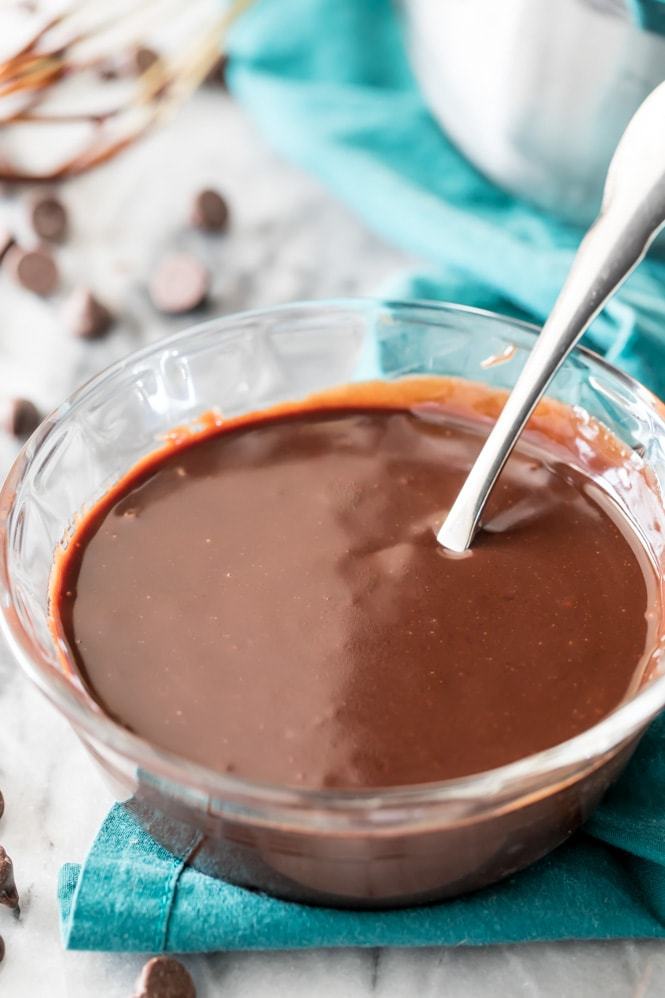
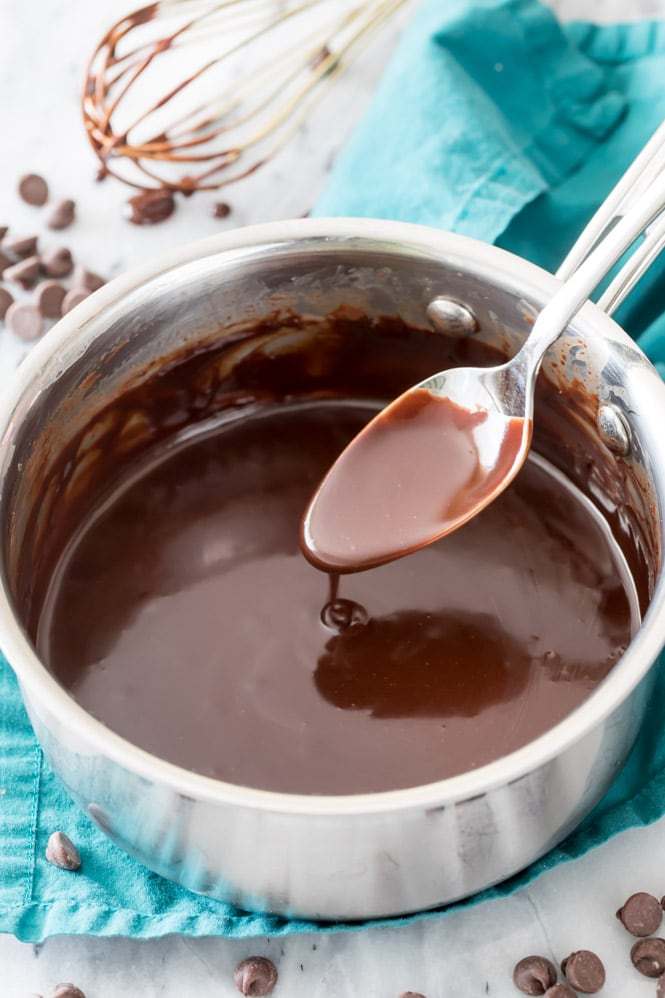
Chocolate Ganache (pronounced geh-Nahsh) sounds fancy because the term “Ganache” is French, but it simply means chocolate melted into hot cream. It is a basic pastry component and SO easy.
The resulting Chocolate Ganache is the consistency of a silky chocolate sauce although it becomes thicker, like creamy peanut butter, as it cools making it ideal for truffles, dessert fillings, icings, and whipped frosting.
WHY DO THEY CALL IT GANACHE?
While no one knows the exact origin of Chocolate Ganache, legend claims it comes from a young French student who poured hot cream onto chocolate bits. His tutoring chef called him a “ganache” which means “moron” in old French. His mistake, however, resulted in one of today’s most beloved forms of chocolate.
WHAT IS GANACHE MADE FROM?
Chocolate Ganache is typically made with equal parts chocolate and heavy cream, although the ratio can change depending on the usage. It can also contain butter for added flavor and smoothness, corn syrup for extra shine or alcohol, extracts or spices for flavor.
Chocolate Ganache 3
CAN I MAKE GANACHE WITH OTHER CHOCOLATES?
Absolutely! You can make ganache with any type of chocolate:
White Chocolate Ganache: replace semi-sweet chocolate with white chocolate and use 25% less heavy cream.
Milk Chocolate Ganache: replace semi-sweet chocolate with milk chocolate.
Dark Chocolate Ganache: use semi-sweet chocolate (which is technically dark chocolate) or use part semi-sweet chocolate and part bittersweet chocolate.
Chocolate Ganache 4
CAN YOU MAKE GANACHE WITH HALF AND HALF INSTEAD OF CREAM?
Heavy Cream is always the best option for Chocolate Ganache because the higher the fat content of the cream, the richer and more stable the finished ganache will be. I would only attempt to use half and half if you are using the ganache as a glaze, and not a thicker frosting because the half and half will permanently thin down the ganache. It will also not be as shiny and can easily become grainy when over stirred.
chocolate ganache 5
CAN I SUBSTITUTE MILK FOR CREAM IN GANACHE?
I do not recommend using milk to make Chocolate Ganache. It will produce a thin, less indulgent ganache with lackluster shine and taste and is likely to become grainy.
CHOCOLATE TO CREAM RATIO
In this Chocolate Ganache recipe, basic 1:1 ratio, 8 ounces heavy cream (1 cup) to 8 ounces of chocolate is used.This ratio is used practically for everything in this recipe. It is ideal for sauces, glazes and at room temperature wonderfully spreadable for frosting or fillings.
The only time you should need a thicker ganache is for truffles. In that instance you will want 2 parts chocolate to 1-part cream. You may want a thinner ganache with more cream than chocolate if making a chocolate syrup or sauce that needs to stay runny for an extended period of time.
Chocolate Raspberry Cake
HOW TO MAKE CHOCOLATE GANACHE
Chocolate Ganache is quick and easy to make:
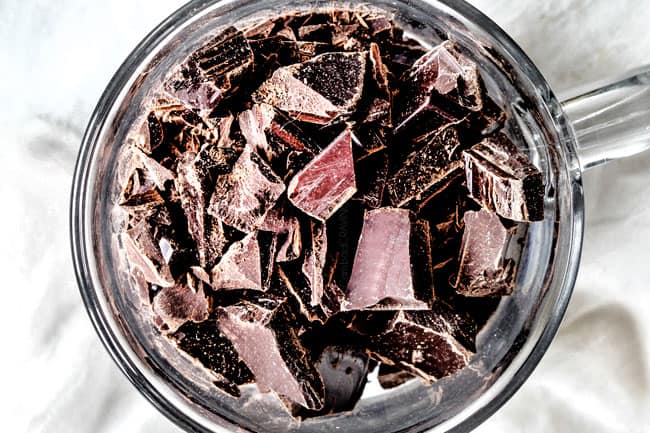
STEP 1: CHOP CHOCOLATE
First, roughly chop your semi-sweet chocolate bar. The pieces don’t have to be uniform but should be on the smaller side so they melt easily.
Your chocolate ganache is only as tasty as your chocolate – so splurge a little and use quality chocolate! I suggest Bakers or Ghirardelli brand chocolate bars. Quality chocolate chips can also work but ONLY use Guittard or Ghirardelli. Other chocolate brands have too many additives and will not melt nicely. Note: 8 oz. chocolate chips is roughly 1 1/3 cups NOT one cup.
chocolate ganache 6
STEP 2: HEAT HEAVY CREAM
You can heat the heavy cream on the stove or in the microwave, but I prefer the easy microwave method.
MICROWAVE: Add heavy cream, butter and corn syrup (if using) to a microwave safe bowl and microwave for 2 minutes or just until simmering and butter is melted. If the butter is not completely melted after 2 minutes, then microwave at 30 second intervals until butter is completely melted.
STOVE TOP: Add heavy cream, butter and corn syrup (if using) to a medium saucepan and heat until butter is melted and the mixture just begins to simmer, stirring occasionally.
You never want to melt your chocolate and cream together unless using a high ratio of corn syrup because the chocolate will scorch.
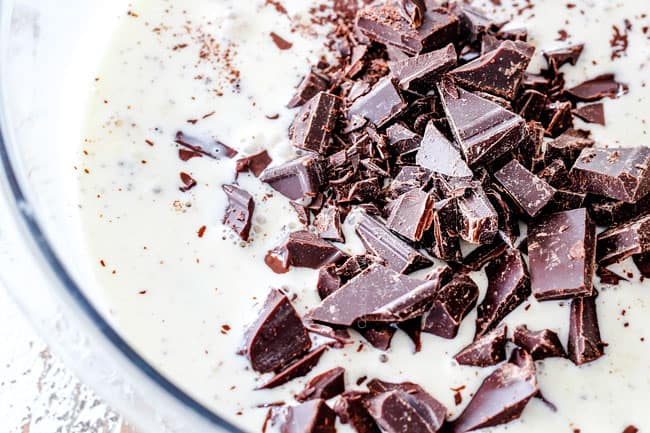
STEP 3: ADD CHOCOLATE
Add chocolate and let the mixture stand for 3 minutes without stirring. This allows the heat of the cream to soften the chocolate while bringing down the temperature of the cream.
If you are over eager and whisk too soon, the heavy cream will be too hot and result in a gritty texture. If this does happen to you, then whisk in 1-3 teaspoons vegetable oil until smooth.
chocolate ganache 7
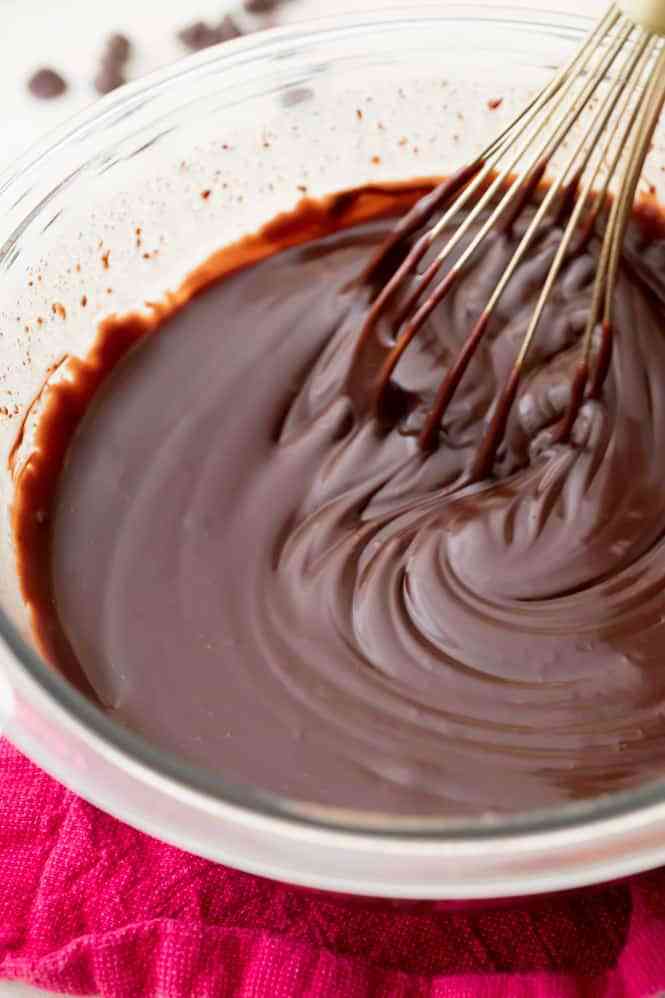
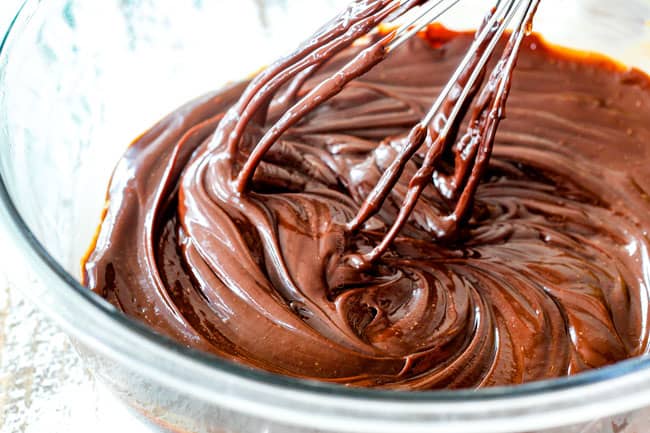
STEP 4: STIR UNTIL SMOOTH
Using a wire whisk, start at the center of the bowl and whisk outward in in a vigorous circular motion to melt the chocolate completely and to achieve thick, glossy ganache. This ensures you are creating an emulsion in which the fat from the cream, butter and chocolate are suspended into the liquid of the cream, resulting in a silky-smooth ganache.
chocolate ganache 8
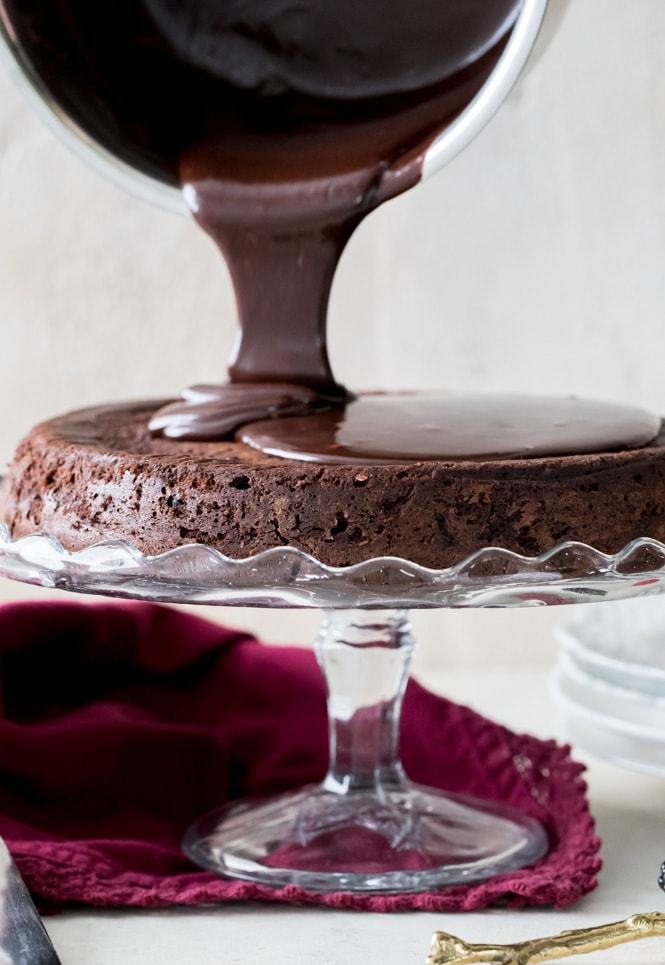
STEP 5: COOL
Cool at room temperature for 10 minutes before using as a sauce or dip or cover with plastic wrap touching the surface of the chocolate and allow to cool and thicken for frosting or piping.
Chocolate Ganache 2
WHY DO YOU ADD CORN SYRUP?
This Chocolate Ganache recipe contains corn syrup for 3 purposes:
To make the ganache extra smooth
Keep the ganache shiny even after being refrigerated
Keep the ganache flexible when it sets
It makes A HUGE difference in the final product. You can omit the corn syrup if you really are opposed but the ganache will not be as smooth, shiny, flexible or overall successful.
HOW DO I THICKEN CHOCOLATE GANACHE?
You will want to use Chocolate Ganache almost immediately for sauces, glazes and dips, allowing it to cool for only about 10 minutes.
If you are using it for anything else, then it will need to thicken either in the refrigerator or at room temperature. So, if you have already made Chocolate Ganache and it seems thin, remember it will thicken upon cooling and be the thickest after refrigerating.
To thicken ganache quickly, cover it with a piece of plastic wrap pressed directly against the top of the chocolate so a film does not form. Chill ganache in the refrigerator until it reaches desired consistency, about 30-60 minutes, depending on usage and quantity and size/depth of container.
You may also thicken the Chocolate Ganache at room temperatures but this will take almost twice as long as the refrigerator.
If you would still like a thicker ganache even after it reaches room temperature, then whip the ganache with a hand or electric mixer for a few minutes so it increases in volume and becomes light brown in color. This will create air pockets like in whipped cream, so it will hold its shape.
DOES GANACHE HARDEN?
If you use the 1 to 1 ratio of cream to chocolate like in this Chocolate Ganache recipe, then your ganache will thicken and set up but not completely harden.
If your ganache becomes thicker than you would like or does harden when refrigerated– don’t worry! You can either let the ganache sit in a warm part of your kitchen for about an hour or add 1 teaspoon vegetable oil and microwave on low for 10 seconds then whisk and microwave another 10 seconds if required until completely smooth.
IS IT SAFE TO LEAVE GANACHE OUT OVERNIGHT?
Yes! Chocolate Ganache is safe at room temperature (not summer temperatures), for up to 2 days. After 2 days, it should be refrigerated.
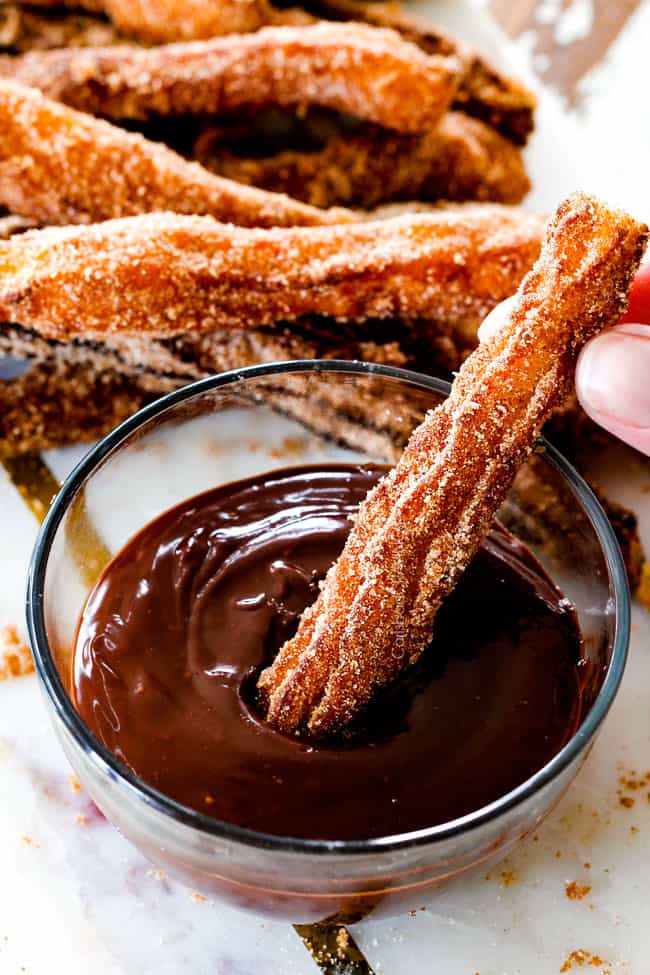
churros
CAN YOU STORE LEFTOVER GANACHE?
Absolutely! Place a piece of plastic wrap directly on the surface of the ganache so its touching. This will stop a sugar film from forming. Store at room temperature for up to 2 days or refrigerate for three weeks.
HOW LONG DOES GANACHE LAST?
When stored properly in an airtight container, Chocolate Ganache can last for:
Room temperature: 2 days
Refrigerated: 3 weeks
Freezer: 3 months
CAN YOU MAKE GANACHE AHEAD OF TIME?
Yes! Chocolate Ganache can be kept at room temperature for up to 2 days.
If it has been refrigerated, then let it come to room temperature before using.
If it has thickened more than your liking at room temperatures or in the refrigerator, then microwave ganache at 50% power, stirring every 10 seconds, until it reaches desired consistency. For a creamier ganache, stir in 1-3 teaspoons vegetable oil when reheating.
CAN YOU FREEZE GANACHE?
Yes, you can freeze Chocolate Ganache for up to 3 months in an airtight container without noticeable change in quality. I would suggest placing a piece of plastic wrap directly on the surface of the ganache so its touching to prevent sugar crystals.
When ready to use, let ganache thaw overnight in the refrigerator then let sit at room temperature for a few hours before serving. You may microwave the ganache at 50% power, stirring every 15 seconds if you still would like thinner ganache.
WHAT IS THE DIFFERENCE BETWEEN GANACHE AND FROSTING?
Ganache can be a frosting, but most frostings are not a ganache. Even most chocolate frostings are not ganache.
Chocolate Ganache is always melted chocolate, heavy cream and sometimes butter and corn syrup. It can be whipped to create a frosting.
Frosting, on the other hand, is a generic term for whipped sugar, butter and milk/heavy cream that is most commonly used to frost cakes. It can also contain other ingredients such as cream cheese, cocoa powder, etc.
WANT TO TRY CHOCOLATE GANACHE RECIPE
Easy Chocolate Ganache made in 5 minutes with just 4 ingredients. Its ideal for glazes, frostings, fillings and 1000X better than store bought chocolate sauce. Use this simple Chocolate Ganache to elevate ice cream, brownies, cakes, truffles or anything it touches!
Prep Time
3 minutes
Cook Time
2 minutes
Servings
cups
INGREDIENTS
1 cup heavy cream
1 tablespoon salted butter
8 oz. semi-sweet chocolate chopped
2 tablespoons corn syrup optional*
1/2 teaspoon vanilla extract optional
INSTRUCTIONS
Add heavy cream, butter and corn syrup (if using) to a medium saucepan and heat until butter is melted and the mixture just begins to simmer, stirring occasionally OR add heavy cream, butter and corn syrup to a microwave safe bowl and microwave for 2 minutes or just until simmering and butter is melted.
Add chocolate and give it swirl so the chocolate is covered. Let stand 3 minutes.
After 3 minutes, vigorously whisk in circular motions until chocolate is melted and completely smooth. Whisk in vanilla if using.
Let ganache cool for 10 minutes before using as a dip or sauce or allow to cool to room temperature for frosting, filling, etc., stirring often. Reheat at 50 % power in the microwave with 1 teaspoon vegetable oil if ganache thickens too much as you work or becomes grainy.
RECIPE NOTES
*DO I HAVE TO USE CORN SYRUP?
This Chocolate Ganache recipe contains corn syrup for 3 purposes:
To make the ganache extra smooth
Keep the ganache shiny even after being refrigerated
Keep the ganache flexible when it sets
Corn syrup makes A HUGE difference in the final product. You can omit the corn syrup if you really are opposed but the ganache will not be as smooth, shiny, flexible or overall successful.
HOW TO STORE GANACHE
Place a piece of plastic wrap directly on the surface of the ganache so its touching. This will stop a sugar film from forming. Store at room temperature for up to 2 days or refrigerate for three weeks. Let refrigerated ganache come to room temperature before using by placing on the counter for 1-2 hours. You can also microwave it at 50% power, stirring every 30 seconds.
HOW TO FREEZE GANACHE:
You can freeze Chocolate Ganache for up to 3 months in an airtight container without noticeable change in quality. I would suggest placing a piece of plastic wrap directly on the surface of the ganache so its touching to prevent sugar crystals.
When ready to use, let ganache thaw overnight in the refrigerator then let sit at room temperature for a few hours before serving. You may microwave the ganache at 50% power, stirring every 15 seconds if you still would like thinner ganache. Stir in 1-3 teaspoons vegetable oil for a smoother ganache.