GERMAN CUP CAKE WITH GANACHE FILLING

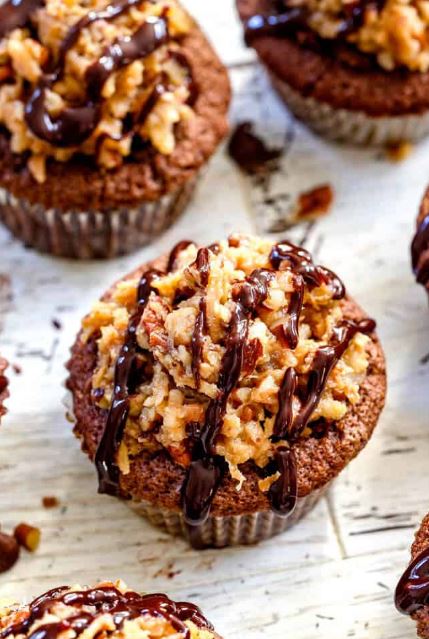
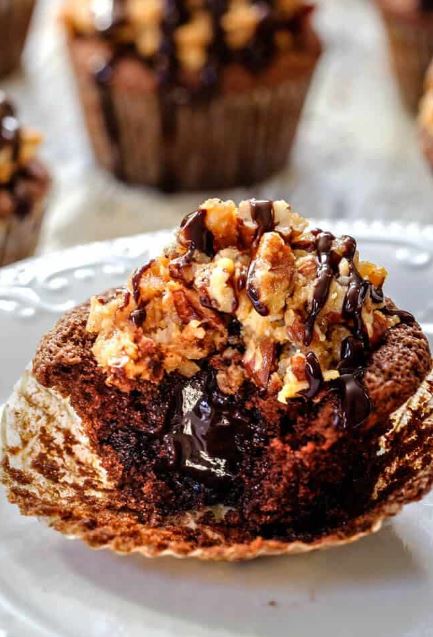
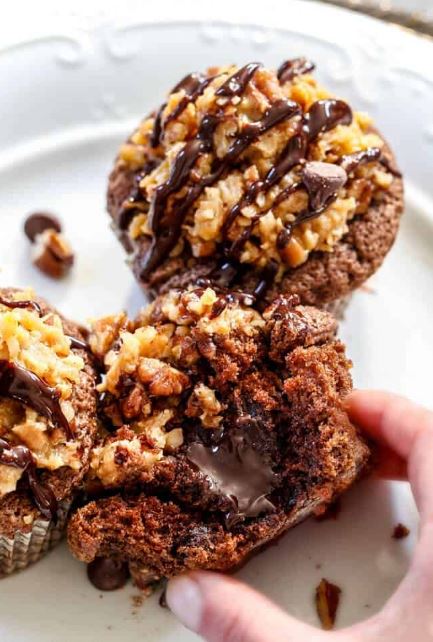
Super moist, rich, chocolaty German Chocolate Cupcakes brimming with Chocolate Ganache all topped with caramel-esque sweet and crunchy Toasted Coconut Pecan Frosting!  .  These German Chocolate Cupcakes are a chocolate lovers dream; a coconut lovers dream; a caramel lovers dream and about to become YOUR dreams come true!

CUPCAKE WITH ROYAL GANACHE FILLING

WHAT IS GERMAN CHOCOLATE?

What exactly is German Chocolate? First of all, you might be surprised to learn that the chocolate coconut delicacy we all love as German Chocolate Cake has nothing to do with chocolate from Germany but rather is named after Samuel German, a Walter Baker & Company employee (in Dorchester, Massachusetts), who developed the dark baking chocolate used for this dessert in 1852.  

HOW TO MAKE GERMAN CHOCOLATE CUPCAKES

CUPCAKE BATTER

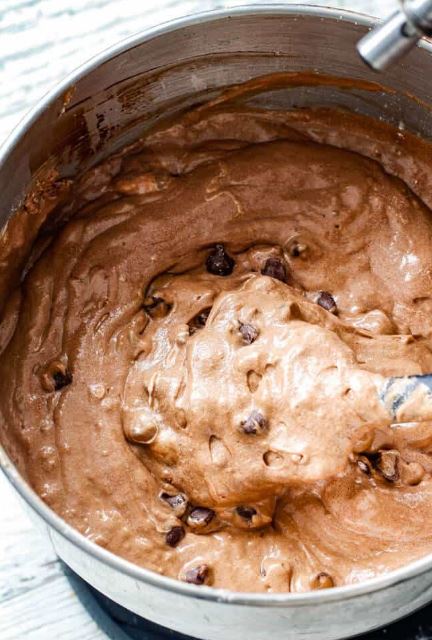
This German Chocolate Cupcake recipe is the perfect balance of sweet, nutty, coconut delight. Because German chocolate is on the sweet side, It is paired with semi-sweet chocolate, unsweetened cocoa powder and tangy buttermilk in the preparation of this dessert.So we have a rich, multi-dimensional chocolate-buttermilk cake that is not overly sweet – but ready to cocoon our Chocolate Ganache.
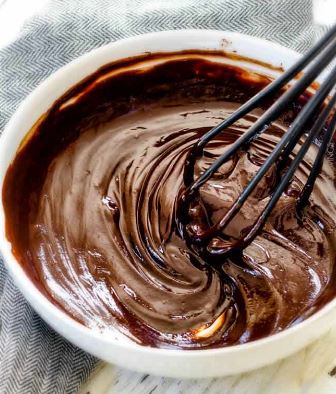
CUPCAKE WITH ROYAL GANACHE FILLING 2

CHOCOLATE GANACHE

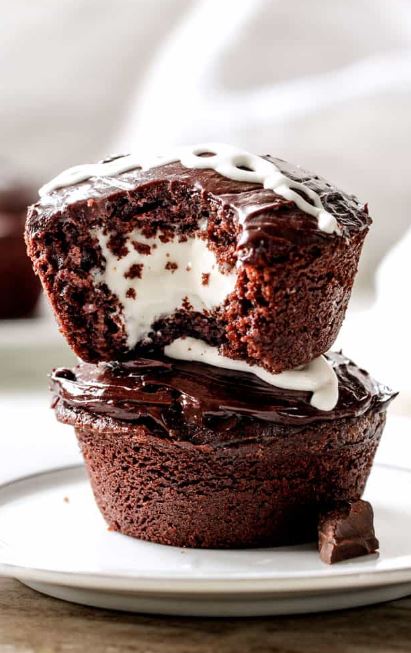
The Chocolate Ganache is s simple whisking of chopped semi-sweet chocolate and German chocolate into very hot heavy cream and butter to create a mega silky, molten chocolate surprise.  How easy is that?!  

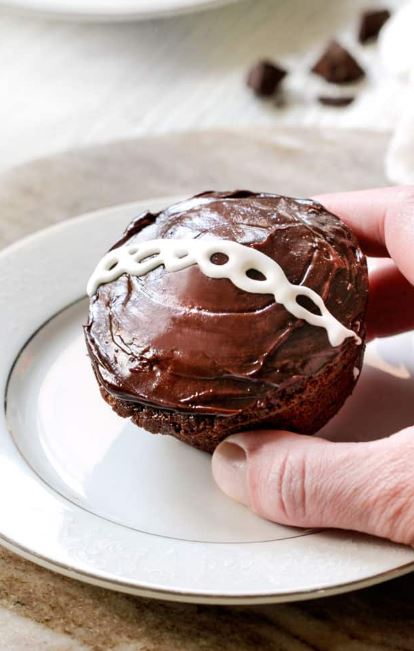
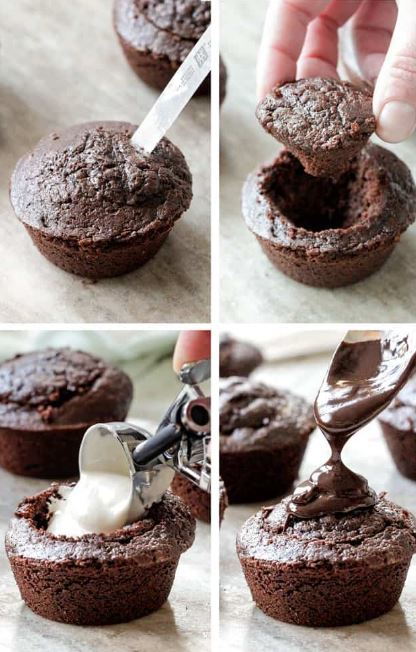
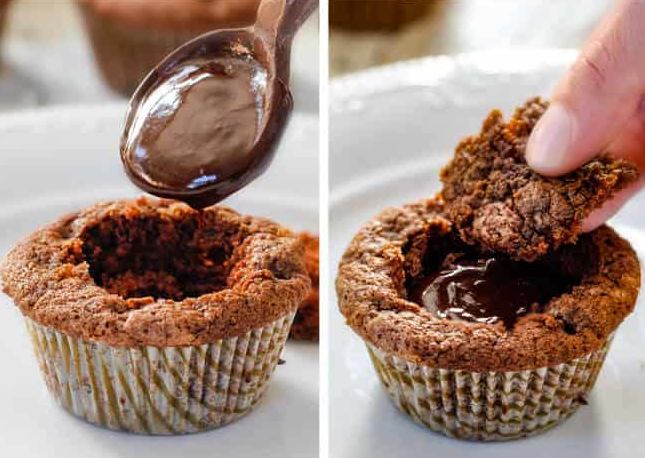
There also is no piping the chocolate into the cupcakes.  Simply cut a cone-like shape out of the top of each cupcake, take a bite off the bottom of the cone (or cut it off if you prefer), fill your cupcake with chocolate and replace the top of the cone.  

CUPCAKE WITH ROYAL GANACHE FILLING 3
CUPCAKE WITH ROYAL GANACHE FILLING 4

GERMAN CHOCOLATE FROSTING

Next, create your uber delectable sweet and sticky Coconut Pecan frosting by first toasting your coconut and pecans together in the oven.  A lot of recipes don’t call for this, but this extra steps makes such a difference!  Next, whisk together your brown sugar, evaporated milk, and butter and simmer until thick enough to coat the back of a spoon to create a gooey caramel like frosting base that you lace with your toasted pecans and toasted coconut.  

Then its frosting time!  And because there really isn’t a nice way to frost these German Chocolate Cupcakes because the gooey, crunchy, chewy Coconut Pecan Frosting is so thick, I just use an ice cream scoop – and that means it takes mere minutes to frost these babies.  And that is a very, very good thing when this deliciousness awaits…

TIPS FOR GERMAN CHOCOLATE CUPCAKES

  • USE ROOM TEMPERATURE INGREDIENTS:  Always use room temperature eggs because they trap more air and result in fluffier cakes and cupcakes. Room temperature eggs also mix much easier so you are more likely not to over-mix your batter which can result in dense cupcakes.
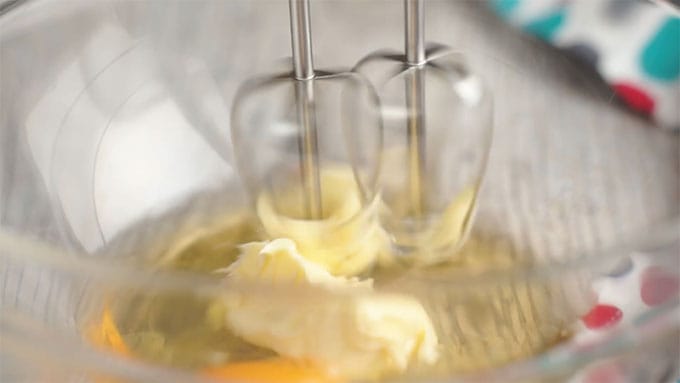
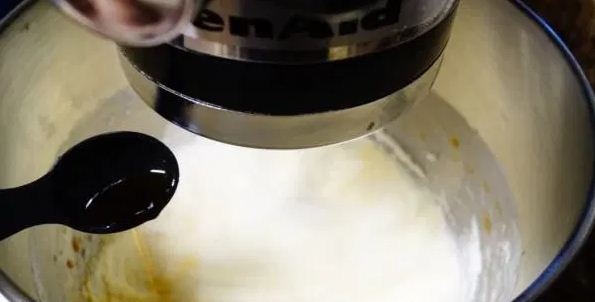
  • CREAM UNTIL FLUFFY:  One of the keys to the softest German Chocolate Cupcakes – or any cupcakes – is to cream your sugar and butter until light and fluffy.  You should beat your butter and sugar at medium – high speed for at least 4 minutes.  I suggest setting a timer because 4 minutes will seem extra-long but you don’t want to cut it short.  The bubbles created when beating will expand as the cupcakes bake, resulting in a lighter cupcakes.  If you don’t cream them enough, your cupcakes will be denser, not as tender, or rise as high. 
  • DON’T PEEK!  I know it is going to be hard not to peek, but please don’t open the door!  Opening the doors can cause your cupcakes to cook unevenly and to fall.
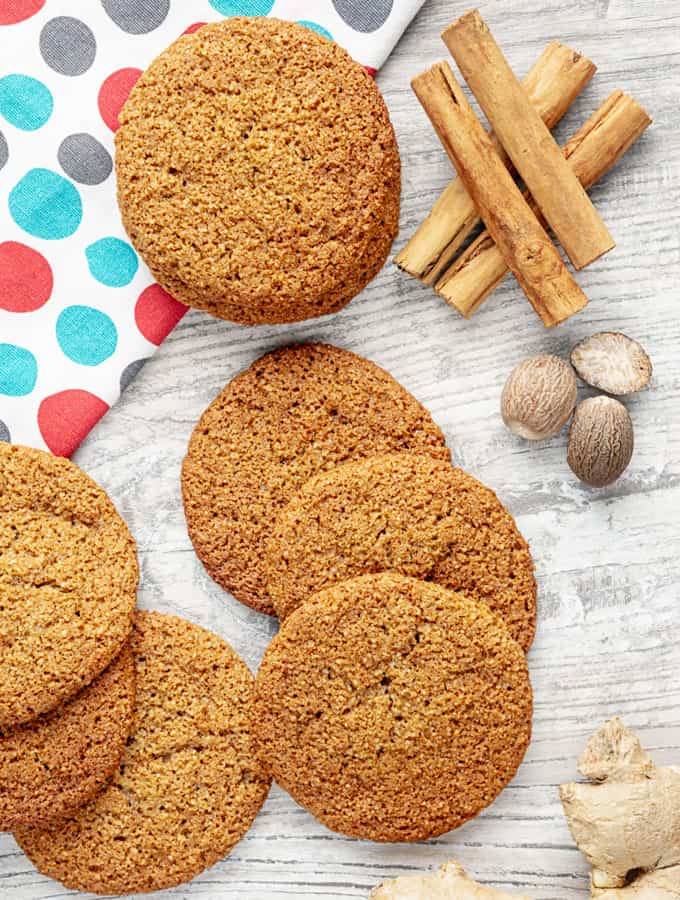
  • DON’T OVERBAKE!  One of the main reasons people complain of dry cupcakes is because they overbake them.   You want to remove your cupcakes when there are just a few crumbs clinging to a toothpick.  Check your German Chocolate Cupcakes at about 15 minutes then continue to cook as needed, setting a timer so you don’t overbake them.
CUPCAKE WITH ROYAL GANACHE FILLING 6

CAN I MAKE GERMAN CHOCOLATE CAKES AHEAD OF TIME?

You can make the German Cupcakes completely ahead of time and refrigerate until ready to serve, then either let them come to room temperature before serving, or better yet, microwave for 10 seconds or so in order for the ganache to soften into delectable motlen .  Alternatively, you can make the cupcakes ahead of time and fill with ganache and frost when ready to serve:

  1. Let baked cupcakes cool to room temperature.
  2. Cut out cones for the chocolate ganache according to recipe directions. 
  3. Transfer cupcakes to an airtight container and store at room temperature for up to two days.   
  4. Meanwhile, you can make the frosting and refrigerate.
  5. Before serving, gently warm German Chocolate Cupcake frosting on the stove to loosen.  
  6. Fill cupcakes with ganache and frost according to recipe directions. 

CAN I FREEZE GERMAN CHOCOLATE CUPCAKES?

  1. Place cupcakes on a baking sheet in the freezer so they are not touching.
  2. Freeze for 1-2 hours or until solid.
  3. Wrap each cupcake tightly in plastic wrap and then place into a zippered bag or airtight container.
  4. Freeze cupcakes and frosting for up to 1 month.   
  5. Allow the cupcakes to thaw overnight in the refrigerator then unwrap and come to room temperature on the counter before serving.
  6. For best results, microwave for 5-10 seconds before serving. 
CUPCAKE WITH ROYAL GANACHE FILLING 7

GERMAN CUP CAKE WITH GANACHE FILLING

These German Chocolate Cupcakes are a chocolate lovers dream; a coconut lovers dream; a caramel lovers dream and about to become YOUR dreams come true!

Prep Time

40 minutes 

Cook Time

20 minutes

Servings

 cupcakes

INGREDIENTS


Cupcakes

  • 1/4 cup water
  • 2 ounces German’s sweet baker’s chocolate, chopped
  • 1 ounce semi-sweet Baker’s chocolate, chopped
  • 1 cup + 1 1/2 tablespoon AP flour
  • 3/4 teaspoons baking soda
  • 1/2 teaspoon baking powder
  • 1/4 teaspoon salt
  • 1 tablespoon cocoa powder
  • 1 cup sugar
  • 1/2 cup unsalted butter, softened, (1 stick)
  • 2 large eggs at room temperature
  • 1 teaspoon vanilla extract
  • 1/2 cup buttermilk
  • 1/2 cup semisweet chocolate chips

Ganache Filling

  • 1/3 cup heavy whipping cream
  • 2 tablespoons salted butter, cubed
  • 4 oz. German’s sweet baker’s chocolate, chopped
  • 2 oz. semi-sweet Baker’s chocolate, chopped

Coconut Pecan Frosting

1 cup sweetened shredded coconut

3/4 cup coarsely chopped pecans

2 egg yolks

1 5 oz. can evaporated milk

1/2 cup +2 tablespoons brown sugar, packed

6 tablespoons unsalted butter, softened,

1/2 teaspoon vanilla extract

1/8 teaspoon salt

Chocolate Drizzle (optional):

3 oz. semi-sweet Baker’s chocolate, chopped (may sub chocolate chips)

1/2 teaspoon Vegetable oil

1 tablespoon heavy cream

INSTRUCTIONS

1. Ganache: Add heavy cream and butter to a large microwave safe bowl and heat for 1 1/2- 2 minutes (until simmering), stir to combine. Add chopped chocolate and vigorously whisk until chocolate is melted. Place in the refrigerator to thicken and cool.

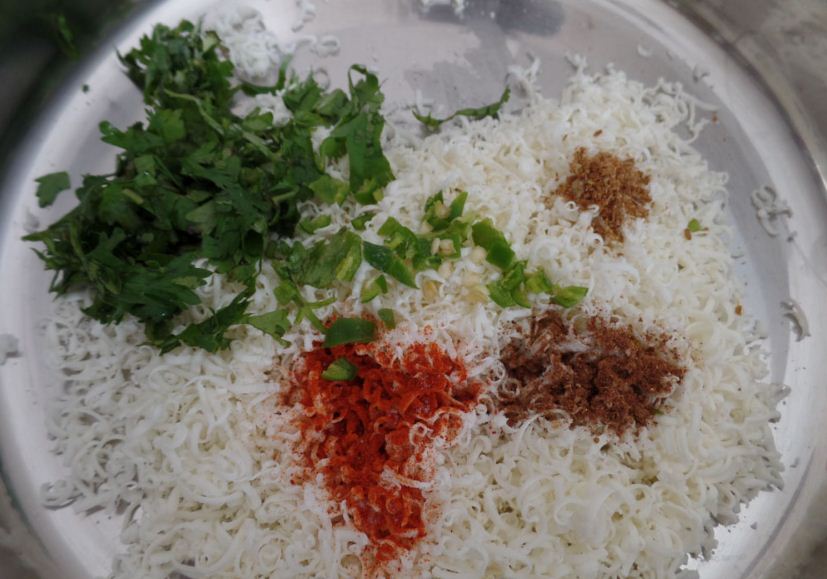
2.Toast Coconut and Pecans (for frosting): Heat oven to 350 degrees F. Add coconut to one half of a baking sheet and pecans to the other half. Bake for 5-7 minutes, or until coconut is golden, stirring occasionally and watching closely towards the end as coconut turns very quickly. Once golden, remove to a large bowl/platter, or any cool surface.

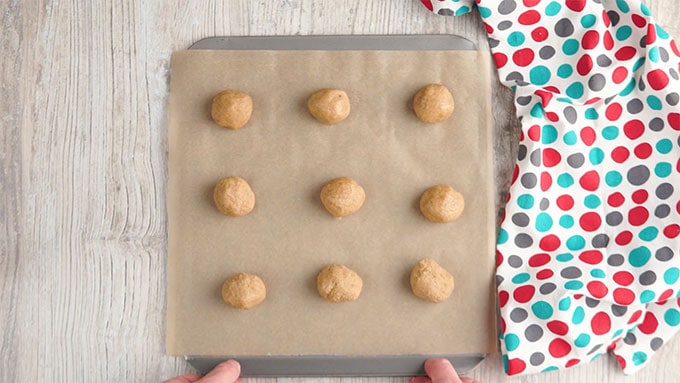
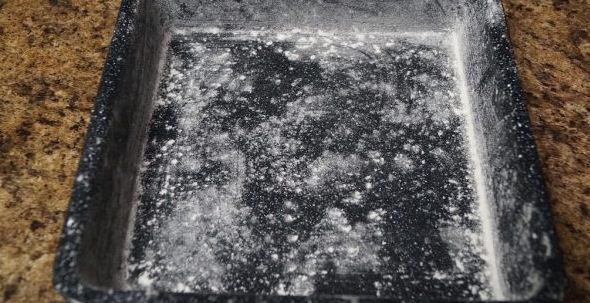
3.Cupcakes: Grease 17 cupcake liners in a cupcake/muffin pan. Set aside.

4.Heat 1/4 cup water in a medium microwave safe bowl until simmering (about 1 minute on high). Add chopped German and semi-sweet chocolate; whisk until smooth. Set aside to cool.

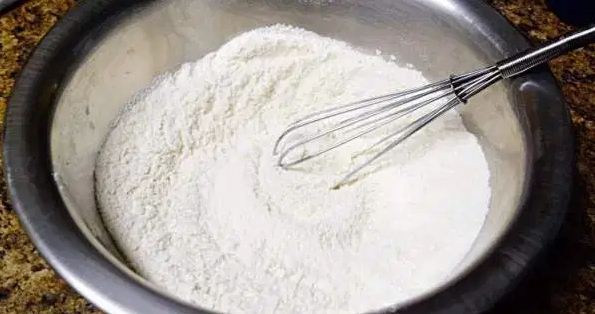
5.Sift flour, baking soda, baking powder, salt, and cocoa powder in a medium bowl. Set aside.

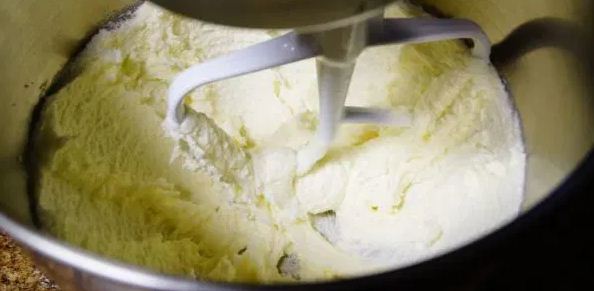
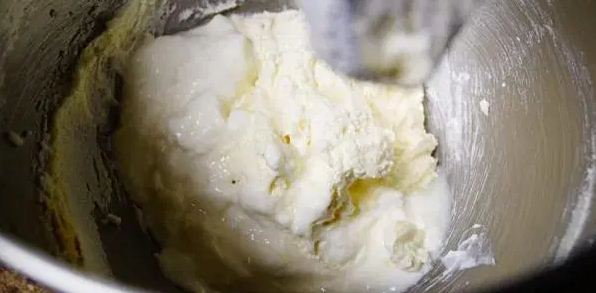
6.With a hand or electric mixer on medium-high speed, cream butter and sugar together until light and fluffy, approximately 3-4 minutes. Add eggs, 1 at a time, mixing just until incorporated after each egg. Beat in melted chocolate followed by vanilla.

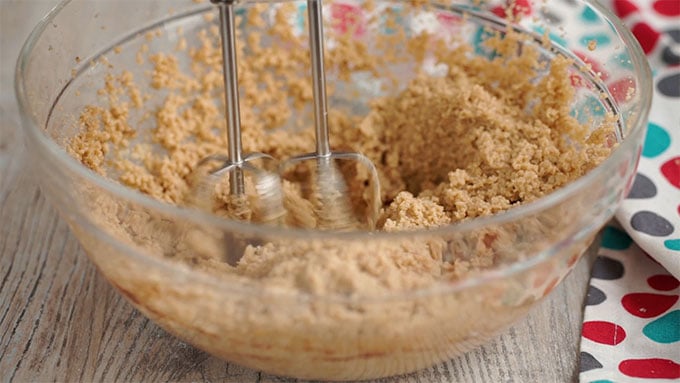
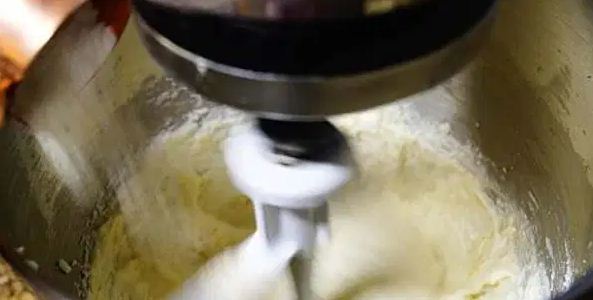
7.Turn mixer to low and slowly add the dry ingredients, alternating with the buttermilk. Fold in chocolate chips.

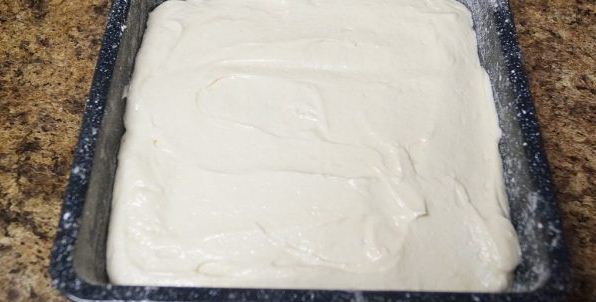
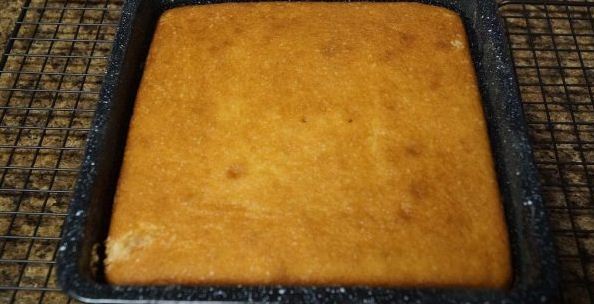
8.Pour batter into greased cupcake liners. Bake at 350 degrees F for 15-20 minutes or until toothpick inserted into center comes out clean. Cool cupcakes in the pan on a wire rack.

9.Frosting: Meanwhile, whisk the egg yolks, evaporated milk and brown sugar together in a large saucepan. Add butter and cook over medium high heat until the sugar dissolves and the butter melts, stirring constantly. Bring to a gentle simmer then turn heat down to medium. Continue to cook, stirring constantly, until thick enough to coat the back of a spoon, approximately 6-8 minutes. Remove from heat and stir in vanilla, salt, coconut and pecans. Allow to cool before frosting (you can place in the refrigerator to spread up this process.)

10.Assemble: Insert a knife at 45 degrees approximately 1/4 inch from the edge of each cupcake, and proceed to cut a cone shape. Remove cone and cut away all but the circular top (“Top”) – or just eat the bottom of the cone. (see How To Pics HERE). Fill each cupcake with a heaping 1/2 teaspoon Ganache and replace Top.* Scoop the frosting onto the cooled cupcakes with a heaping 1/2 ounce ice cream scoop.

11.Chocolate Drizzle (optional): Add chocolate, heavy cream and vegetable oil to a medium microwave safe bowl. Melt chocolate in microwave, mixing at 30 second intervals until melted. Drizzle over cupcakes by placing chocolate in a Ziploc bag, and cutting off the corner.

12.Store Cupcakes in an airtight container for up to 2 days then refrigerate.

13.I like to warm my cupcakes for 10 seconds or so before eating- so good!

RECIPE NOTES

*If Ganache has thickened too much, then microwave at 5-10 second intervals, stirring in between until Ganache reaches desired consistency.
**Ganache will thicken as cupcakes sit at room temperature and is still delicious but for a “molten” oozing ganache as shown, microwave cupcakes for 5-10 seconds each before devouring.

CUPCAKES

Ding Dong Cupcakes are rich, moist and chocolaty stuffed with creamy marshmallow filling and smothered in a silky chocolate ganache!  You will never want to buy Ding Dongs from the store again!  

CUPCAKES 2
CUPCAKES 2

These Ding Dong Cupcakes start with a rich, moist, chocolaty cupcake that is double infused with chocolate from cocoa powder and melted chocolate chips.  The cupcakes are so moist that you can’t use a pastry bag to pump the filling right into the center (a very good sign).  Instead, you cut the center out to make room for your creamy marshmallow filling that is a delectable mixture of marshmallow creme, butter and some gelatin to help it set.  You might be tempted to leave out the gelatin but the filling sinks without it – with it, its perfectly creamy, perfectly delicious…

CUPCAKES 3
CUPCAKES 3

CUPCAKES 4
CUPCAKES 4

And perfectly ready for you to devour…And to become one of your new favorites year-round!

WANT TO TRY THESE HOMEMADE DING DONG CUPCAKES?

Prep Time

30 minutes

Cook Time

18 minutes

Servings 

cupcakes

INGREDIENTS

Cupcakes

  • 1 cup all-purpose flour
  • 1/2 teaspoon baking soda
  • 1/4 teaspoon salt
  • 1/2 cup boiling water
  • 1/2 cup unsweetened cocoa powder
  • 1/4 cup semisweet chocolate chips
  • 1/2 cup granulated sugar
  • 1/3 cup brown sugar
  • 1/2 cup Vegetable oil
  • 2 large eggs
  • 1 teaspoon vanilla extract
  • 1/2 cup sour cream

INSTRUCTIONS

1. CUPCAKES: Preheat oven to 325 degrees F. Grease and flour (or use nonstick cooking spray with flour) a12-cup muffin tin.

2.Combine flour, baking soda, and salt in medium bowl. Set aside.

3.In a separate large bowl, whisk together water, cocoa, and chocolate chips together until smooth. Add sugar, oil, eggs, and vanilla and mix until combined. Whisk in flour mixture alternating with sour cream until incorporated.

4.Divide batter evenly among greased muffin cups. Bake 18 to 22 minutes or until toothpick inserted in center comes out almost clean. Cool cupcakes in tin for 10 minutes, then turn out onto wire rack and cool completely.

5.FILLING: Meanwhile, combine water and gelatin in large bowl and let sit until gelatin softens, about 5 minutes then microwave until mixture is bubbling around edges and gelatin dissolves, about 30 seconds. Stir in butter, vanilla, and salt until combined. Let mixture cool until just warm to touch, about 5 minutes. When slightly cooled, whisk in marshmallow creme until smooth.

6.Refrigerate filling until set, about 30 minutes. Transfer 1/3 cup marshmallow mixture to pastry bag fitted with small plain tip (or to a plastic bag and snip the corner) and reserve remaining mixture for filling cupcakes.

7.CHOCOLATE GLAZE: Add heavy cream and butter to a large microwave safe bowl and heat for two minutes, stir to combine. Heat at 30 second intervals if butter is not completely melted at this point. Add chopped chocolate and stir until chocolate is melted and smooth then stir in corn syrup. Let cool to room temperature, about 10 minutes.

8.ASSEMBLE: Insert a knife at approximately 1/4 inch from the edge of each cupcake, and proceed to cut a cone shape. Remove cone and cut all but the circular top off (“top”) – or just eat the bottom of the cone. Using a spoon, fill each cupcake with the marshmallow filling then add “top.” Lightly frost with Chocolate Ganache Glaze. Let set then pipe reserved marshmallow filling in decorative pattern on top.

KETO GINGER COOKIE RECIPE

This Keto Ginger Cookie Recipe gives you all the flavor of ginger snap cookies without all the carbs. They’re oh so delicious and take less than 30 minutes to make!

KETO GINGER COOKIE 1

HOW THIS LOW CARB GINGER COOKIE RECIPE IS ABOUT TO CHANGE YOUR LIFE

These little keto cookies won’t last long. They’re the perfect texture, only take 10 minutes of prep, and have an incomparable taste. You may find yourself choosing this Ginger Cookie Recipe over sugary ones.

These little ones are gluten-free, vegetarian, low-carb, keto, and if you sub the butter with coconut oil, they are also dairy-free and paleo. So there. You now have a good excuse to eat them.

This streamlined recipe for this gluten-free, low carb Ginger Cookie Recipe will take you about 10 minutes to put together and 10-15 minutes to bake.

That is a little dangerous if you think about it.

I have to say, these are the BEST low carb cookies I’ve ever tasted.

Many of those taste like fiber or sawdust. These do not. These taste like COOKIES. Real, really delicious cookies! Now let’s get to cooking…

HOW TO MAKE GINGER COOKIES

1. Preheat the oven to 350F.

2. Line a cookie sheet with parchment paper and set aside.

3. Using a hand blender, cream together the butter, agave nectar, egg, and water.

KETO GINGER COOKIE 2

4. To this mixture, add all the dry ingredients and mix well on low speed.

KETO GINGER COOKIE 3

5. Roll into 2 teaspoon balls and arrange on a baking tray with parchment paper. They don’t really spread too much but leave a little room between them.

KETO GINGER COOKIE 4

6. Bake for 12-15 minutes until the tops have lightly browned.

7. Once cooled, store in an air-tight container. For like, the one hour these cookies will be around before you eat them all.

WHY ARE THEY CALLED GINGER SNAPS?

They call them ginger snaps because they’re made with ginger and they are typically a crispier, crunchier cookie that makes a “snap” sound when they’re consumed.

This gluten-free Ginger Cookie Recipe is basically just a ginger snap cookie baked with lower carb ingredients like almond flour and Truvia. They do, however, still have that delightful texture and “snap” you’d expect from a good ginger snap.

HOW LONG DO GINGER SNAP COOKIES LAST?

Now it depends on what you mean by “last”. This Ginger Cookie Recipe will keep in an airtight container for about 2-3 weeks. However, don’t expect them to last that long as they’ll more than likely all be eaten before then.

DO THESE KETO COOKIES USE ALMOND FLOUR?

They sure do. That’s what helps keep them low carb. But don’t fret. The unconventional flour won’t change the flavor or texture of these cookies one bit. With the influx of people eating low carb and gluten-free, you can easily find it in the baking aisle of your local grocer.

KETO GINGER COOKIE RECIPE 4

Keto Ginger Cookie Recipe

This Ginger Cookie Recipe gives you all the flavor of ginger snap cookies without all the carbs. They’re so delicious and take less than 30 minutes to make! 

Prep Time

10 minutes

Cook Time

15 minutes

Total Time

25 minutes

Servings

18 COOKIES

Course

Desserts

Cuisine

American

Author: Zeeshan

Keyword: keto cookies, keto desserts, keto ginger snaps

Equipment

  • KITCHENAID STAND MIXER
  • COOKIE SHEET
  • SILICONE SPATULA TURNER

Ingredients

Cream Together

  • 4 tbsp (4 tbsp) butter, softened (or coconut oil)
  • 2 tbsp (2 tbsp) agave nectar, (or water for strict keto)
  • 1 (1 ) Egg
  • 2 tablespoons (2 tablespoons) Water

Add Dry Ingredients

  • 2.5 cup (280 g) Superfine Almond Flour
  • 1/3 cup (0.33 g) Truvvia, or 1/2 cup sugar
  • 2 tsp (2 tsp) ground ginger
  • 1 tsp (1 tsp) Ground Cinnamon
  • ½ tsp (0.5 tsp) Ground Nutmeg
  • 1 tsp (1 tsp) Baking Soda
  • ¼ tsp (0.25 tsp) Salt

Instructions

  • Preheat the oven to 350F.
  • Line a cookie sheet with parchment paper and set aside.
  • Using a hand blender, cream together the butter, agave nectar, egg, and water.
  • To this mixture, add all the dry ingredients and mix well on low speed.
  • Roll into 2 teaspoon balls and arrange on a baking tray with parchment paper. They don’t really spread too much but leave a little room between them.
  • Bake for 12-15 minutes until the tops have lightly browned.
  • Once cooled, store in an air-tight container. For like, the one hour these cookies will be around before you eat them all.
  • This recipe yeilds a total of 18 cookies. The nutritional info is per a cookie.
  • This Ginger Cookie Recipe will keep in an airtight container for about 2-3 weeks.

Nutritional Information

Calories: 122 kcal , Carbohydrates: 5 g , Protein: 3g , Fat: 10g , Saturated Fat: 2g , Fiber: 1g , Sugar: 2g

Classic Pineapple Upside-Down Cake

This pineapple upside-down cake is a classic recipe that never goes out of style! It’s delicious with the traditional pineapple, but try it with peaches or a combination of cranberries and orange.

Classic Pineapple Upside-Down Cake 1

Makes 9 servings

Prep: 20 min
Bake: 30 min. + standing
Total Time 50 min

Ingredients

  • 1/3 cup butter, melted
  • 2/3 cup packed brown sugar
  • 1 can (20 ounces) sliced pineapple
  • 1/2 cup chopped pecans
  • 3 large eggs, separated
  • 1 cup sugar
  • 1 teaspoon vanilla extract
  • 1 cup all-purpose flour
  • 1 teaspoon baking powder
  • 1/4 teaspoon salt
  • 9 maraschino cherries
  • Whipped topping, optional

Directions

  • Preheat oven to 375°. In an ungreased 9-in. square baking pan, combine butter and brown sugar. Drain pineapple, reserving 1/3 cup juice. Arrange 9 pineapple slices in a single layer over sugar (refrigerate any remaining slices for another use). Sprinkle pecans over pineapple; set aside.
  • In a large bowl, beat egg yolks until thick and lemon-colored. Gradually add sugar, beating well. Blend in vanilla and reserved pineapple juice. Combine flour, baking powder and salt; add to batter, beating well.
  • In a small bowl with clean beaters, beat egg whites on high speed until stiff peaks form; fold into batter. Spoon into pan.
  • Bake 30-35 minutes or until a toothpick inserted in center comes out clean. Let stand 10 minutes before inverting onto serving plate. Place a cherry in the center of each pineapple slice. If desired, serve with whipped topping.

Peach Upside-Down Cake: Omit the pineapple, pecans and cherries. Drain 1 can (15 ounces) sliced peaches, reserving 1/3 cup juice. Arrange peaches over brown sugar. Substitute reserved peach juice for the pineapple juice. Cranberry Orange Upside-Down Cake: Omit the pineapple, pecans and cherries. Sprinkle 1 cup halved fresh or frozen cranberries and 1 chopped peeled orange over brown sugar. Substitute 1/3 cup orange juice for the pineapple juice.

NUTRITIONAL INFORMATION

1 piece: 361 calories, 13g fat (5g saturated fat), 88mg cholesterol, 193mg sodium, 58g carbohydrate (46g sugars, 2g fiber), 4g protein.

The Best Homemade Biscuits

These best homemade biscuits are flaky,soft and the preparation time is about 15 minutes.These biscuits are made from scratch and are a good choice to have them in breakfast.

the best homemade biscuits

Almost every weekend I whip up a batch of these easy homemade biscuits. It’s by far my favorite biscuit recipe and since it’s so easy, we make them all the time.

There is nothing quite like a warm, buttery, flaky biscuit straight from the oven that you can slather with butter and jelly, make into a biscuit breakfast sandwich. A biscuit recipe this easy, it’s just as easy to make biscuits from scratch.

 The biscuits rise up nice and fluffy and the copious amounts of butter ensure a tender, delicious biscuit each and every time.

What Ingredients Do I Need for Homemade Biscuits

Not a whole lot! And I’m pretty sure you have most, if not all, of these on hand in your kitchens store. The one ingredient you may see in this list that could be a little unfamiliar is the cream of tartar. I love it in biscuits but if you don’t have it on hand, please, don’t let that stop you from making this biscuit recipe. Go ahead and omit it from the recipe.

If you want to omit the eggs and make these biscuits without eggs then go ahead and make these biscuits without eggs.

Ingredients

  • all-purpose flour
  • sugar
  • salt
  • baking powder
  • cream of tartar
  • cold butter
  • egg
  • milk

Tips for Making Biscuits

  • The secret to excellent biscuits is COLD BUTTER. Really cold. Many times the biscuit dough gets worked so much that the butter softens before the biscuits even go in the oven. You want to handle the dough as little as possible because we want that butter to stay cold.
the best homemade biscuits 2
  • I use two methods tor incorporate the butter into the flour mixture.
  • One is to cut the butter into small pieces, refrigerate or freeze until ready to use, and then use a pastry cutter to cut the butter into the mixture when ready.
  • The second is grating frozen butter with a box grater and then stirring it into the flour mixture.
grating frozen butter
  • Both work great so use the method you prefer. Don’t go too crazy here – you want to see small, pea-sized pieces of butter throughout the dough.
  • To keep the butter from melting at all, use a cold egg and cold milk as well.
  • The dough is going to be sticky so you want to generously flour the surface before turning your dough out onto it. I also sprinkle some flour on top before working with the dough.
dough for biscuits
dough for biscuits
  • You can either use your hands to pat the dough out, or, if you prefer, use a rolling pin to very gently roll the dough out. I always just use my hands because at this point, they’re already a mess. If the dough is sticky, just sprinkle on additional flour, about a tablespoon at a time.

Can I Use Buttermilk in this Biscuit Recipe?

Yes, you absolutely can and we frequently do. Since buttermilk is thicker than regular milk, you will need slightly more to get the dough to the right consistency. Start with one and one-quarter cup and add more as needed.

To get a nice, tall biscuit, I like to pat the dough out to 3/4 to 1 inch thickness and cut with a biscuit cutter. I ended up with nine this time but depending on who is snacking on biscuit dough, I can get up to 12 biscuits.

snacking up biscuits

Baking the biscuits is super quick – just about 10 minutes is all you need. I like to bake my biscuits on parchment paper but if you don’t have that on hand, lightly grease your baking sheet.

baking the biscuits
baking the biscuits

To add some extra taste, brush the tops of the biscuits with melted butter…

brushing top of the biscuits

And serve with jams and jellies for a delicious treat.

adding jam or jellies

What You’ll Need to Make Biscuits

  • A baking sheet that can handle the size of the scones.
  • Biscuit cutter so you get nice evenly sized biscuits.
  • Parchment paper makes removal of these biscuits painless and ensures they come off in one piece.
  • A pastry cutter makes quick work of cutting the butter into the flour. Two knives or forks will also work or you can use a box grater.
  • A pastry brush to brush on melted butter when the biscuits are hot from the oven.

Perfect Homemade Biscuits

These easy, homemade biscuits are soft, fluffy, made completely from scratch and can be on your table in about 15 minutes! A weekend staple in our house! 

Servings  12 

Prep Time

5 minutes

Cook Time

10 minutes 

Total Time 

15 minutes

Course 

Breakfast

Cuisine 

American

Calories 

246  kcal 

Author Zeeshan

Ingredients

  • 3 cups all-purpose flour
  • 3 tbsp sugar
  • 1/2 tsp salt
  • 4 tsp baking powder
  • 1/2 tsp cream of tartar
  • 3/4 cup COLD butter
  • 1 egg
  • 1 cup whole milk

Instructions

  • Preheat oven to 450 degrees.
  • The secret to excellent biscuits is COLD BUTTER. Really cold. Many times the biscuit dough gets worked so much that the butter softens before the biscuits even go in the oven. Try cutting the butter into small pieces and stick back in the fridge pulling out only when ready to incorporate into the dough.
  • Combine the dry ingredients in a large bowl. 
  • Use a pastry cutter to cut cold butter into flour mixture. Don’t go too crazy here – you want to see small, pea-sized pieces of butter throughout the dough. 
  • Add in the milk and egg and mix just until the ingredients are combined. The dough will be sticky but don’t keep working it. You should be able to see the butter pieces in the dough.
  • Turn the dough out onto a generously floured surface. Sprinkle some flour on to the top of dough so it won’t stick to your fingers and knead 10-15 times. If the dough is super sticky just sprinkle on some additional flour.
  • Pat the dough out to 3/4 – 1 inch thickness and cut with a biscuit cutter or glass. I ended up with nine this time but depending on who is snacking on biscuit dough, I can get up to 12 biscuits. 
  • Place the biscuits on a lightly greased baking sheet or parchment lined baking sheet and bake for 10 to 15 minutes or until golden brown on top.
  • For extra yumminess, brush the tops of the biscuits with melted butter…

Nutritional Information

Calories: 246kcal | Carbohydrates: 28g | Protein: 4g | Fat: 12g | Saturated Fat: 7g | Cholesterol: 46mg | Sodium: 214mg | Potassium: 257mg | Sugar: 4g | Vitamin A: 405IU | Calcium: 105mg | Iron: 1.7mg

How To Make Paneer Paratha Step By Step

Paneer paratha is a flat bread stuffed with crumbled cottage cheese and spices usually served with breakfast with plain yogurt and pickle.It belongs to Indian cuisine.It is made in a dhaba style brunch and grated cheese is used in the preparation of this paratha to make it special.

Paneer Paratha
Paneer Paratha

Recipe

Ingredients For The Dough Of Paneer Paratha

1 teaspoon ghee or oil

2 cups of wheat flour

1 cup+ 4 tablespoon extra water

1/2 teaspoon salt

Ingredients For Stuffing Of Paneer Paratha

1/2 teaspoon red chili powder

1 cup (grated or crumbled) paneer

1/2 teaspoon cumin powder

1/2 teaspoon garam masala powder

3 small (finely minced) green chili

1/4 cup Coriander leaves (finely chopped)

1/4 teaspoon salt

Method

For Making The Dough- Combine salt, ghee or oil, and wheat flour and mix well.Slowly add water little by little to make a soft pilable dough.The dough should be non sticky, firm and soft.Cover the dough and keep it aside.Cover it with a cloth or plate and rest it for atleast 30 minutes.

For Making The Stuffing

Combine red chili powder, grated paneer,garam masala powder,cumin powder,chopped green chili,salt and coriander leaves.Mix them well to combine.

For Making The Paratha

Knead the resting dough and combine it into 8 equal portions.Divide the crumbled paneer mixture into 8 equal portions and make their small balls by rolling them and keep them aside.Rool out each dough like small pooris and place one paneer ball in the center, gather the dough around it as shown in the pic below-seal flatten the dough with your hands and press.Dust some flour and roll it out gently with the stuffing.Turn on the flame under the tawa and heat it then place the paratha and cook it for few seconds.Then flip the paratha and drizzle the ghee or oil and cook the paratha till both sides of the paratha get brown colour.Apply this procedure on the rest of the paratha dough.Serve hot with tawa chicken,plain yogurt or pickle.

Making of Paneer paratha
Making of paneer paratha 2
Making of p paratha 3
making of paneer paratha 4
making of paneer paratha 5
making of pa pa 6
making of pa pa 6
making of pa pa 7
making of pa pa 7
making of pa pa 8
making of pa pa 8
making of pa pa 9
making of pa pa 9
making of pa pa 10
making of pa pa 10
making of pa pa 12
making of pa pa 12
making of pa pa 13
making of pa pa13
making of pa pa14
making of pa pa 14
making of pa pa 15
making of pa pa 15
making of pa pa 16
making of pa pa 16

Notes

The Above Measures makes 8 parathas.

If you are using freshly made paneer to make this paratha the drain all the water from the paneer and then use it.If you are using the frozen paneer than put the paneer on a frozen towel to drain the excess water.

To make the parathas make sure that the dough is firm and soft.

Make the parathas thick by rolling because thin parathas will not hold the stuffing and also thin parathas will become very stiff and will turn hard after sometimes.

Cook the parathas on a medium high flame.

You can use maida/flour for dusting and rolling the paratha because it does not makes tha parathas dark brown.If you are using the wheat flour for dusting than wipe with a cloth after making each paratha.

for every cup of wheat flour its about 1/2 cup of water with 1 teaspoon oil.So for 2 cups wheat flour it takes 1 cup of water with some extra tablespoons of water.As it is a stuffed paratha you can use 2 teaspoons oil or ghee if you want to.

How To Make Bakery Cake Rusk At Home

These cake rusk are crunchy, crispy,sweet and delicious teatime treats.They are very easy to make and are cheaper, healthier and delicious then the cake rusks which you purchase from the top brand bakeries and 5 star hotels plus you will be making them by yourself at home so you know what ingredients you are using to make these cakes.

On the other hand you don’t know what ingredients are in the cake rusks which you bought from the bakeries or even 5 star hotels.

Cake Rusk
Cake Rusk

Rusk

Rusks are very famous in India and Pakistan and people especially children like to have the rusks because they are sweet and delicious.

How To Make The Cake Rusk

After making the cake (recipe given below) from which you will make cake rusk by cutting in small pieces and believe me they will be perfect and delicious.

How To Eat Cake Rusk

Cake rusks are hard biscuits and they are best dunked in liquids like coffee,milk or the drink which is drunk by majority of peoples in especially India, Pakistan, Bangladesh etc.I personally like cake rusks very much and I used to buy them from the bakery but now I prefer to make them at home because cake rusks from the market are very expensive and their way of making in the bakeries is not healthy and the ingredients they use are also harmful for human health.

Step By Step Instructions On How To Make Cake Rusk

1 .Preheat the oven to 350 degrees F/ 180 degrees C.position a rack in the middle of the oven.Grease a 7×7- inch square pan or 9×5- inch loaf pan with little butter and dust with flour to coat the pan, or the parchment paper can be used.

Baking Tray Cake Rusk 1

2 .Sieve flour,baking powder and baking soda in a medium mixing bowl.Add salt and whisk the dry ingredients and step aside.

Mixing Bowl cake rusk 2

3 .Take your stand mixer and in the bowl of your stand mixer fitted with the paddle attachment beat the butter and sugar on a medium high speed until light and creamy.This scraping down in between should take 2-3 minutes or you can use an electric hand mixer.

stand mixer fitted with paddle cake rusk 3

4 .Next add in the yogurt beating on medium high speed.

Yogurt beating cake rusk

5 .Then add the vanilla extract/ cardamom powder next.Beat for another 30 seconds on a medium speed.

Adding vanilla extract cake rusk

6 .Now reduce to a lowest possible speed.Alternately add the dry ingredients and milk starting with flour and ending with flour.(do not over mix)

mixing ingredients
mixing ingredients

7 .In a baking pan transfer the batter.To remove the air bubbles top it on the counter 2-3 times.Bake it on the middle rack of the oven for 40-45 minutes or until the toothpick inserted in the cake comes out clean.

Transferring batter into a baking pan

8 .Cool the cake in the tray for 15 minutes and then remove it from the tray and place it on the rack and let it cool completely atleast for 1 hour.If you try slicing it when it is hot it will be crumbly as it is a soft cake.

 step 8
step 8

9 .Preheat the oven at 350 degrees F/ 180 degrees C.Once completely cool cut the cake from the centre and then start cutting 1/2 inch pieces from there on.

pre heat oven
pre heat oven 

10 .Place the slices on a baking tray with parchment paper.Bake for 20-25 minutes or until light golden brown.

Placing slices on a baking tray

11 . Remove the tray from the oven and flip the slices and then bake for another 20-25 minutes.

12 .Transfer to a wire rack and and let it cool completely.Store them in an air tight container when they are completely cool.

step 12
step 12
Preparation time
15 minutes
Cooking time
1 hour 10 minutes
Total time
1 hour 25 minutes

Serving

6 peoples

Author

Zeeshan

Recipe

Ingredients

Measuring cup used : 1 cup=250 ml, 1 tsp = 5ml

1 & 1/2 cups/7.5 oz/214 grams all purpose flour spooned and leveled.

1 cup/210 gram granuled sugar

1 & 1/2 cups/7.5 oz/214 grams all purpose flour spooned and leveled.

1 cup/210 gram granuled sugar

1/2 cup/4 oz/113 gram butter unsalted butter

4 oz/12 non sour yogurt

1/2 cup milk

1 & 1/2 teaspoon baking powder.

1/4 teaspoon baking soda

1/4 teaspoon salt skip if using salted butter.

1 tsp vanilla extract or 1/4 tsp cardamom powder.

Method

1 .Preheat oven to 350 degrees F/180 degrees C.In the middle of the oven position a rack.Grease 7×7- inch square pan or 9×5-inch pan with little butter and dust with flour to coat the pan, or parchment paper can be used.

2 .In a medium mixing bowl sieve baking powder, flour and baking soda.Add salt and mix dry ingredients until well combined.Set aside.

3 .Take your stand mixer and in the bowl of your stand mixer fitted with the paddle attachment beat the butter and sugar on a medium high speed until light and creamy.This scraping down in between should take 2-3 minutes or you can use an electric hand mixer.

4 .Next add in the yogurt beating on medium high speed.

5 .Then add the vanilla extract/ cardamom powder next.Beat for another 30 seconds on a medium speed.

6 .Now reduce to a lowest possible speed.Alternately add the dry ingredients and milk starting with flour and ending with flour.(do not over mix)

7 .In a baking pan transfer the batter.To remove the air bubbles top it on the counter 2-3 times.Bake it on the middle rack of the oven for 40-45 minutes or until the toothpick inserted in the cake comes out clean.

8 .Cool the cake in the tray for 15 minutes and then remove it from the tray and place it on the rack and let it cool completely atleast for 1 hour.If you try slicing it when it is hot it will be crumbly as it is a soft cake.

9 .Preheat the oven at 350 degrees F/ 180 degrees C.Once completely cool cut the cake from the centre and then start cutting 1/2 inch pieces from there on.

10 .Place the slices on a baking tray with parchment paper.Bake for 20-25 minutes or until light golden brown.

11 . Remove the tray from the oven and flip the slices and then bake for another 20-25 minutes.

12 .Transfer to a wire rack and and let it cool completely.Store them in an air tight container when they are completely cool.

Peanut Butter Chocolate Chunk Cookies

I love the taste of peanut butter and this is the first time I am adding chocolate to the peanut butter to make cookies which are peanut butter chocolate chunk cookies and it gives the great texture and flavor to the basic chocolate but I am afraid how it taste because the peanut butter taste is too strong and I had some doubts about the flavor of the biscuits but it tastes so great.The taste is not overwhelming but it combines so well with the chocolate.

I am pretty much sure that our readers will enjoy the taste of the biscuits especially the kids would love to have these biscuits.

Peanut Butter Chocolate Chunk Cookies

Nutritional Facts Of Peanut Butter Chocolate Chunk Cookies

1 cookie contains –calories: 121, fat 6.9 g, saturated fat 2.7 g, carbohydrates: 13.7 g, fiber: 0.9 g, sugar :8.4 g, cholesterol: 14 mg, protein :2.9g; calories from fat 62, sodium 83 mg, potassium 79 mg, vitamin A 1%, iron 6%, calcium 1%, vitamin c 0%, nutrition grade C

Daily percent values are based on a 2000 calorie diet.

Ingredients

140 g or 10 tbsp of unsalted softened butter

50 g or 1/4 cup of granules sugar

135 g or 2/3 cup of firmly packed light or dark

140 g or 1/2 cup creamy peanut butter

1 large egg

1 large egg yolk

Vanilla extract 1/2 teaspoon

1½ cups all purpose flour or 185 g

1 tablespoon cornstarch (cornflour)

3/4 teaspoon baking soda

3/4 teaspoon salt

Milk chocolate 8 oz coarsely chopped (use 5 bars of chocolate)

Method

1. Combine butter,sugar and peanut butter in a large pot and use an electric mixer or standard mixer to beat until it becomes creamy and well combined.

2. Add egg yolk, egg and vanilla extract and stir well.

3. In a separate medium size bowl whisk together baking soda, cornstarch, flour and salt.

4. Stir flour mixture into peanut butter mixture gradually with mixture on low speed. Pausing occasionally to scrape down the sides of bowl.

5. Stir in chocolate pieces by the help of spatula.

6. Cover cookie dough with plastic wrap and transfer to refrigerator.Chill it for at least 30 minutes.

7. Preheat oven at 350°F/175°C.Line cookie sheets with parchment paper and set it aside.

8. Once oven has preheated and cookie dough has chilled remove dough from fridge and scoop cookie dough into roughly 1½ tablespoon-sized balls.Roll into balls between your palms if desired and then place onto prepared cookie sheets.

9. Place cookies at least 1½ inch apart on prepared baking sheets and bake for about 12 minutes

10. Allow cookies to cool completely on baking sheets before serving.

How To Make A Delicious Ratafia

Introduction To Ratafia

Ratafia is a delicious confectionery item which is easy to make and the methods and techniques given in this recipe will make a delicious ratafia which you can serve to your guests as a biscuit item which they will surely appreciate.

Ratafia
Ratafia

How To Make A Delicious Ratafia

Cooking Time

20 minutes

Makes

12-18 biscuits

Ingredients 

(1 )Egg whites 2 or 2 in American

(2) Almond or ratafia essence (extract)   few drops or few drops in American

(3) Ground almonds 150 g/5 oz or 1¼ cups in American

(4) caster sugar 175 g/6 oz or 3/4 cup in American

(5) Rice flour or cornflour (cornstarch),   1 teaspoon or 1 teaspoon in American

(6) Rice paper

(7) To decorate:

glace candied (cherries),see method below

almonds blanched see method below

Whisk the egg whites until just frothy.Do not over whisk.Add the essence then blend in the ground almonds and sugar.You should be able the handle the mixture ;if it is a little stiff add a few drops of water,if too moist add a teaspoon of rice flour or cornflour(cornstarch) or a little more grounds almonds.

Place the sheet of rice paper on ungreased baking trays.Form the mixture into balls The ingredients given will make 18 medium sized macaroons or about 12 of average size.Put the biscuits onto the rice paper ,allowing room for the balls to flatten.Top with pieces of glace. (candied) cherry or whole or flaked almonds,the size depends on the size of the macaroons.

Bake in the center of the moderate oven 180°C/350°F Gas Mark 4,for 20 minutes or until pale golden and firm.If you like sticky macaroons place the bowl of water in the oven or on a shelf below the biscuits.Cool sufficiently to handle then cut around the rice paper .Macaroons are better freshly eaten ;they do harden with keeping which is quite satisfactory for ratafias. Make 48 to 60 minutes miniature balls of the macaroon mixture and bake for 10 minutes only.These can be stored for months