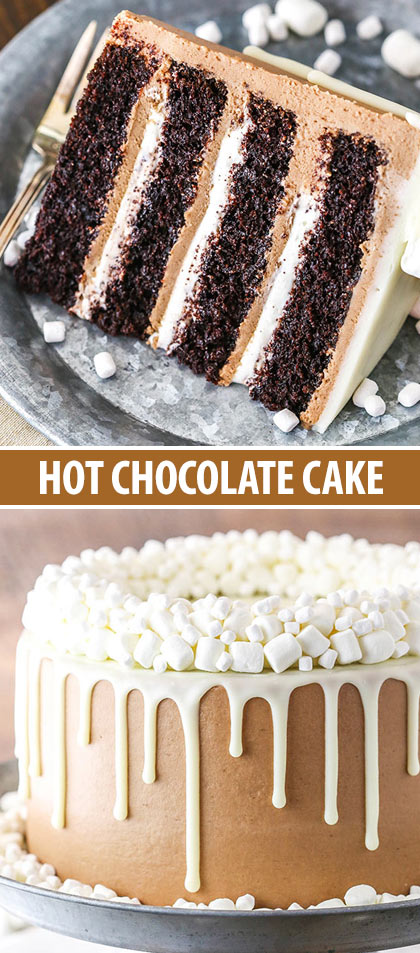
This Hot Chocolate Cake is a moist chocolate cake, hot chocolate buttercream frosting and marshmallow filling! The combination is wonderfully decadent and addicting!
HOT CHOCOLATE CAKE
Hot chocolate just feels very holiday-y to me, but it’s obviously perfect for any cold weather.
And I’m a big hot chocolate fan. Have you ever tried it with Baileys in it? It’s amazing. And the more marshmallows the better.
HOW TO MAKE A HOT CHOCOLATE CAKE
Since hot chocolate isn’t going to be strong enough on it’s own to give a cake a full on chocolate flavor, the cake has to use both cocoa powder and hot chocolate. Otherwise you’d have a vanilla cake with a smidge of chocolate flavor. Not what we want.
Not only is the chocolate make amazing (if you haven’t tried it yet, you have to), but the frosting is SO good! It’s made with four whole packets of hot chocolate (assuming you use the individual packets for a cup of hot chocolate), but it’s dissolved in a small amount of milk, so you get loads of hot chocolate flavor without thinning out your buttercream. Sweet!
FLUFFY MARSHMALLOW FROSTING
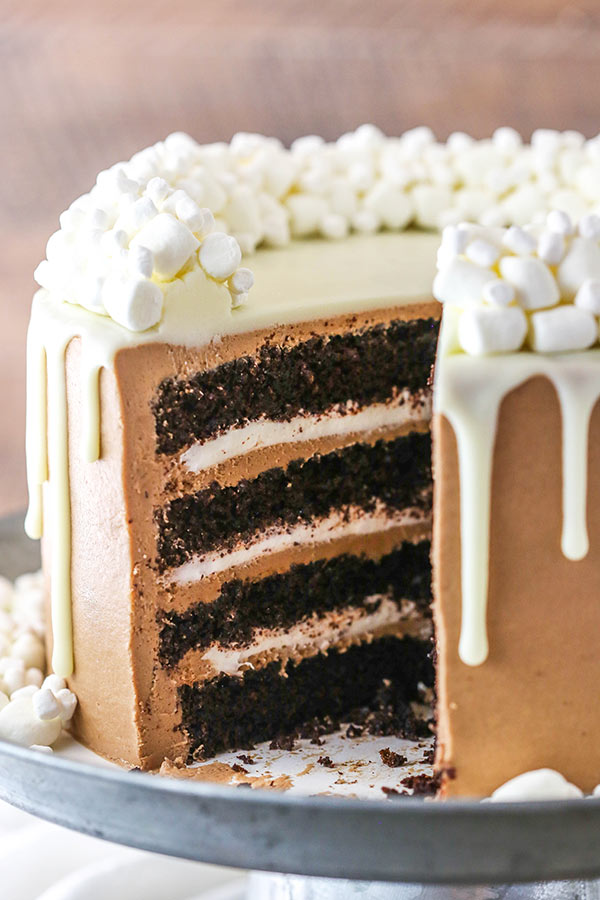
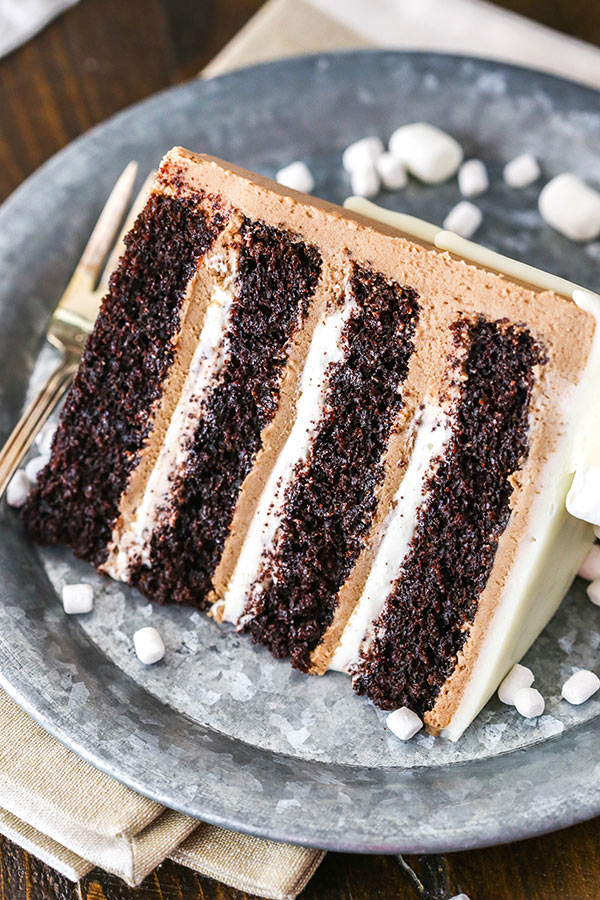
The only thing that could make this cake better is a wonderful marshmallow filling. I used a marshmallow frosting made with just three ingredients – butter, powdered sugar and marshmallow cream. And since more marshmallows are better, I used almost a full container and a half of cream. I also made sure that this cake had three layers of filling. Not one, not two, but three.
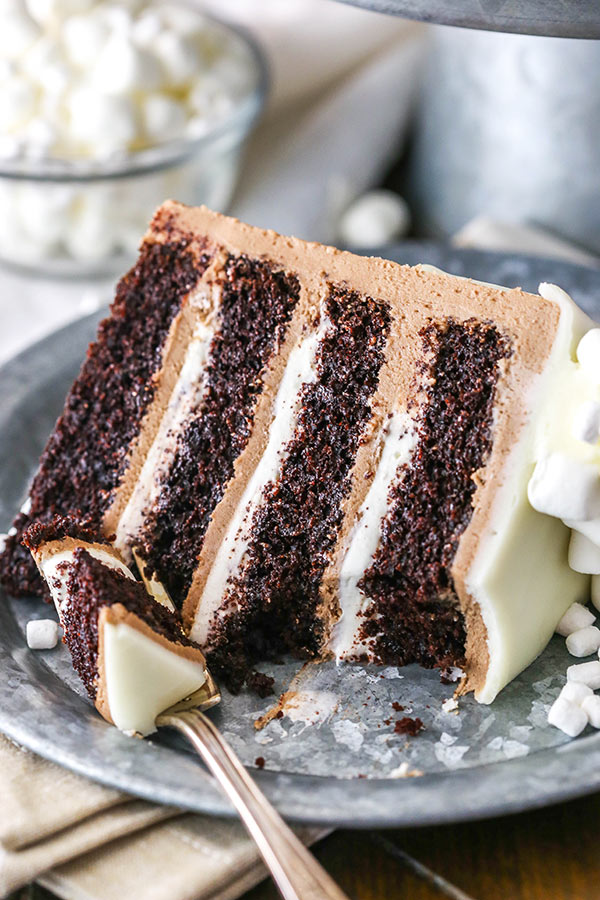
The trick with this cake is layering everything. The marshmallow filling is on the softer side when at room temperature, so you will want to refrigerate the cake for about an hour after you torte and fill it – prior to frosting the full cake and decorating it. You might be able to get by without that step, but you’ll have to be really careful, since the layers slip around a bit. So do yourself a favor, and refrigerate it – it’ll be much easier to work with and it won’t budge again.
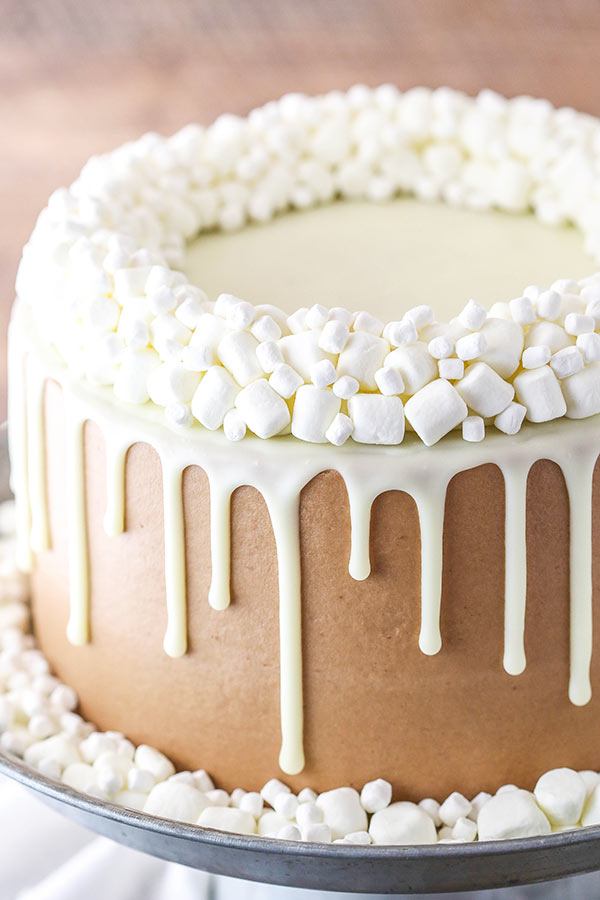
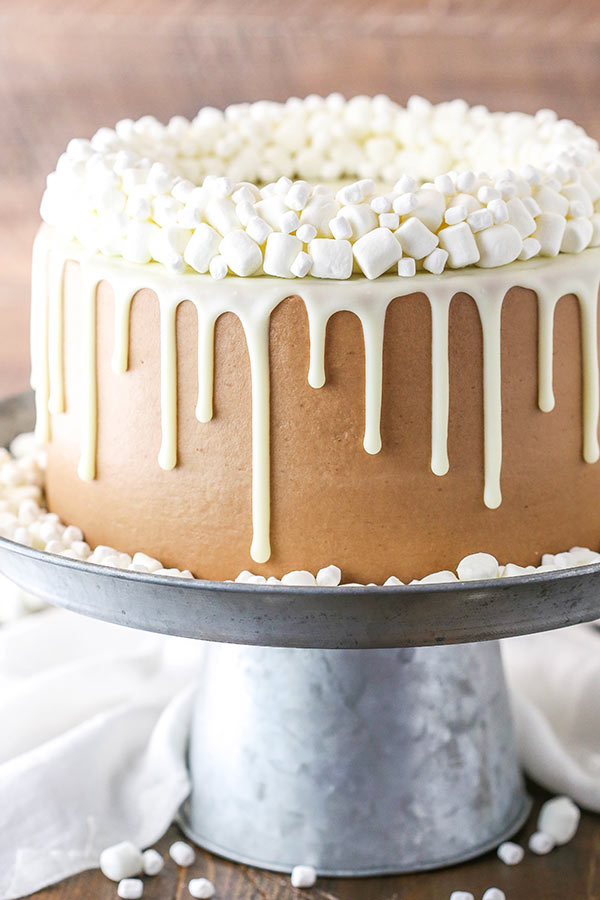
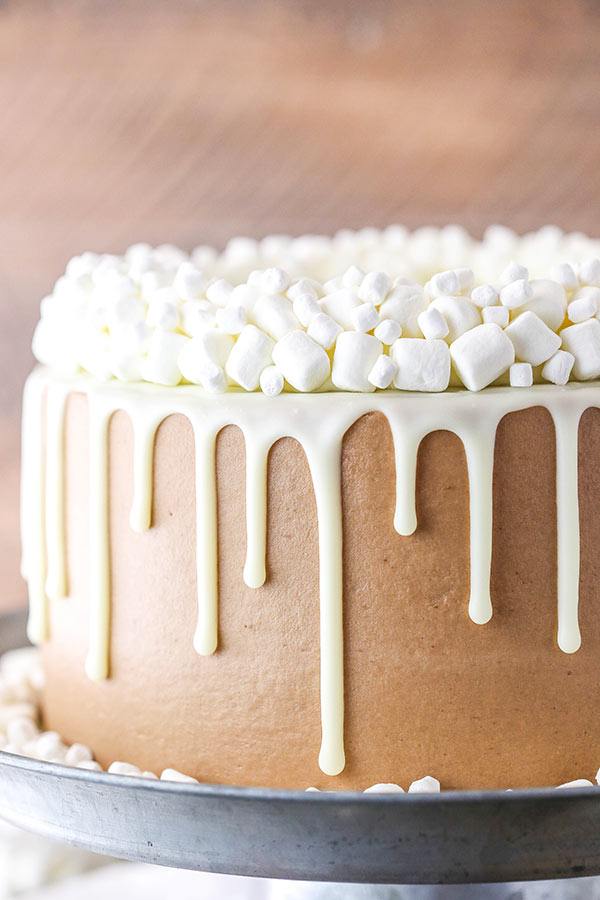
Once the cake is frosted, I added a white chocolate drip and a ring of marshmallows on top. I was torn between a white chocolate and regular chocolate drip. Both would have been so fun. But ultimately, since hot chocolate is covered with white marshmallows, I went white.
To help give yourself full coverage with the marshmallows, it’s helpful to have both mini marshmallows and marshmallow bits, which can fill in gaps and small spaces really well. It also gives a little size variety, which looks a little more interesting.
BEST HOT CHOCOLATE CAKE
The final result of this Hot Chocolate Cake is one amazing dessert! The combination of moist chocolate cake, smooth hot chocolate frosting and fluffy marshmallow filling is amaizing.SO yummy and such a fun cake!
HOT CHOCOLATE CAKE
This Hot Chocolate Cake is a moist chocolate cake, hot chocolate buttercream frosting and marshmallow filling! The combination is wonderfully decadent and addicting!
- Author: Zeeshan
- Prep Time: 2 hours 15 minutes
- Cook Time: 50 minutes
- Total Time: 3 hours 5 minutes
- Yield: 12-14 slices 1x
- Category: Cake
- Method: Oven
- Cuisine: American
Ingredients
CHOCOLATE CAKE
2 cups (260g) flour
2 cups (414g) sugar
3/4 cup (85g) natural unsweetened cocoa powder
2 tsp baking soda
1 tsp salt
2 large eggs
1 cup (240ml) milk
1 cup (240ml) vegetable oil
1 1/2 tsp vanilla
1 cup (240ml) hot water
HOT CHOCOLATE BUTTERCREAM FROSTING
4 tbsp (60ml) hot water/milk
2.92 oz hot chocolate powder mix*
1 1/2 cups (336g) unsalted butter, room temperature
1 1/4 cup (237g) shortening
10 cups (1150g) powdered sugar
2 tbsp (14g) natural unsweetened cocoa powder
1–2 tbsp water or milk
MARSHMALLOW FILLING
1/2 cup (112g) unsalted butter, room temperature
1 cup (115g) powdered sugar
10 oz marshmallow creme
WHITE CHOCOLATE GANACHE
6 oz (1 cup) white chocolate chips
3 tbsp (45ml) heavy whipping cream
Mini marshmallows
Marshmallow bits
VANILLA BUTTERCREAM, OPTIONAL
1/2 cup (112 g) unsalted butter, room temperature
2 cups (230 g) powdered sugar
1/2 tsp vanilla extract
1–2 tbsp water/milk
INSTRUCTIONS
1. Prepare two 8 inch cake pans (see note below) with parchment paper circles in the bottom, and grease the sides. Preheat oven to 300°F (148°C).
2. To make the chocolate cake, add the dry ingredients to a large bowl and whisk together.
3. Add the eggs, milk, oil and vanilla extract to the dry ingredients and mix until well combined.
4. Add the hot water and mix until well combined.
5. Divide the batter evenly between the cakes pans and bake for 45-50 minutes, or until a toothpick comes out with a few crumbs.
6. Remove cakes from oven and allow to cool for 2-3 minutes, then remove to cooling racks to cool completely.
7. To make the hot chocolate frosting, dissolve the hot chocolate powder into the hot water or milk. It’ll be fairly thick. Set aside.
8. Add the butter and shortening to a large mixer bowl and beat until smooth.
9. Add about half of the powdered sugar and mix until well combined and smooth.
10. Add the hot chocolate mixture and cocoa powder and mix until well combined and smooth.
11. Add the remaining powdered sugar and mix until well combined and smooth.
12. Add additional water or milk as needed to get the right consistency.
13. To make the marshmallow filling, add the butter to a mixer bowl and beat until smooth.
14. Add the powdered sugar and beat until well combined and smooth. It’ll take a bit for it all to fully incorporate, so scrape down the sides of the bowl as needed and keep mixing.
15. Stir in the marshmallow cream. Set filling aside.
16. When you are ready to build the cake, remove cake domes from top with a large serrated knife, if needed. Divide each cake into two layers, so you have four total layers.
17. Place the first layer of cake on cake plate or cardboard cake circle. Add half a cup of hot chocolate frosting and spread into an even layer.
18. Pipe a dam around the outer edge of the cake, then fill it with about 3/4 cup of marshmallow filling. Spread into an even layer.
19. Place the second layer of cake on top and add another layer of hot chocolate frosting and marshmallow filling.
20. Repeat with the third layer of cake and filling, then top the cake with the final layer.
21. Spread a light crumb coat around the sides of the cake, then refrigerate for about an hour to let the filling firm up a bit. The layers will slip around a bit if you skip this step.
22. After refrigerating, frost the outside of the cake. Feel free to use my tutorial for frosting a smooth cake with buttercream.
23. To make the white chocolate ganache, add the white chocolate chips to a medium sized bowl. Heat the cream just until it begins to boil, then pour over the white chocolate.
24. Whisk the chocolate mixture so that it begins to melt. Heat for another 10 seconds and whisk to continue melting. If needed heat another 10 seconds.
25. Drizzle the white chocolate around the top edge of the cake. I like to use a squeeze bottle, but you can also use a spoon or any other method.
26. Fill in the top of the cake with the ganache and spread evenly.
27. To create the ring of marshmallows, make the vanilla buttercream. Add the butter to a mixer bowl and beat until smooth.
28. Add half of the powdered sugar and beat until smooth.
29. Add a tablespoon of water or milk and the vanilla extract and beat until smooth.
30. Add the remaining powdered sugar and beat until smooth. Add additional water or milk, if needed for the right consistency.
31. Pipe a ring of the vanilla buttercream around the top edge of the cake, then add mini marshmallows and marshmallow bits.
32. Refrigerate cake until ready to serve. Cake is best served after letting it sit out for a few hours to come closer to room temperature. Cake is best when stored well covered for 2-3 days.
NOTES
1. For the hot chocolate powder mix, I used four 0.73 individual packets of hot chocolate powder. If you have one large container of hot chocolate powder, it would be about 20 tablespoons.
2. These two cakes are fairly tall once baked, so they will completely fill an 8×2 inch cake pan. If you have 8×3 inch pans, those would be ideal.
Keywords: hot chocolate cake, chocolate cake recipe, easy chocolate cake, marshmallow frosting, hot chocolate dessert, best chocolate dessert ideas, best chocolate dessert recipe