CUPCAKES

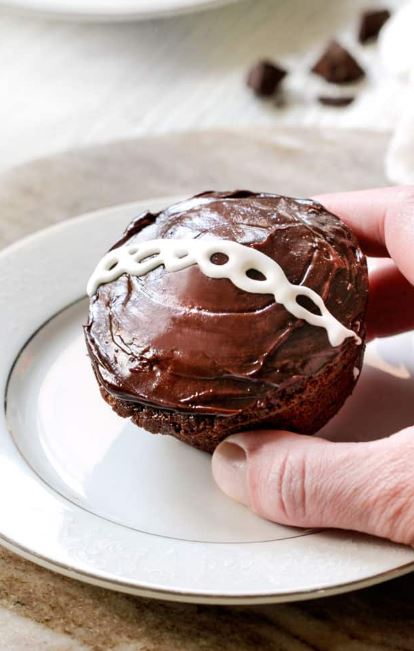
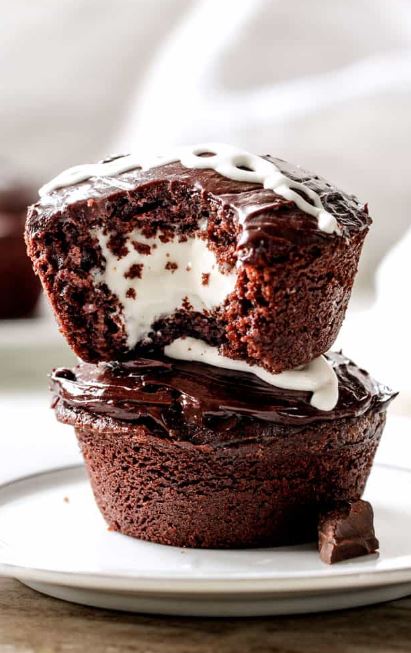
Ding Dong Cupcakes are rich, moist and chocolaty stuffed with creamy marshmallow filling and smothered in a silky chocolate ganache!  You will never want to buy Ding Dongs from the store again!  

CUPCAKES 2
CUPCAKES 2

These Ding Dong Cupcakes start with a rich, moist, chocolaty cupcake that is double infused with chocolate from cocoa powder and melted chocolate chips.  The cupcakes are so moist that you can’t use a pastry bag to pump the filling right into the center (a very good sign).  Instead, you cut the center out to make room for your creamy marshmallow filling that is a delectable mixture of marshmallow creme, butter and some gelatin to help it set.  You might be tempted to leave out the gelatin but the filling sinks without it – with it, its perfectly creamy, perfectly delicious…

CUPCAKES 3
CUPCAKES 3

CUPCAKES 4
CUPCAKES 4

And perfectly ready for you to devour…And to become one of your new favorites year-round!

WANT TO TRY THESE HOMEMADE DING DONG CUPCAKES?

Prep Time

30 minutes

Cook Time

18 minutes

Servings 

cupcakes

INGREDIENTS

Cupcakes

  • 1 cup all-purpose flour
  • 1/2 teaspoon baking soda
  • 1/4 teaspoon salt
  • 1/2 cup boiling water
  • 1/2 cup unsweetened cocoa powder
  • 1/4 cup semisweet chocolate chips
  • 1/2 cup granulated sugar
  • 1/3 cup brown sugar
  • 1/2 cup Vegetable oil
  • 2 large eggs
  • 1 teaspoon vanilla extract
  • 1/2 cup sour cream

INSTRUCTIONS

1. CUPCAKES: Preheat oven to 325 degrees F. Grease and flour (or use nonstick cooking spray with flour) a12-cup muffin tin.

2.Combine flour, baking soda, and salt in medium bowl. Set aside.

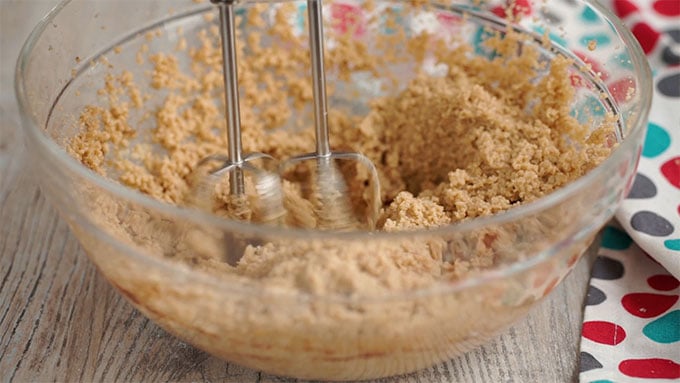
3.In a separate large bowl, whisk together water, cocoa, and chocolate chips together until smooth. Add sugar, oil, eggs, and vanilla and mix until combined. Whisk in flour mixture alternating with sour cream until incorporated.

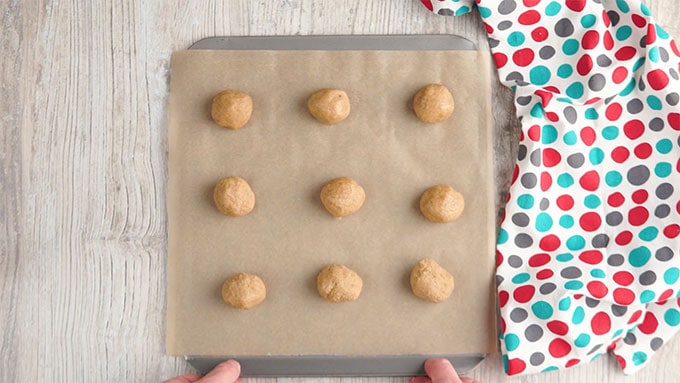
4.Divide batter evenly among greased muffin cups. Bake 18 to 22 minutes or until toothpick inserted in center comes out almost clean. Cool cupcakes in tin for 10 minutes, then turn out onto wire rack and cool completely.

5.FILLING: Meanwhile, combine water and gelatin in large bowl and let sit until gelatin softens, about 5 minutes then microwave until mixture is bubbling around edges and gelatin dissolves, about 30 seconds. Stir in butter, vanilla, and salt until combined. Let mixture cool until just warm to touch, about 5 minutes. When slightly cooled, whisk in marshmallow creme until smooth.

6.Refrigerate filling until set, about 30 minutes. Transfer 1/3 cup marshmallow mixture to pastry bag fitted with small plain tip (or to a plastic bag and snip the corner) and reserve remaining mixture for filling cupcakes.

7.CHOCOLATE GLAZE: Add heavy cream and butter to a large microwave safe bowl and heat for two minutes, stir to combine. Heat at 30 second intervals if butter is not completely melted at this point. Add chopped chocolate and stir until chocolate is melted and smooth then stir in corn syrup. Let cool to room temperature, about 10 minutes.

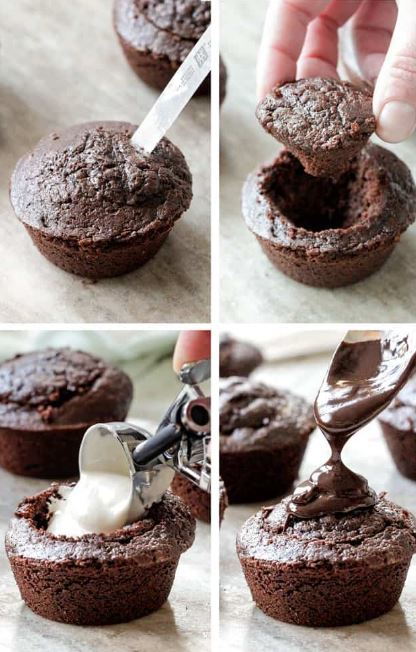
8.ASSEMBLE: Insert a knife at approximately 1/4 inch from the edge of each cupcake, and proceed to cut a cone shape. Remove cone and cut all but the circular top off (“top”) – or just eat the bottom of the cone. Using a spoon, fill each cupcake with the marshmallow filling then add “top.” Lightly frost with Chocolate Ganache Glaze. Let set then pipe reserved marshmallow filling in decorative pattern on top.

Easy Marinara Sauce

Marinara Sauce is an easy to make tomato sauce that is perfect to top your favorite pasta or to use in recipes calling for jarred pasta sauce.

A simple base of tomatoes (whole and crushed) with onions and garlic makes the best marinara sauce. This simple sauce takes less than 30  minutes and keeps for 5 days in the fridge and freezes well!

Once you start making this quick homemade tomato sauce, you’ll never buy jarred pasta sauce again! 

Easy Marinara Sauce
Easy Marinara Sauce

Homemade Marinara Sauce is incredibly easy to make! Juicy tomatoes are simmered with fresh herbs and aromatics to give you the best marinara sauce in just minutes.

WHAT IS MARINARA SAUCE?

Marinara Sauce is a simple tomato sauce with very few ingredients.  Generally tomatoes, aromatics (onion/garlic) and some seasonings.  It is amazing on pasta, served as a dipping sauce, or perfect replacement for jarred sauces in your recipes (we always use it in place of spaghetti sauce)!

You may be wondering, what is the difference between spaghetti sauce and marinara? The difference between the two is that marinara is simply tomatoes and seasonings while spaghetti sauce contains more ingredients such as meat or other vegetables. 

Easy Marinara Sauce 3

Tomatoes can be acidic (depending on the brand) and sometimes tart and adding shredded carrot to this recipe adds sweetness and replaces most of the sugar. Depending on what brand of tomatoes you use, you may need to add a little more or less sugar to your marinara sauce to help cut some of the acidity. If you’d prefer, you can add a bit of sugar and skip the carrot.

You can use fresh as well as canned tomatoes.Be sure to peel your tomatoes first.Whole tomatoes, squished by hand or by spoon have the best consistency. 

Easy Marinara Sauce 4

HOW TO MAKE MARINARA SAUCE

Marinara sauce is a flavorful and surprisingly easy dish to make in just 30 minutes!

  1. Finely dice onions and shred carrots and soften in a pan.
  2. Add your tomatoes and use a wooden spoon to gently break them apart.
  3. Simmer your marinara sauce for about 20 minutes, or until it is your desired consistency.

You want to make sure that your sauce is a little thinner if it is being used as a pasta sauce, as opposed to a little thicker if you are using it on a pizza or as a dip.

To store your marinara sauce, it will last about 5-7 days in the fridge in an airtight container. Alternatively, you can freeze it in single serving sizes for up to a year, and just defrost as needed!v

Easy Marinara Sauce

PREP TIME 

10 minutes

COOK TIME

 20 minutes

TOTAL TIME 

30 minutes

SERVINGS 

8 cups

COURSE 

Main Course

CUISINE 

Italian

AUTHOR Zeeshan

Marinara Sauce is an easy to make tomato sauce that is perfect to top your favorite pasta or to use in recipes calling for jarred pasta sauce.

Ingredients

  • 3 tablespoons olive oil
  • 1 cup onion finely diced
  • 1/3 cup carrot shredded
  • 3 garlic cloves minced
  • 1/4 cup fresh basil chopped
  • 1/2 teaspoon dried oregano
  • salt and pepper
  • 28 oz whole tomatoes canned
  • 28 oz crushed tomatoes canned
  • 2 tablespoons tomato paste
  • 1-2 teaspoons sugar (optional)
  • 1/2 cup water

Instructions

  1. In a large pot, heat olive oil over medium heat. Add onion, carrot and garlic. Cook until soft, about 5 minutes.
  2. Add whole tomatoes (with juice) and gently break apart with the spoon.  Stir in remaining ingredients.
  3. Simmer uncovered on low heat for 20 minutes or until sauce reaches desired consistency.
  4. Serve over spaghetti or enjoy in your favorite recipes. Freeze or refrigerate to store.

Recipe Notes

Sugar may be required depending on the brand of tomatoes you purchase.

NUTRITION INFORMATION Calories: 112, Fat: 5 g, Sodium: 310 mg, Potassium: 568 mg, Carbohydrates: 15 g, Fiber: 3 g, Sugar: 8 g, Protein: 2 g, Vitamin A: 1320%, Vitamin C: 21.5%, Calcium: 76%, Iron: 2.5%

(Nutrition information provided is an estimate and will vary based on cooking methods and brands of ingredients used.)

Stuffed Pepper Soup

Stuffed Pepper Soup is an inexpensive and delicious soup that will warm your belly from the inside out. A fun twist on traditional Stuffed Peppers, this soup has sausage and ground beef simmered in beef broth with peppers, and tomatoes. Add in rice and serve it hot!

This easy stuffed pepper soup recipe is a family favorite and it reheats beautifully!

Stuffed Pepper Soup 3

BEEF, TOMATOES & RICE

This easy Stuffed Pepper Soup is quick to make (and less prep work than traditional stuffed peppers) but still has tons of flavor! While many stuffed bell pepper recipes use only ground beef, I find the addition of sausage adds a lot of great flavor. Of course this recipe is perfect made with just ground beef (or even ground turkey if you’d prefer).

Stuffed Pepper Soup 4

PEPPERS FOR STUFFED PEPPER SOUP

Red and green peppers are used in this recipe but you can use whatever you have on hand. Red, yellow and orange peppers tend to be sweeter while a green peppers are a bit more zesty. If you prefer a Spicy Stuffed Pepper Soup, add in a minced jalapeno pepper with the bell peppers.  

Got leftover rice or beef? This stuffed pepper soup can be made with any leftover ingredients you might have on hand! Leftover rice, ground beef, ground sausage, leftover burgers or meatloaf or peppers that you need to use up can save you time (and money)! 

stuffed pepper soup 5

HOW TO MAKE STUFFED PEPPER SOUP

Stuffed pepper soup only takes about 35 minutes and can be made in just one pot with only a few minutes of prep! 

  1. Brown beef, onions, and garlic in a large pot. Drain.
  2. Add remaining ingredients (per recipe below) except rice and simmer 25 to 30 minutes.
  3. Finally, stir in the cooked rice and parsley and heat about 5 minutes.

TO MAKE IN SLOW COOKER

You can make stuffed pepper soup in the crock pot if you want to cook it while you’re out and about. Prep as directed and cook 3-4 hours on high or 5-6 hours on low. Add the cooked rice for the last 20-30 minutes.

GOT LEFTOVERS?

Fridge:  This recipe can be stored in the fridge for 3-4 days and reheated on the stovetop or in the microwave.

Freezer: Stuffed pepper soup can be made in batches and frozen, it reheats really well. Tip: Freeze in individual servings and enjoy as a quick lunch for one!

Stuffed Pepper Soup

PREP TIME

5 minutes

COOK TIME

35 minutes

TOTAL TIME

40 minutes

SERVINGS

10 servings

CUISINE

American

COURSE

Soup

AUTHOR Zeeshan

Stuffed pepper soup has sausage and ground beef lots of tender sweet bell peppers, and tomatoes. Add in rice and serve it hot! 

Ingredients

  • 1 1/2 pounds ground beef
  • 1/2 pound ground sausage
  • 1 onion diced
  • 2 cloves garlic minced
  • 1 teaspoon Italian seasoning
  • 6 cups low sodium beef broth
  • 1 can 16 ounces crushed tomatoes
  • 1 can 28 ounces diced tomatoes, undrained
  • 2 green bell peppers
  • 1 red bell pepper
  • 1 teaspoon pepper
  • 1 tablespoon Worcestershire sauce
  • 2 cups cooked long grain white or brown rice
  • 2 tablespoons fresh parsley chopped

Instructions

  1. Cook beef, sausage, onion and garlic in a large pot until no pink remains. Drain any fat.
  2. Stir in remaining ingredients except rice. Simmer uncovered 25-30 minutes or until peppers are tender.
  3. Add rice and parsley and simmer an additional 5 minutes or until heated through.

NUTRITION INFORMATION

Calories: 245, Fat: 9 g Saturated Fat: 3g, Cholesterol: 58 mg, Sodium: 677 mg, Potassium: 937 mg, Carbohydrates: 15 g, Fiber: 1 g, Sugar: 3 g, Protein: 23 g, Vitamin A: 575%, Vitamin C: 43.4%, Calcium: 48%, Iron: 3.1%

(Nutrition information provided is an estimate and will vary based on cooking methods and brands of ingredients used.)

KEYWORD bell pepper soup, green pepper soup, stuffed green pepper soup, stuffed pepper soup

Italian Seasoning

Italian Seasoning is a blend of dried herbs and spices creating the perfect addition to your pasta sauces, marinades or your choice of chicken, beef or pork dishes! The possibilities are completely endless, Italian Seasoning is perfect for grilled vegetables, sprinkled on pizza or used in soups or sauces.

This mildly flavoured seasoning has just the right balance of herbs and spices, with just a hint of spice from the red pepper flakes! Reach for it time and again as your favorite seasoning!

Italian Seasoning 1
Italian Seasoning 1

WHAT IS AN ITALIAN SEASONING?

Italian Seasoning is a blend of herbs and spices used to flavor many Italian dishes. Ironically, it is not typically found in traditional Italian cuisine or in markets in Italy. You may wonder what is in Italian Seasoning? The main herbs commonly used are oregano, basil, thyme and rosemary (many recipes contain marjoram but I rarely have it on hand so I make this Italian Seasoning without marjoram).

HOW TO MAKE ITALIAN SEASONING

This seasoning is so simple to make and tasty that you will never bother to purchase store bought again! Simply measure out the given herbs and spices, mix and store in an airtight container. This will stay perfectly fresh for 6 months if stored in a dark cupboard or drawer and in an airtight container. This is good practice for all your herbs and spices!

Italian Seasoning 2
Italian Seasoning 2

Homemade Italian Seasoning Good For You? Certain dried herbs found in Italian Seasoning, such as oregano, are antioxidant rich and may help aid digestion but to be honest, you’ll end up consuming such a small amount that you won’t really notice any health benefits.

The nice thing about making your own seasoning is that you know exactly what you are consuming. Many pre-made seasonings are high in salt, so if you need to watch or cut down on your salt intake, this no salt added Italian Seasoning is perfect for you too (and of course it is also gluten free)!

Italian Seasoning is a versatile seasoning that makes a fantastic addition to your spice cupboard. Add it to your favorite recipe that calls for Italian Seasoning or even as a replacement for recipes that simply call for oregano or basil! You will not be disappointed!

Homemade Italian Seasoning

The perfect blend of spices to add to your soups, stews and marinades.

PREP TIME

5 minutes

TOTAL TIME

5 minutes

SERVINGS

8 tablespoons

AUTHOR

Zeeshan

COURSE

Seasonings

CUISINE

Italian

Ingredients

  • 2 tablespoons dried basil
  • 2 tablespoons dried oregano
  • 1 tablespoons dried rosemary
  • 2 tablespoons dried parsley
  • 1 tablespoon dried thyme
  • 1 tablespoon red chili flakes
  • 1 teaspoon garlic powder

Instructions

  1. Combine all ingredients in a small bowl.
  2. Pour into an air tight container and store in a cool dark place for up to 6 months.

NUTRITION INFORMATION

Calories: 13mg, Sodium: 20mg, Potassium: 79mg, Carbohydrates: 2g, Fiber: 1g, Vitamin A: 360%, Vitamin C: 1%, Calcium: 64%, Iron: 2.3%

(Nutrition information provided is an estimate and will vary based on cooking methods and brands of ingredients used.)

Stuffed Peppers

Stuffed Peppers are a fancy way to serve peppers! They are so easy, delicious and impressive enough to serve for special occasions or special guests! 

While I often serve peppers in a stir fry or in a fresh Greek salad, I do love using the pepper itself as a serving vessel!  We’ve filled these with a delicious beef, sausage and rice filling perfect for a quick and complete meal in one tidy package!

stuffed peppers
stuffed peppers

Stuffed Bell Peppers are easy to make and everyone loves them!  We fill these with a mixture of beef and sausage but you can use one or the other (or even ground turkey if you prefer).

When choosing the color of pepper for your Stuffed Peppers recipe, it will depend on your personal taste preference. Green peppers are a bit more zesty and definitely less sweet than red, yellow or orange. Green peppers in this recipe really compliment the flavors in the beef, sausage, tomato-rice mixture.

Stuffed Peppers 2
Stuffed Peppers 2

How to make Stuffed Peppers

If you follow these easy steps, you will have perfect stuffed peppers every time!

  • Brown meat and aromatics. Add tomato sauce, rice and seasonings and cook until rice is tender.
  • While the filling is cooking, prepare your peppers by simmering 5 minutes to soften.
  • Fill peppers with pasta sauce, meat and rice mixture.
  • Top with cheese and bake until bubbly!

Do You Have to Pre-cook the Peppers Before Stuffing Them?  No you don’t have to precook the peppers, but they do stay quite crisp if you don’t pre-cook them. I personally prefer starting with cooked peppers for this Stuffed Peppers recipe.  

How Long to Cook Stuffed Peppers

Stuffed peppers should be cooked at about 350°F for about 45 minutes. Be sure to cover with foil during the initial 30-35 minutes to ensure they do not dry out. Uncover and top with cheese and bake for the remaining 10 minutes or so until brown and bubbly.

What to Serve with Stuffed Peppers?

Can you freeze Stuffed Peppers?

Yes, you definitely can freeze Stuffed Peppers and they are a great make-ahead meal! You will need to bake them first, then you can either freeze them individually or together in a baking dish. To re-heat, simply thaw in the fridge overnight and bake in a 350°F oven until heated through.

Keep this Stuffed Peppers recipe close at hand for a quick, easy and fun way to serve dinner! Prepped and ready in under 1 hour, this recipe is great for your busy schedule!

Stuffed Peppers

PREP TIME

30 minutes

COOK TIME

45 minutes

TOTAL TIME

1 hour 15 minutes

SERVINGS

6 servings

COURSE

Main Course

Cuisine

American

AUTHOR  Zeeshan

Tender bell peppers stuffed with a zesty beef and rice filling with tomato sauce are baked until bubbly.

Ingredients

  • 6 bell peppers
  • 1/2 lb lean ground beef
  • 1/2 lb Italian sausage
  • 1 small onion diced
  • 2 cloves garlic
  • 1 can small diced tomatoes 14 1/2 oz
  • 1/2 cup white rice uncooked
  • 1 1/4 cup water
  • 1 tablespoon Worcestershire sauce
  • 1/2 teaspoon Italian seasoning
  • 2 1/2 cups marinara sauce divided
  • 1/2 cup cheddar cheese shredded

Instructions

  1. Preheat oven to 350°F.
  2. Cut the tops off the peppers (reserve the tops), remove seeds and membranes and discard. Chop tops of the peppers to add to the filling.
  3. Bring a large pot of water to a boil and cook peppers 5 minutes. Remove and drain well.
  4. In a large skillet, brown beef, sausage, onion & garlic over medium high heat until no pink remains. Drain any fat. 
  5. Stir in the diced tomatoes with juice, rice, 1 1/4 cup water, diced pepper tops, Worcestershire sauce and Italian seasoning.
  6. Bring to a simmer, reduce heat and cover. Cook 15-20 minutes or until rice is tender. You can add more water if needed. Stir in 1/2 cup marinara sauce.
  7. Place 1 1/2 cups of marinara sauce in the bottom of a 9×13 pan. Fill each pepper with the rice mixture. Spoon remaining marinara sauce over peppers.
  8. Cover with foil and bake 35 minutes. Remove foil, baste peppers with any sauce in the bottom. Top with cheddar and bake an additional 10 minutes or until cheese is melted and peppers are tender.

Recipe Notes

If you firmer/tender-crisp peppers, skip the boiling step and bake as directed.

NUTRITIONAL INFORMATION

Calories: 385, Fat: 21 g, Saturated Fat: 8 g, Cholesterol: 64 mg, Sodium: 922 mg, Potassium: 933 mg, Carbohydrates: 29 g, Fiber: 4 g, Sugar: 11 g, Protein: 18 g, Vitamin A: 4255%, Vitamin C: 166.8%, Calcium: 137%, Iron: 3.7%

(Nutrition information provided is an estimate and will vary based on cooking methods and brands of ingredients used.)

KETO CHOCOLATE CHEESECAKE BROWNIES | LOW CARB DESSERT

How do you make chocolate brownies better? You mix cheesecake into them. And how do you make chocolate cheesecake brownies better than that?! You manage to make them low carb, which is exactly what I did with this Keto Chocolate Cheesecake Brownies recipe.

KETO CHOCOLATE CHEESECAKE BROWNIES 1

KETO CHOCOLATE CHEESECAKE BROWNIES | LOW CARB DESSERT

This is not a test and this is not a joke. They’re one part deliciously chocolaty brownies and one part decadently sweet cheesecake. Two of the arguably best desserts of all time wrapped into one very delicious package. Make them for your next party or get together. You and your guests will thank me.

In fact, you may be so delighted by me.

And that’s not even the best part. These are Keto Chocolate Cheesecake Brownies. Yup, you’ve read that right. These brownies are actually low carb! Who says that keto dieters don’t get to have all the fun? Not me, that’s for sure.

And if mixing the two desserts doesn’t sound like your cup of tea, I’ve got low carb recipes for both brownies and cheesecake.

KETO CHOCOLATE CHEESECAKE BROWNIES 2

Keto Chocolate Cheesecake Brownies

These Keto Chocolate Cheesecake Brownies are a chocolate cheesecake lovers dream! They’re so good you won’t be able to tell their low carb! 

Prep Time

15 minutes

Cook Time

50 minutes

Total Time

1 hour 5 minutes

Servings

8

Course

Desserts

Cuisine

American

Keyword: cheesecake brownies, keto brownies, keto cheesecake, low carb brownies 

Ingredients

For the Brownie Batter

  • 1/2 cup (90 g) Sugar-Free Chocolate Chips
  • 1/2 cup (113.5 g) Butter
  • 3 (3 ) Eggs
  • 1/4 cup (0.25 g) Truvia , or other sweetener
  • 1 teaspoon (1 teaspoon) vanilla extract

For the Cheesecake Batter

  • 8 ounces (226.8 g) Cream Cheese, cubed and softened
  • 1 (1 ) Egg
  • 3 tablespoons (3 tablespoons) Truvia, or other sweetener
  • 1 teaspoon (1 teaspoon) vanilla extract

Instructions

  • Preheat oven to 350F.
  • Grease an 8 x 8-inch square pan and set aside.
  • For the Chocolate Batter: In a microwave-safe bowl, melt butter and chocolate for about 1 minute. Remove and stir well.   
  • In a bowl, add eggs, sweetener, and vanilla and blend until light and frothy.
  • Pour the melted butter and chocolate into the bowl in a slow stream and beat again until it is well-incorporated.   
  • Pour the mixture into the pan.
  • For the Cheesecake Batter: beat together cream cheese, egg, Truvia and vanilla extract. Pour the cheesecake batter on top of the brownie batter. Use a spatula to swirl the two batters together. 
  • Cover the pan with foil. Bake at 350F for 45-50 minutes until a knife inserted in the center emerges clean.   

Nutritional Information

Calories: 274kcal , Carbohydrates: 3g , Protein: 5g , Fat: 27g , Saturated Fat: 16g , Fiber: 1g , Sugar: 1g

BAKED SWEET AND SOUR CHICKEN

Baked Sweet And Sour Chicken Is One Of Our Family’s Favorite Asian Recipes! You Can Add Pineapple And Peppers And Serve With Rice Or Noodles To Complete This Flavorful Dish!

This baked sweet and sour chicken is a family favorite and often served with egg rolls or fried rice. If you love this recipe, you’ll also love our General Tso’s chicken .

BAKED SWEET AND SOUR CHICKEN

A CLASSIC WITH A TWIST

The sweet and sour sauce is made with only a handful of ingredients that you probably already have on hand. It all comes together fairly quickly and then you just toss it in the oven to bake for 20 minutes.

The hardest part is just patiently waiting for it to bake! But trust me, it is well worth the wait because the chicken comes out of the oven tasting DELICIOUS!! I can seriously eat it all by myself.

BAKED SWEET AND SOUR CHICKEN 2

HOMEMADE SWEET AND SOUR SAUCE

Not only is it simple, but it’s so flavorful and works for any chicken or pork recipe . Here are the ingredients…

Ingredients

  • ¼ cup pineapple juice
  • 2/3 cup water
  • 1/3 cup vinegar
  • ¼ cup brown sugar
  • 1/2 cup sugar
  • ⅛ tsp. salt
  • 1/4 cup Ketchup
  • ¼ cup soy sauce
  • 3 TB cornstarch mixed with ¼ cup water

To make the sauce, combine pineapple juice, water, vinegar, sugars, salt, soy sauce and Ketchup in a medium pot and bring to a boil.

From there, you thicken the sauce with cornstarch mixed with ¼ cup water stirring occasionally. Add any pineapple chunks or chopped peppers and you’re set. Just pour over chicken or to use as a dip.

SAUCE NOTES:

Vinegar: I use white vinegar for this recie but you can also use apple cider vinegar or rice vinegar. You may notice a distinct vinegar smell during the baking process. Don’t worry about it affecting the taste. The vinegar burns off leaving behind a delicious sweet and sour sauce. 

BAKED SWEET AND SOUR CHICKEN 3

BAKING, THEN FRYING

Other Sweet and Sour Chicken recipes tend to only fry the chicken after being covered in the egg and cornstarch batter. I’ve found that baking it helps thicken up the sauce more and make it even more flavorful.

To make this chicken, preheat oven to 325 degrees. Rinse chicken in water and cut into 1 inch cubes. Place cornstarch and eggs in separate bowls.

Toss several pieces of chicken into the cornstarch to coat and then dip them in the eggs. Set chicken pieces aside on a plate and repeat until all pieces have been coated.

Heat ¼ cup oil in a large pan and cook your chicken for a few minutes on each side until they are slightly browned but not cooked all the way. Place the chicken in a greased 9×13 pan. Set aside and make the sauce.

Pour the sauce evenly over the chicken. Bake for half hour turning the chicken at 15 minutes. (NOTE: I like to leave a little sauce for dipping egg rolls or cream cheese wont tons. YUM!)

MORE VEGGIES. Pineapple chunks and bell peppers are added to this dish and are served on top of white rice. But you could easily add any of your favorite veggies like onions or snap peas, and then serve on top of brown rice or noodles, depending on what your family likes.

CROCKPOT: Add the browned chicken and sauce to a crockpot and cook on low for about 4-5 hours or on high for 2-3 hours. Then, add veggies and pineapple. Cover and cook on high for about 30 minutes or until the produce is tender. 

BAKED SWEET AND SOUR CHICKEN 3

MAKE IT A FREEZER MEAL

You can easily turn this recipe into a freezer meal. You will save a lot of time by getting everything prepped for several meals all at once. On a busy evening, all you have to do is brown the chicken and bake.

  • Begin by cutting the chicken into bite sized pieces. Place chicken in its own Ziploc bag.
  • Place the cornstarch into a smaller ziploc
  • In a third Ziplock place all the ingredients called for in the sauce including the pineapple and peppers
  • Place all three bags in a larger Ziplock. Label and freeze for up to 3 months. Thaw in the fridge before cooking according to the recipe directions.
  • You can also have bags of frozen rice cooked and ready to heat up: Once the Rice has cooled place the allotted amount in a Ziploc bag. Freeze. To reheat place rice in a microwave bowl. Add a couple tablespoons of water cover and microwave until hot.  

Between the consistency and the flavor, this recipe really is to die for! The savory chicken paired with sweet sauce, and complete with your favorite add-ins will make you want to never order takeout again!

Baked Sweet and Sour Chicken recipe

Baked Sweet and Sour Chicken is one of our family’s favorite Asian recipes! You can add pineapple and peppers and serve with rice or noodles to complete this flavorful dish!

Prep Time

 10 minutes

Cook Time 

30 minutes

Total Time 

40 minutes

Servings

6

Course 

Main Course

Cuisine 

Chinese

Author: Zeeshan

Ingredients

  • 3-4 boneless, skinless chicken breasts
  • 1 cup cornstarch
  • 3 eggs beaten
  • 1/4 cup canola oil
  • Pineapple Chunks
  • Chopped peppers

Sweet and Sour Sauce recipe:

  • 1/4 cup pineapple juice
  • 2/3 cup water
  • 1/3 cup vinegar
  • 1/4 cup brown sugar
  • 1/2 cup sugar
  • 1/8 tsp salt
  • 1/4 cup ketchup
  • 1/4 cup soy sauce
  • 3 TB cornstarch mixed with 1/4 cup water

Instructions

  1. Preheat oven to 325 degrees.
  2. Rinse chicken in water and cut into 1 inch cubes. Place cornstarch and eggs in separate bowls.
  3. Toss several pieces of chicken into the cornstarch to coat and then dip them in the eggs.
  4. Set chicken pieces aside on a plate and repeat until all pieces have been coated.
  5. Heat ¼ cup oil in a large pan and cook your chicken for a few minutes on each side until they are slightly browned but not cooked all the way. Place the chicken in a greased 9×13 pan. Set aside.
  6. For the Sauce: Combine Pineapple juice, 2/3 cup water, vinegar, sugars, salt, soy sauce and Ketchup in a medium pot and bring to a boil.
  7. Thicken sauce with cornstarch mixed with ¼ cup water stirring occasionally. Add desired amount of pineapple chunks and any optional ingredients. Pour evenly over the chicken.
  8. Bake for half hour turning the chicken at 15 minutes. (NOTE: I like to leave a little sauce for dipping egg rolls or cream cheese wont tons. YUM!)

Nutritional Information

Amount Per Serving Calories 463 Calories from Fat 126%

Daily Value*Fat 14g 22% ,Saturated Fat 2g 13% , Cholesterol 154mg 51%

Sodium 848mg 37% ,Potassium 525mg 15% ,Carbohydrates 53g 18%

Fiber 1g 4%, Sugar 29g 32% ,Protein 28g 56%, Vitamin A 204IU 4% ,Vitamin C 3mg 4%, Calcium 28mg 3% ,Iron 1mg 6%

* Percent Daily Values are based on a 2000 calorie diet.

COCONUT CURRY CHICKEN

This Delicious Coconut Curry Chicken Is Flavorful And Filled With Potatoes, Carrots And Spices. Serve It With Any Kind Of Rice Or Bread And You’ll Have Made The Perfect Chicken Curry Meal.

COCONUT CURRY CHICKEN

COCONUT CURRY

What to change up the flavors?

This particular yellow curry includes potatoes, carrots and chicken. But you can add whatever veggies you want. What other vegetables go with coconut curry? We like…

  • Cauliflower
  • squash
  • sweet potato
  • celery root

HOW TO MAKE THAI COCONUT CURRY + COCONUT CURRY SAUCE

Making curry chicken is simple! Sauté the onion and garlic until fragrant, cook the chicken until browned, then stir in potatoes and carrots.

Sprinkle the seasonings over top and add the red curry past along with the yellow curry powder.

COCONUT CURRY TIP: Toasting the seasonings will help develop the flavors in the curry.You wouldn’t believe what a difference it makes!

Pour in the coconut milk (full-fat is recommended) along with the chicken broth (or vegetable broth if you plan on keeping things vegetarian), brown sugar, and fish sauce. Yes, I said fish sauce. A teaspoon gives this coconut curry sauce depth without being detectible, or even worse, overwhelming!

Let the curry simmer for 20 minutes or until it thickens up and the vegetables and chicken are cooked through.

coconut curry 3
coconut curry 3

Serve this curry over rice. White rice or brown rice works well with this dish.

Do you have to use full-fat coconut milk for this recipe? That’s what I suggest – it really adds so much flavor to the coconut curry sauce!

How to reheat coconut curry? Store in airtight containers and place in fridge for up to 3 days. To reheat, cook in a saucepan or wok on medium heat until heated through. You can also microwave until heated through.

coconut curry 4
coconut curry 4

BEST SIDES FOR CHICKEN CURRY

Most veggies, rice and noodles are great with this chicken curry recipe, but other favorites include:

Nan bread.

I love this chicken curry recipe because it’s simple, delicious and a meal the entire family enjoys. It’s a quick dinner recipe that requires minimal prep (always a win in my book)! Any leftovers reheat really well the next day, just add a few tablespoons of water to each serving to help thin it out.

Curry Chicken Recipe

This delicious Coconut Curry Chicken is flavorful and filled with potatoes, carrots and spices. Serve it with any kind of rice or bread and you’ll have made the perfect chicken curry meal.

Prep Time

10 minutes

Cook Time

25 minutes

Total Time

35 minutes

Servings

6

Course

Main Course

Cuisine

Indian

Ingredients

  • 1 tbsp. oil
  • 1/2 yellow onion, diced
  • 2 cloves garlic minced
  • 1 lb. chicken breasts cut into 1-inch cubes
  • 3 carrots cut into 1/4-inch slices
  • 2 russet potatoes peeled and cut into 1-inch cubes
  • 3 tbsp. yellow curry powder
  • 1 1/2 tbsp. red curry paste
  • 1 14 oz. can full-fat coconut milk
  • 3 c. low-sodium chicken vegetable broth
  • 2 tbsp. brown sugar coconut sugar
  • 1 tsp. fish sauce

Instructions

  1. In a large skillet set over medium heat, add oil. Once the oil is hot, add the onion and cook for 2 minutes. Add garlic and cook for 30 seconds.
  2. Add chicken and brown, about 3 minutes per side. Add carrots and potatoes, cook until lightly browned. Stir in curry powder and curry pastes. Cook for 1 minute or until fragrant.
  3. Whisk in coconut milk, broth, sugar, and fish sauce. Gently simmer (covered or uncovered) for 20 minutes or until potatoes and carrots are cooked through. 
  4. Remove from heat and serve with rice and garnish with cilantro, if desired.

Recipe Notes

– Swap the chicken for 1 can of drained chickpeas, for a vegetarian curry.

– Add chopped roasted cashews or peanuts for added protein and crunch.

Nutrition Information

Amount Per Serving Calories 286, Calories from Fat 63%,Daily Value*Fat 7g 11% Saturated Fat 1g 6% ,Cholesterol 64mg 21%

Sodium 186 mg 8% Potassium 822mg 23% Carbohydrates 27g 9%

Fiber 4g 17% Sugar 7g 8% Protein 28g 56% Vitamin A 5765IU 115%

Vitamin C 8mg 10% Calcium 84mg 8% Iron 4.1mg 23%

* Percent Daily Values are based on a 2000 calorie diet

HOMEMADE NAAN BREAD

This Homemade Naan Bread Is Soft, Chewy, And Simply Delicious. You Won’t Believe How Easy It Is To Make And Will Want It As A Side To Every Meal.

HOMEMADE NAAN BREAD 1

EASY NAAN RECIPE

Naan bread is traditionally served with Indian dishes like curry

WHAT IS THE DIFFERENCE BETWEEN PITA BREAD AND NAAN BREAD?

Unlike pita bread, naan usually has yogurt in it making it a softer texture. Both are flatbreads and are often served the same way but made different causing the difference in texture.

naan bread dough
naan bread dough

HOW TO MAKE NAAN BREAD

You start by making a basic yeast dough. Combine warm water, yeast and sugar in a large bowl and let it sit for a few minutes.

Then add oil, yogurt, egg, salt, and enough flour to form a soft dough. Place the dough in a greased bowl, cover it and let it raise till doubled.

Cut the dough into eight pieces. On a floured surface, roll each piece into a circle about 6″ across.

naan 2
naan 2

Heat a skillet to medium hot. Add a little bit of oil or non-stick spray. Place a circle of dough in the middle of the skillet and cook till bubbly and golden brown on the bottom. It takes 2-3 minutes. Flip it over and cook the other side for 2-3 minutes or till golden brown.

Brush hot naan bread with melted butter. I added minced garlic to my butter and it was incredible! We even topped ours off with chopped fresh parsley, and it was the perfect addition to this easy naan bread.

naan 4
naan 4

HOW LONG DOES NAAN BREAD LAST?

We recommend storing this bread in a Ziploc bag. At room temp, naan bread should last 5-7 days on the counter. Those who put it in the fridge can you usually squeeze out even a few more days.

HOW TO FREEZE NAAN BREAD?

Freezing naan is easy to do. Just wrap in Saran Wrap or foil and for extra security, place in a freezer safe Ziploc bag and store in the freezer for up to 3 month. Let defrost and warm up in the oven or microwave.

WHAT TO SERVE WITH NAAN BREAD?

Naan can go with anything really, but it’s typically best with Asian and Indian foods. Here are some of our favorite recipes to serve it with:

Coconut Curry

naan 6
naan 6

Naan Bread Recipe

This homemade Naan Bread is soft, chewy, and simply delicious. You won’t believe how easy it is to make and will want it as a side to every meal.

Prep Time

 1 hour 20 

minutes

Cook Time 

6 minutes

Total Time

1 hour 26 minutes

Servings

8

Course 

Bread

Cuisine 
 
Indian


Author: Zeeshan

Ingredients

  • 1/2 cup warm water
  • 2 tsp instant yeast
  • 1 tsp sugar
  • 3 Tbsp olive oil
  • 1/4 cup plain yogurt
  • 1 egg
  • 1/2 tsp salt
  • 2 1/2-3 cups all purpose flour
  • 2 Tbsp melted butter
  • 2 tsp garlic, minced (optional)

Instructions

  1. Combine warm water, yeast, and sugar in a large bowl; let sit for five minutes or till bubbly. Add olive oil, yogurt, egg, salt and 2 cups of flour. Stir till smooth.
  2. Add enough flour to make a soft dough. Knead a few times on a floured counter until smooth. 
  3. Place dough in a greased bowl. Cover and let rise in a warm place until doubled.
  4. Preheat a skillet to medium heat.
  5. Cut dough into eight pieces. On a floured surface, roll out each piece into a 6″ circle. 
  6. Add a little oil or non-stick spray to the skillet. Cook each circle for 2-3 minutes or until bubbly and golden brown on the bottom. Flip over and cook for another 2-3 minutes.
  7. Brush the top (the bubbly side) of each naan with melted butter. I added garlic to my butter, but that is optional.

Nutritional Information

Amount Per Serving Calories 231 Calories from Fat 81%

Daily Value*Fat 9g 14% Saturated Fat 2g 13% Cholesterol 29 mg 10%

Sodium 184 mg 8% Potassium 70 mg 2%Carbohydrates 31 g 10%

Fiber 1 g 4% Sugar 1 g 1% Protein 5 g 10% Vitamin A 125 IU 3% Calcium 18 mg2% Iron 1.9 mg 11%

* Percent Daily Values are based on a 2000 calorie diet.

KETO GINGER COOKIE RECIPE

This Keto Ginger Cookie Recipe gives you all the flavor of ginger snap cookies without all the carbs. They’re oh so delicious and take less than 30 minutes to make!

KETO GINGER COOKIE 1

HOW THIS LOW CARB GINGER COOKIE RECIPE IS ABOUT TO CHANGE YOUR LIFE

These little keto cookies won’t last long. They’re the perfect texture, only take 10 minutes of prep, and have an incomparable taste. You may find yourself choosing this Ginger Cookie Recipe over sugary ones.

These little ones are gluten-free, vegetarian, low-carb, keto, and if you sub the butter with coconut oil, they are also dairy-free and paleo. So there. You now have a good excuse to eat them.

This streamlined recipe for this gluten-free, low carb Ginger Cookie Recipe will take you about 10 minutes to put together and 10-15 minutes to bake.

That is a little dangerous if you think about it.

I have to say, these are the BEST low carb cookies I’ve ever tasted.

Many of those taste like fiber or sawdust. These do not. These taste like COOKIES. Real, really delicious cookies! Now let’s get to cooking…

HOW TO MAKE GINGER COOKIES

1. Preheat the oven to 350F.

2. Line a cookie sheet with parchment paper and set aside.

3. Using a hand blender, cream together the butter, agave nectar, egg, and water.

KETO GINGER COOKIE 2

4. To this mixture, add all the dry ingredients and mix well on low speed.

KETO GINGER COOKIE 3

5. Roll into 2 teaspoon balls and arrange on a baking tray with parchment paper. They don’t really spread too much but leave a little room between them.

KETO GINGER COOKIE 4

6. Bake for 12-15 minutes until the tops have lightly browned.

7. Once cooled, store in an air-tight container. For like, the one hour these cookies will be around before you eat them all.

WHY ARE THEY CALLED GINGER SNAPS?

They call them ginger snaps because they’re made with ginger and they are typically a crispier, crunchier cookie that makes a “snap” sound when they’re consumed.

This gluten-free Ginger Cookie Recipe is basically just a ginger snap cookie baked with lower carb ingredients like almond flour and Truvia. They do, however, still have that delightful texture and “snap” you’d expect from a good ginger snap.

HOW LONG DO GINGER SNAP COOKIES LAST?

Now it depends on what you mean by “last”. This Ginger Cookie Recipe will keep in an airtight container for about 2-3 weeks. However, don’t expect them to last that long as they’ll more than likely all be eaten before then.

DO THESE KETO COOKIES USE ALMOND FLOUR?

They sure do. That’s what helps keep them low carb. But don’t fret. The unconventional flour won’t change the flavor or texture of these cookies one bit. With the influx of people eating low carb and gluten-free, you can easily find it in the baking aisle of your local grocer.

KETO GINGER COOKIE RECIPE 4

Keto Ginger Cookie Recipe

This Ginger Cookie Recipe gives you all the flavor of ginger snap cookies without all the carbs. They’re so delicious and take less than 30 minutes to make! 

Prep Time

10 minutes

Cook Time

15 minutes

Total Time

25 minutes

Servings

18 COOKIES

Course

Desserts

Cuisine

American

Author: Zeeshan

Keyword: keto cookies, keto desserts, keto ginger snaps

Equipment

  • KITCHENAID STAND MIXER
  • COOKIE SHEET
  • SILICONE SPATULA TURNER

Ingredients

Cream Together

  • 4 tbsp (4 tbsp) butter, softened (or coconut oil)
  • 2 tbsp (2 tbsp) agave nectar, (or water for strict keto)
  • 1 (1 ) Egg
  • 2 tablespoons (2 tablespoons) Water

Add Dry Ingredients

  • 2.5 cup (280 g) Superfine Almond Flour
  • 1/3 cup (0.33 g) Truvvia, or 1/2 cup sugar
  • 2 tsp (2 tsp) ground ginger
  • 1 tsp (1 tsp) Ground Cinnamon
  • ½ tsp (0.5 tsp) Ground Nutmeg
  • 1 tsp (1 tsp) Baking Soda
  • ¼ tsp (0.25 tsp) Salt

Instructions

  • Preheat the oven to 350F.
  • Line a cookie sheet with parchment paper and set aside.
  • Using a hand blender, cream together the butter, agave nectar, egg, and water.
  • To this mixture, add all the dry ingredients and mix well on low speed.
  • Roll into 2 teaspoon balls and arrange on a baking tray with parchment paper. They don’t really spread too much but leave a little room between them.
  • Bake for 12-15 minutes until the tops have lightly browned.
  • Once cooled, store in an air-tight container. For like, the one hour these cookies will be around before you eat them all.
  • This recipe yeilds a total of 18 cookies. The nutritional info is per a cookie.
  • This Ginger Cookie Recipe will keep in an airtight container for about 2-3 weeks.

Nutritional Information

Calories: 122 kcal , Carbohydrates: 5 g , Protein: 3g , Fat: 10g , Saturated Fat: 2g , Fiber: 1g , Sugar: 2g